This manual contains a complete description of all functions of the SAMPLES user interface. It is primarily aimed at users of the app who want to get to know SAMPLES and use it in their daily lab routine.
Introduction
This section contains some introductory information about the SAMPLES app itself and the content structure of the manual. The introduction ends with some references to further information.
|
|
Generic masculine: This document uses the generic masculine form for better readability. Unless otherwise indicated, all references to persons refer to all genders. |
About SAMPLES
We ourselves like to call SAMPLES the operating system for smart labs. And that for a good reason! SAMPLES is a combination of different apps and services that helps lab staff organize and perform their daily work. The app offers functions that accompany the entire path of a sample through the laboratory.
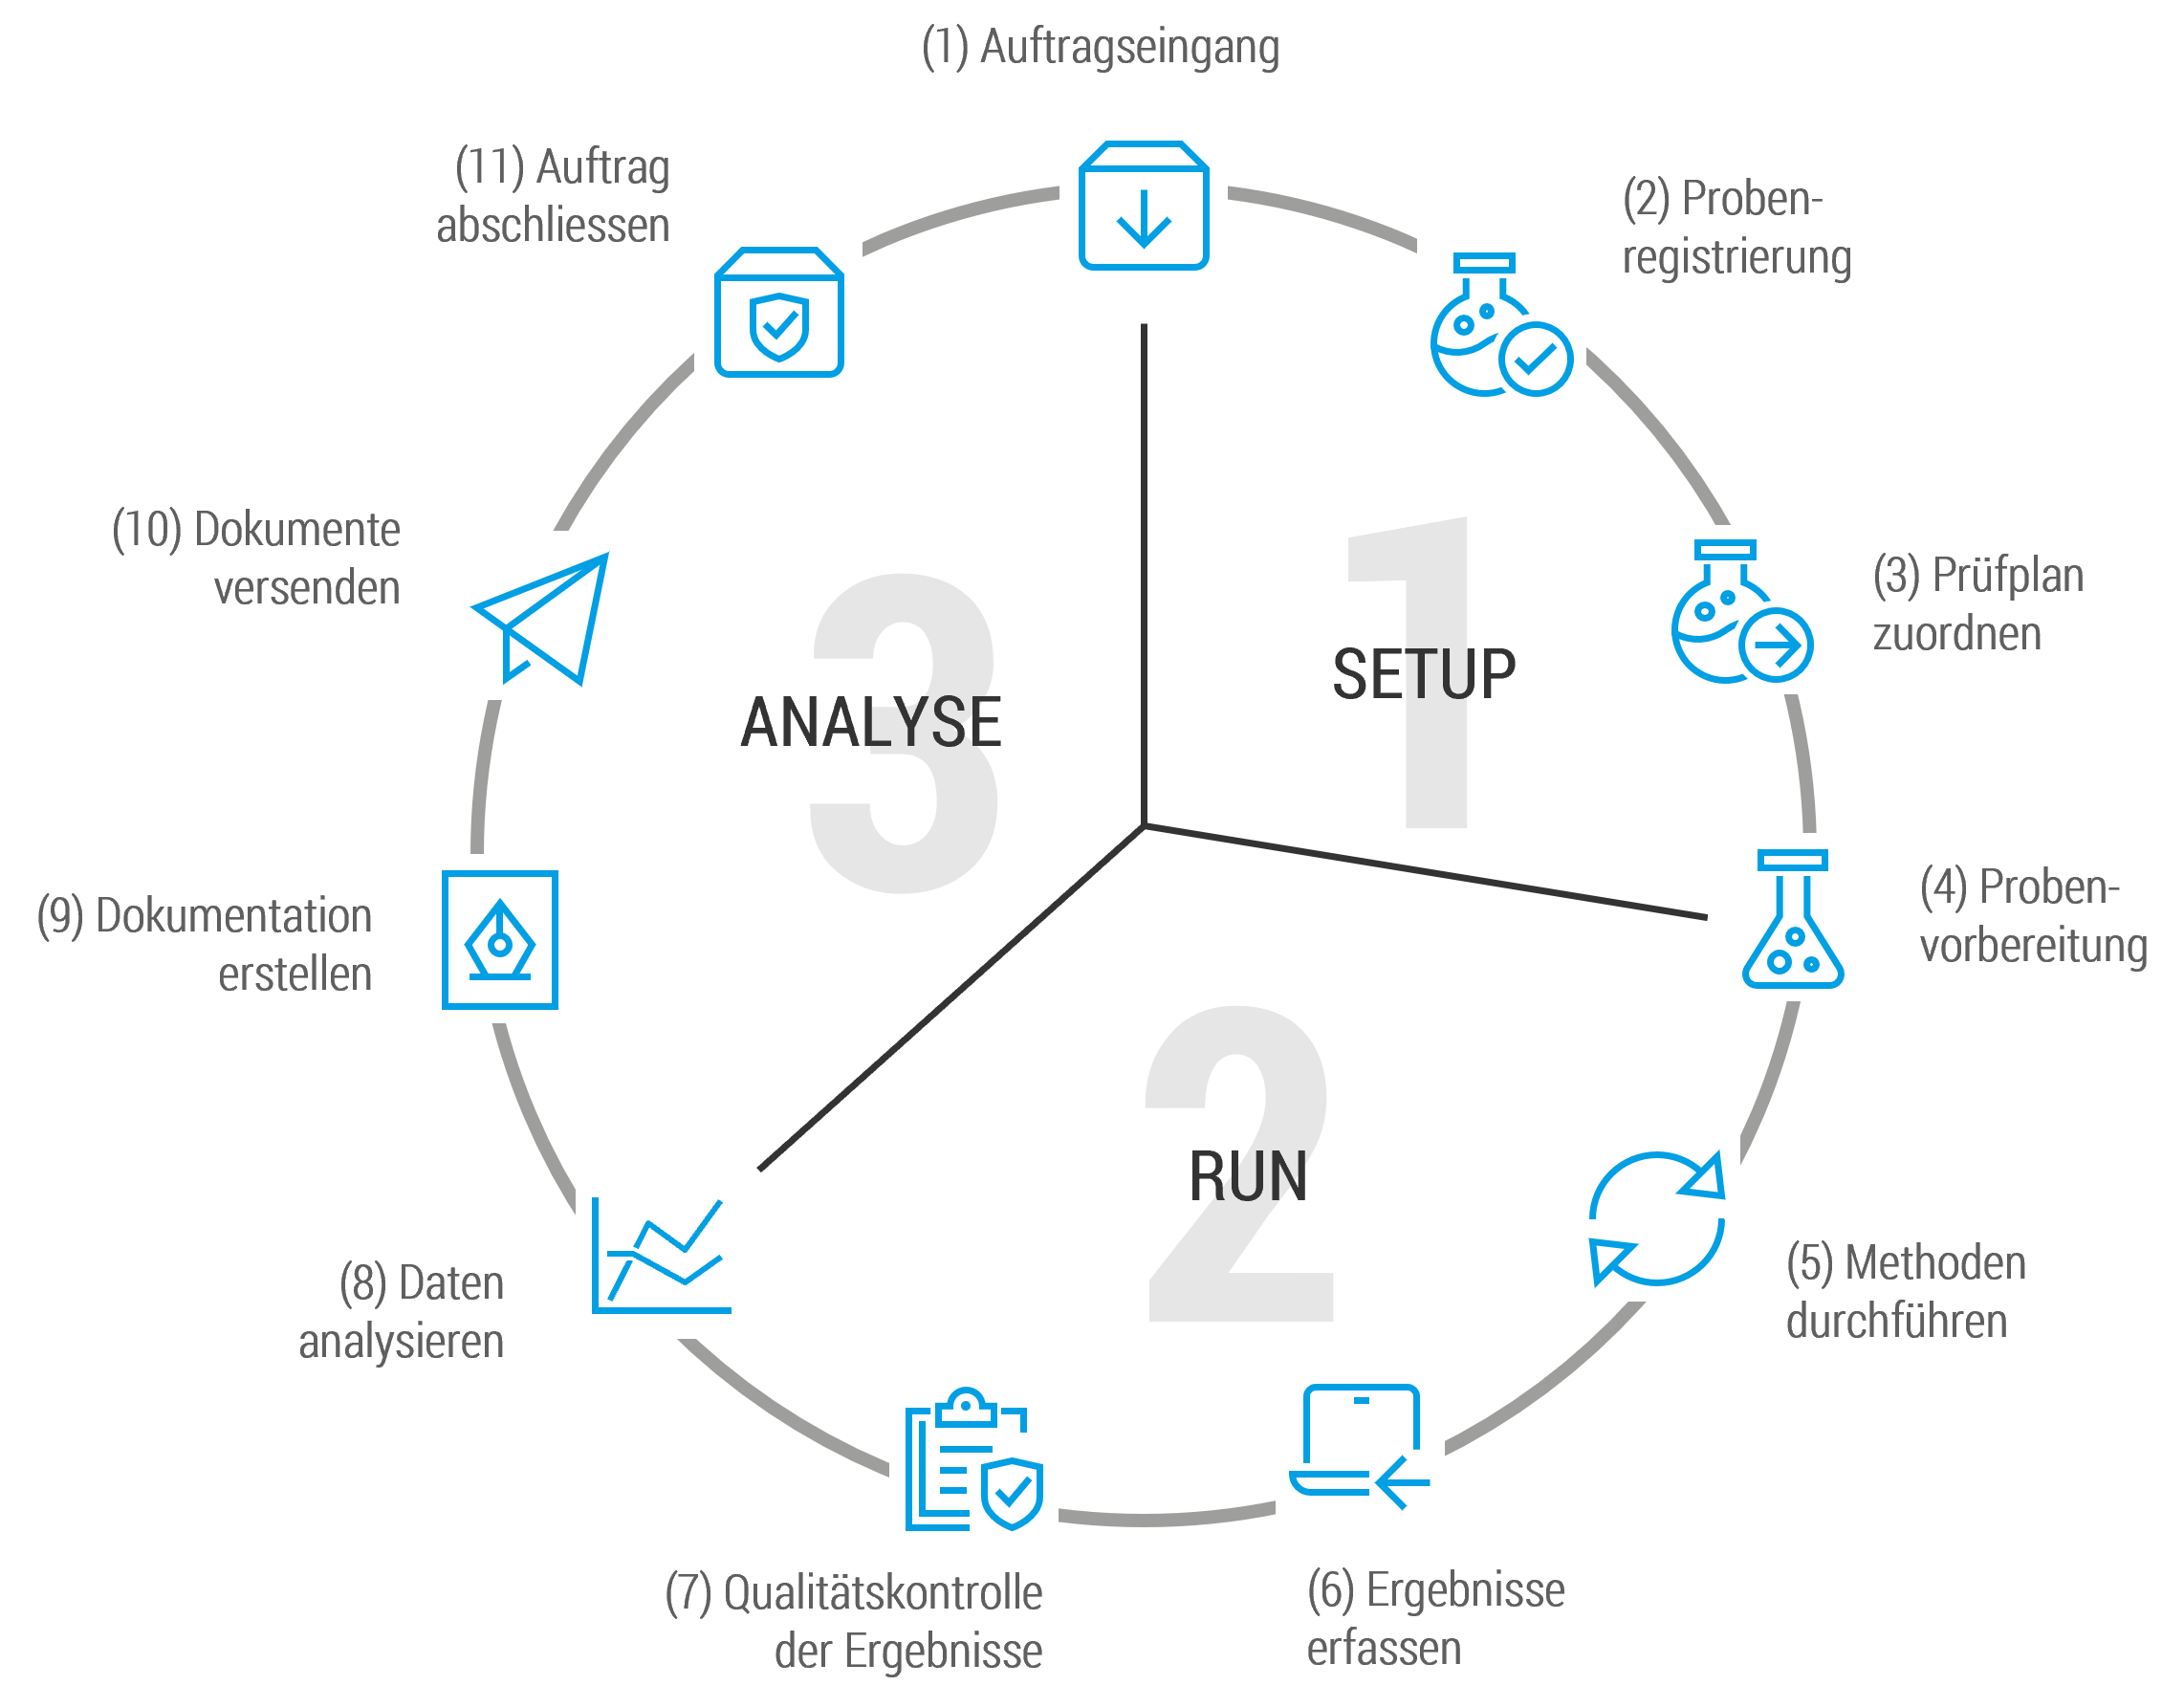
After installing and setting up SAMPLES, one starts to map its own individual laboratory process (data, workflows, interfaces) in the software. This is because SAMPLES is oriented to the process of its users and does not force them to adapt their processes, that have been developed and well thought out over a long period of time, to the software.
In addition, SAMPLES can also be used as a middleware between the laboratory and surrounding areas (e.g. clinics, other laboratories or physicians in private practice) and at this point support communication between these institutions.
We aim for our lab users as the guardians of a treasure (we mean the data obtained in the lab) to get more out of it. For example, by using the numerous interfaces of the SAMPLES API for the analysis and further processing or enrichment of their data, to improve the validity of their results or their own processes.
Contents of this manual
The manual is intended for all users of the app and is accordingly divided into the following sections:
First steps: This section describes how to set up a new SAMPLES installation. After the initial login, user roles are configured and user accounts are registered for the lab staff. Then you define the desired form and content of the identification numbers for samples, orders and other data that later are automatically generated by the app.
Laboratory process and procedures: The setup of an individual laboratory process as well as the daily routine work including examination profiles, methods and parameters are described here. One focus is the individualization of a sample installation to specific processes and contents.
Daily routine tasks: The daily laboratory routine is determined by activities such as the registration and preparation of sample material, the documentation, checking and confirmation of test results and the further processing of the information obtained in the process. This section provides detailed descriptions of how to perform all these tasks with samples.
Target audience
As primary and secondary users of the app, we see mainly people from these usage areas:
Laboratory staff: With the help of this manual all laboratory staff interacting with the app on a daily basis should be guided safely through the operation of the application functions. For users who are just looking for a quick start and overview of the app’s functions and for whom an entire manual is too extensive for this purpose, we have summarized this content in a separate SAMPLES Quickstart Guide.
Members of the technical application support: IT Administration staff install SAMPLES, integrate it into the operating environment and assist lab staff with proper operation of the app. They use the manual for their own familiarization and as supplementary material for training their help-searching users. A supplementary manual Technical Operation of SAMPLES provides further guidance for the daily routine of these users in installing, controlling, maintaining and servicing a SAMPLES installation.
Data analysts and developers: With its open interfaces, SAMPLES is also aimed directly at data analysts and computer scientists in the lab. They use the API to access the laboratory data stored in the app with the aim of analyzing it or integrating it into complementary apps or automated workflows. They also use this user guide to get started using the app. Another manual SAMPLES Developer Guide contains additional information for accessing and using the API as well as some real-world examples.
Read more
For more information on the product, visit our product website.
First steps
This section describes how to set up a new SAMPLES installation. After the first login, user roles are configured and user accounts are registered for the lab staff. Afterwards the form and content of the identification numbers automatically generated by the app for samples, patients, etc. are set-up.
Login and logout
SAMPLES is used to store very sensitive information. Of course, this information may only be accessed by a restricted, precisely defined group of people. To gain access to the app’s functions and data, users must first identify themselves with a user name and password.
Open app in browser
To open the app in the web browser, the web address of your own samples installation (e.g. https://my-lab.samples.app) is entered in the address line of the browser window and loaded.
This web address is obtained after completing the installation in the Microsoft App Source or Azure Marketplace. At any later time, your own local administrator is sure to help.
|
|
To use the app an up-to-date web browser is required. The following products are optimally suitable for operating the app:
|
The view for logging in with user name and password will be opened.
Login with username and password
To log in with user name and password, the start page is called.
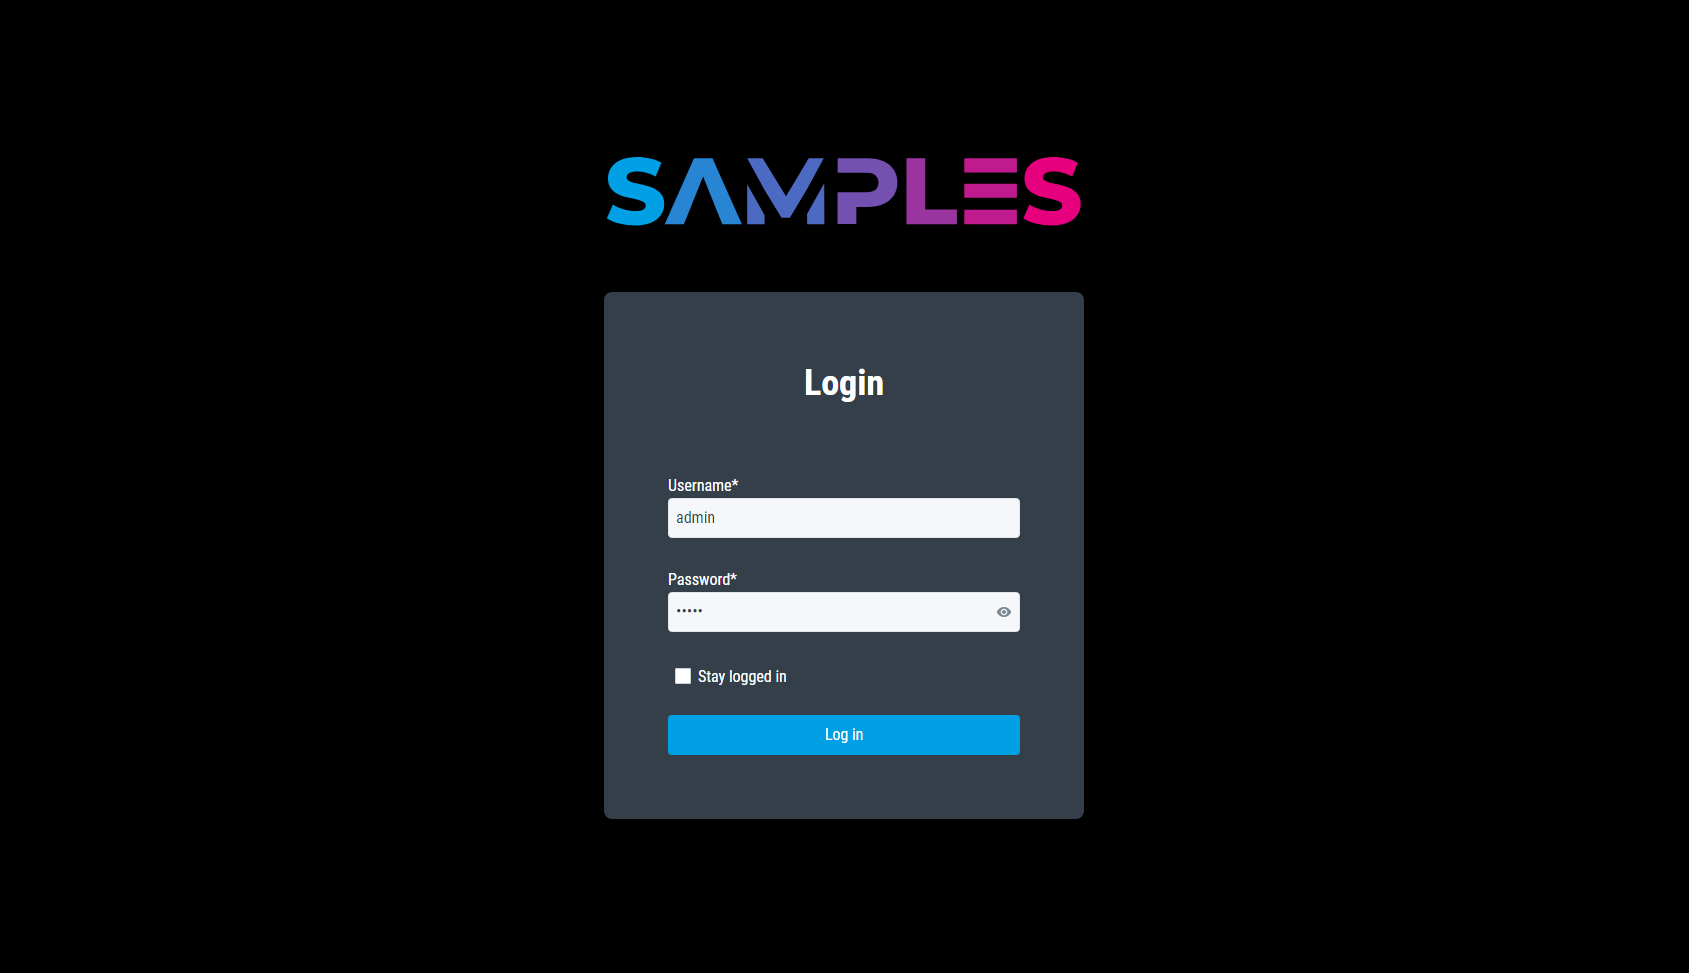
There Username and Password are entered and confirmed by calling Login.
|
|
If you lose your access credentials, your own local administrator will certainly help. |
After a successful authentication the individual overview page will be opened.
|
|
Related articles with additional content: |
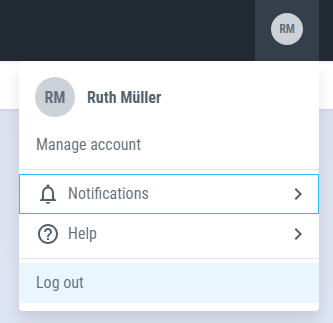
Logout your current user
Users remain logged into SAMPLES until they actively log out or close the browser tab.
|
|
As soon as the workplace is switched, one should always terminate the running user session for security reasons. |
To log out, the Logout function is called up in the user menu.
After successful logout, the start page of the app will open.
|
|
Related articles with additional content: |
Permissions and User Roles
For controlled access of users to stored content in the app, SAMPLES uses a combination of permissions and user roles. Each access-protected object and the interactions with it are linked to permissions, e.g. one needs the permission View sample to list all samples. Administrative users combine these permissions into user roles, which usually are based on the roles of real actors in the laboratory process. Finally, one or more of these user roles are assigned to each user, thereby defining that person’s possibilities in dealing with the app.
List and search user roles
A searchable listing of all available data about user roles can be found in view Administration / User Roles.
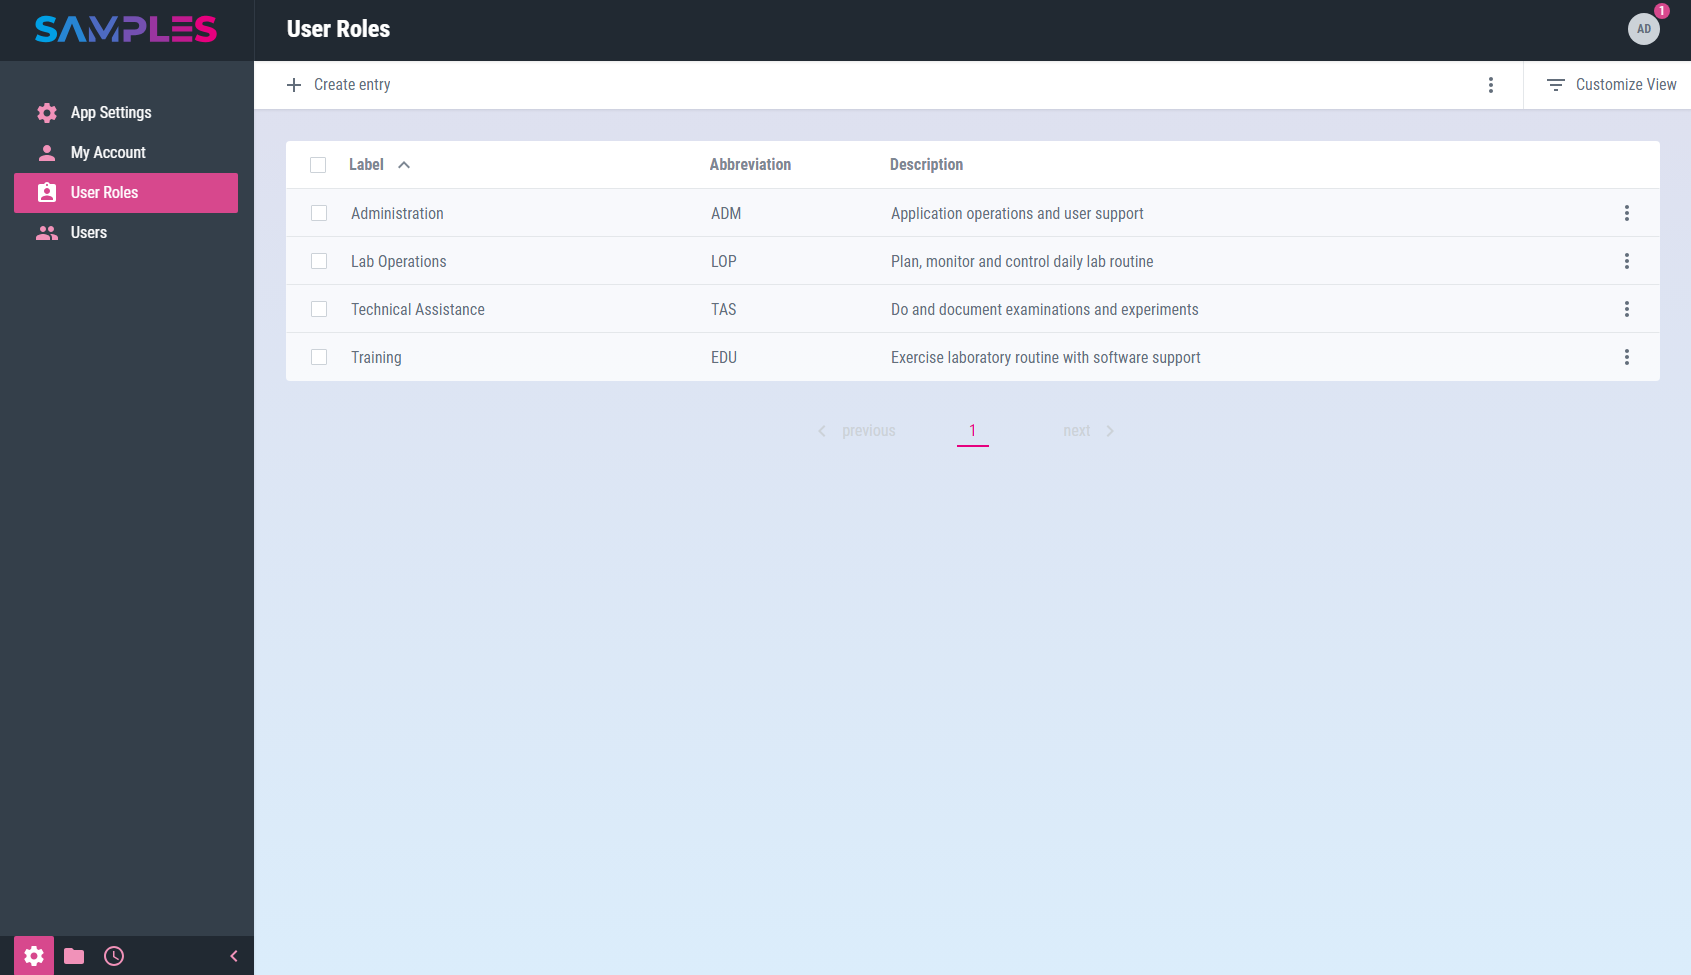
The listing contains information about:
| Title | Meaning |
|---|---|
Label |
Readable name of the user role |
Abbreviation |
Short name to identify and reference the user role in other parts of the app |
Description |
Technical description and meaning of the user role |
In the toolbar of the view you can find even more functions for processing user roles:
- Create entry
-
adds a new user role
- Reload list
-
updates the content of the listing
- Delete selected entries
-
removes the selected list entries
|
|
Related articles with additional content: |
Add new user role
To add a new user role open view Administration / User Roles and call the function Create entry.
A wizard opens for entering all the necessary information for the new entry:
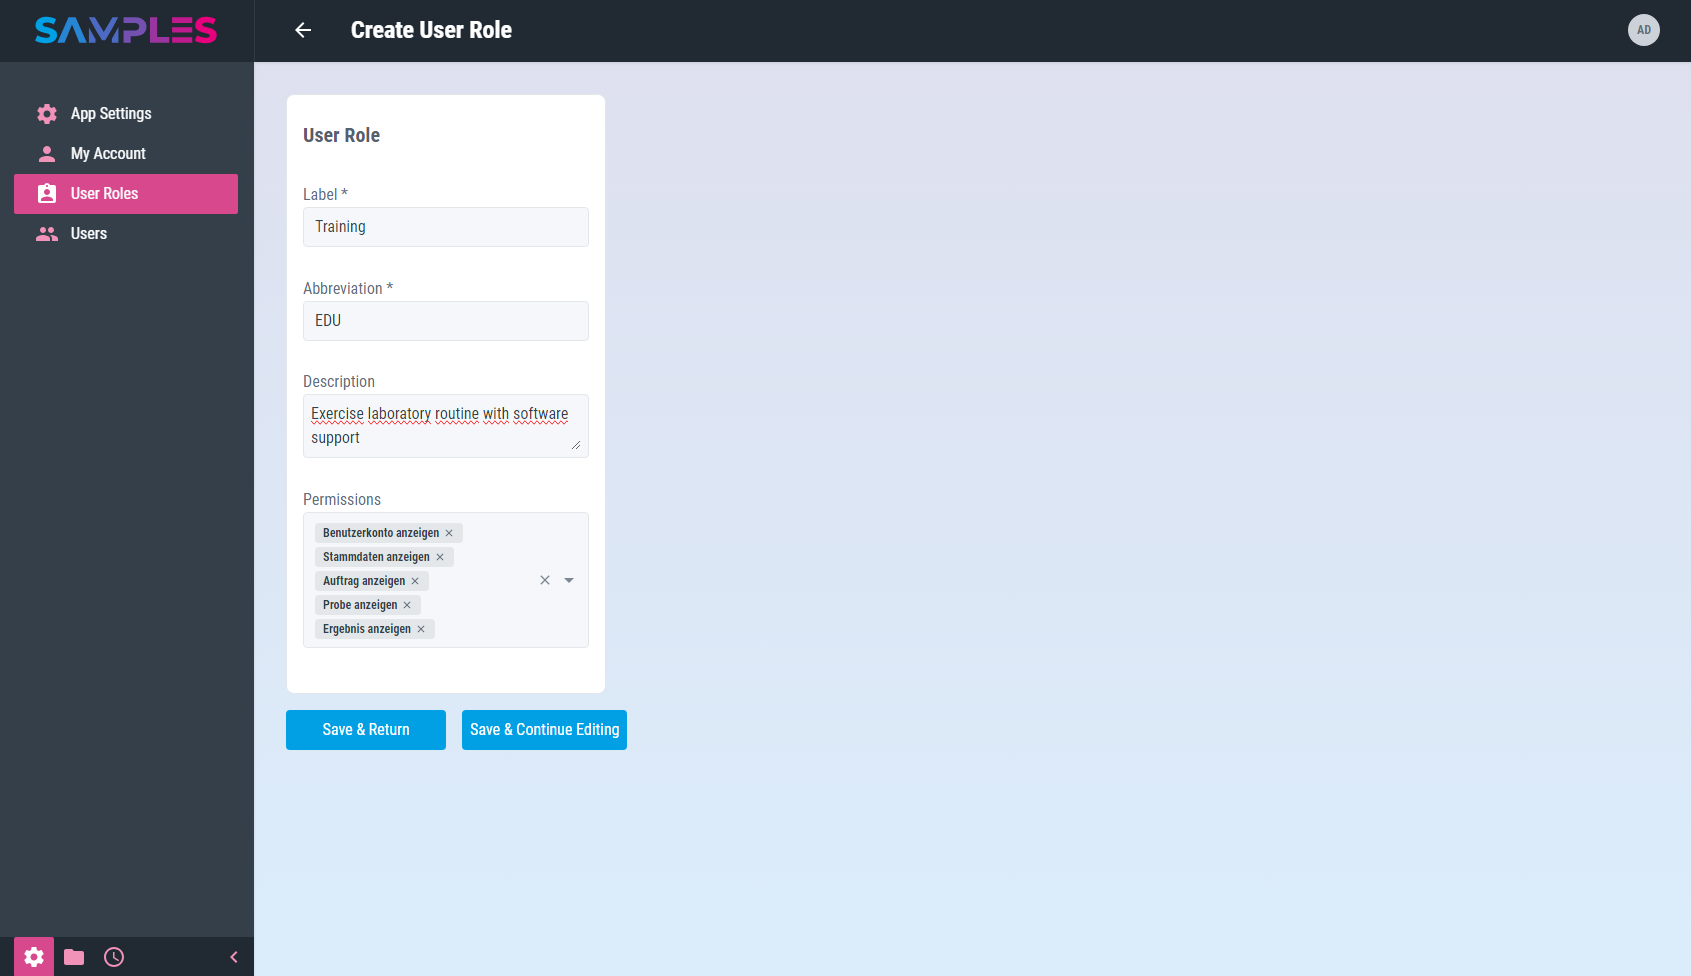
This includes:
| Input field | Meaning | Remarks |
|---|---|---|
Label |
Readable name of the user role |
unique mandatory information |
Abbreviation |
Short name to identify and reference the user role in other parts of the app |
unique mandatory information |
Description |
Technical description and meaning of the user role |
|
Permissions |
List of permissions for this user role |
for details look at Permissions for user roles |
Only the click on the button Finish completes the assistant.
Your input is checked by the app for completeness and correctness before it is permanently saved. In case of errors in the input, a hint message is displayed and the corresponding input field is highlighted.
The time and editor of the input are recorded in the history of the new entry. Finally, the updated list of user roles is opened again.
|
|
Related articles with additional content: |
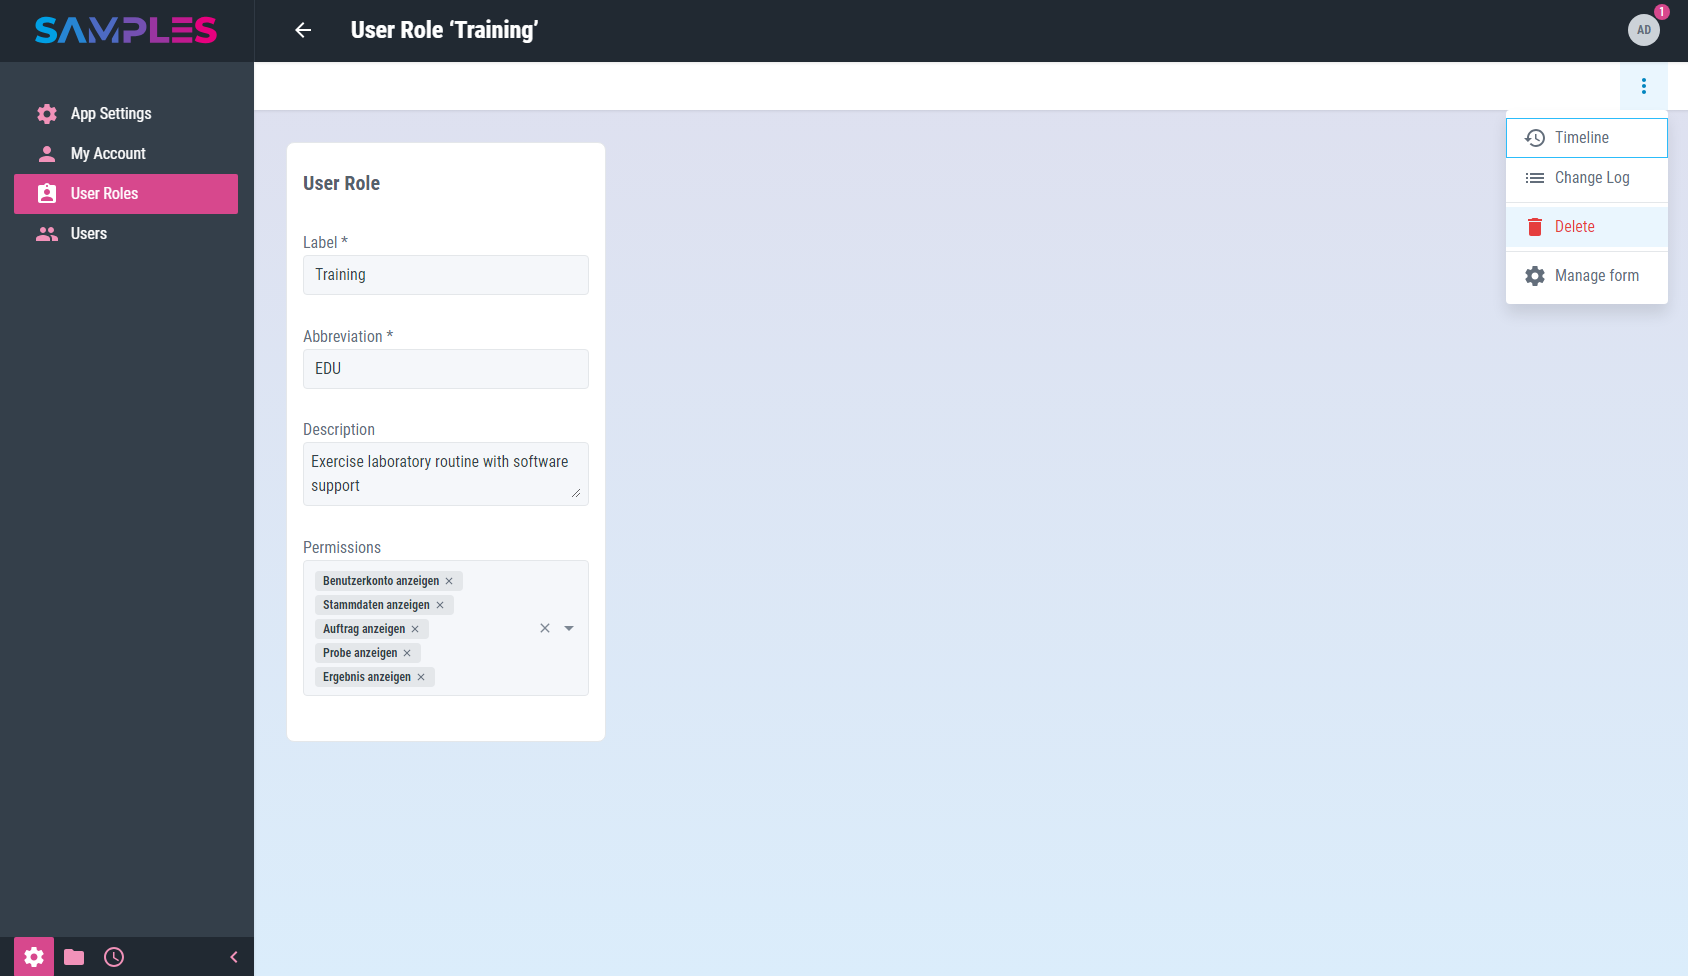
Edit user role
To display and edit all information about a user role, call up the desired list entry by clicking on it in the Administration / User Roles view.

This opens the editing screen with the following information:
| Input field | Meaning | Remarks |
|---|---|---|
Label |
Readable name of the user role |
unique mandatory information |
Abbreviation |
Short name to identify and reference the user role in other parts of the app |
unique mandatory information |
Description |
Technical description and meaning of the user role |
|
Permissions |
List of permissions for this user role |
for details look at Permissions for user roles |
|
|
Your input is checked, processed and saved immediately. |
Any input errors are displayed as a message and the relevant input fields are highlighted accordingly. The time and the editor are recorded in the history of the entry.
In the toolbar of the view you can find even more functions for editing user roles:
- History
-
shows the editors and the time for the creation and last editing of the item
- Delete
-
removes the user role from the app’s memory
Calling the Back function in the toolbar closes the view and takes you back to the list view.
|
|
Related articles with additional content: |
Permissions for user roles
SAMPLES uses permissions to control user access to app features and data.
Administrative permissions
| Permission | Meaning |
|---|---|
Benutzerkonto anzeigen |
List and show users and user roles |
Benutzerkonto bearbeiten |
Add and edit new users and user roles |
Benutzerkonto archivieren |
Lock and unlock users |
Benutzerkonto entfernen |
Remove users |
Permissions for setup and configuration
| Permission | Meaning |
|---|---|
Anwendung einrichten |
Edit application settings; Add, edit and remove catalogs and custom fields |
Stammdaten anzeigen |
List and show master data objects |
Stammdaten bearbeiten |
Add and edit master data objects |
Stammdaten entfernen |
Remove master data objects |
Permissions for daily lab routine
| Permission | Meaning |
|---|---|
Auftrag anlegen |
Register orders |
Auftrag anzeigen |
List and show orders |
Auftrag beurteilen |
Accept orders |
Auftrag bearbeiten |
Edit orders |
Auftrag archivieren |
Archive and restore orders |
Auftrag entfernen |
Remove orders |
Probe registrieren |
Register samples |
Probe anzeigen |
List and show samples |
Probe bearbeiten |
Edit samples |
Probe versenden |
Send samples (outdated) |
Probe archivieren |
Archive and restore samples |
Probe entfernen |
Remove samples |
Untersuchung starten |
Start sample screening |
Ergebnis anzeigen |
Show results of single samples and batch analyses |
Ergebnis erfassen |
Enter results of single samples and batch analyses |
Ergebnis freigeben |
Confirm results of single samples and batch analyses |
Remove user role
To remove a user role, call the Delete entry function in the 3-dot-menu of the list item in the Administration / User Roles view.
Alternatively, open the desired user role for editing and call the Delete function there in the 3-dot-menu of the toolbar.
In addition, it is also possible to remove several user roles at the same time. To do this, select the list items to be removed in the Administration / User Roles view and then call the Delete function in the 3-dot-menu of the toolbar.
In all 3 cases, a message is then displayed to confirm the action. Only after the confirmation of the user the removal of the selected item takes place.
|
|
The removal of a user role is not logged in the history and cannot be undone or retraced after confirmation. |
|
|
Related articles with additional content: |
Users
With the help of the app, laboratories process information with very sensitive content. Access to this confidential content must therefore only be permitted to authorised users. For traceability reasons, all changes to the content stored in the app are automatically logged by the software and linked to the user.
|
|
We strongly advise not to pass the app credentials to third parties. When leaving the workplace, you should also always log out of the app to prevent misuse of your own app identity. |
List and search users
A searchable listing of all available data about users can be found in view Administration / Users.
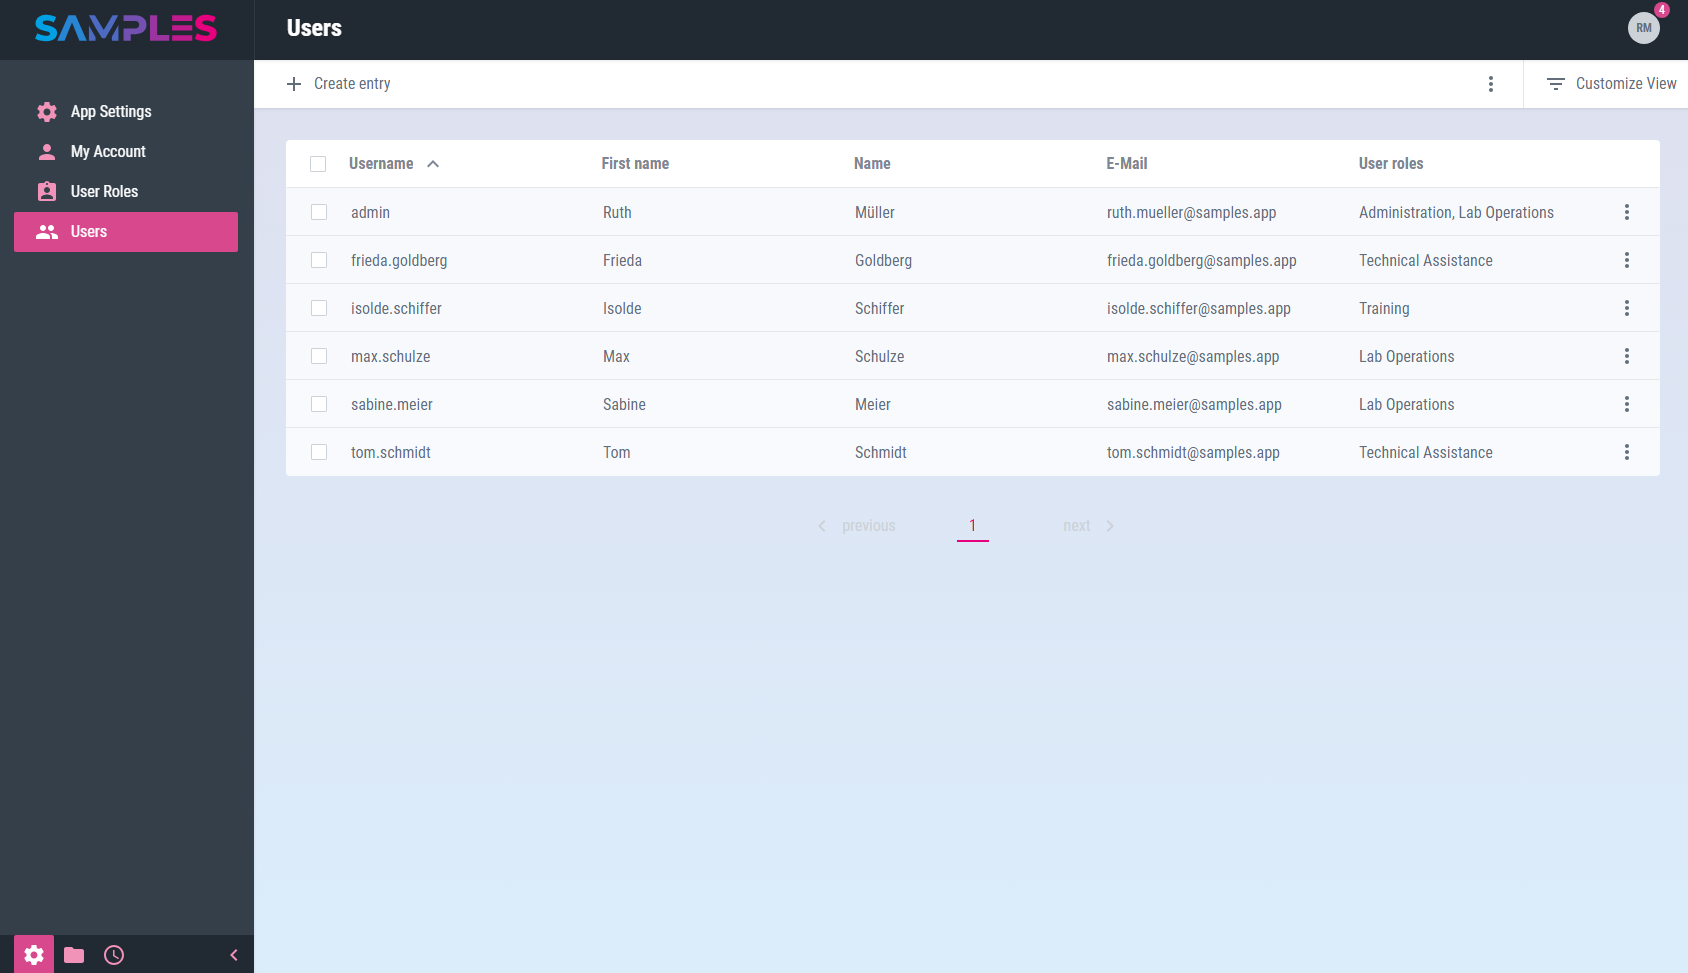
The listing contains information about:
| Title | Meaning |
|---|---|
Username |
Name for log-in into the app |
First name |
First name from the users contact information |
Name |
Name from the users contact information |
E-Mail from the users contact information |
|
User roles |
List of assigned user roles |
In the toolbar of the view you can find even more functions for processing users:
- Create entry
-
adds a new user
- Reload list
-
updates the content of the listing
|
|
Related articles with additional content: |
Register new user
For the registration of a new user open view Administration / Users and call the function Create entry.
A wizard opens for entering all the necessary information for the new entry:
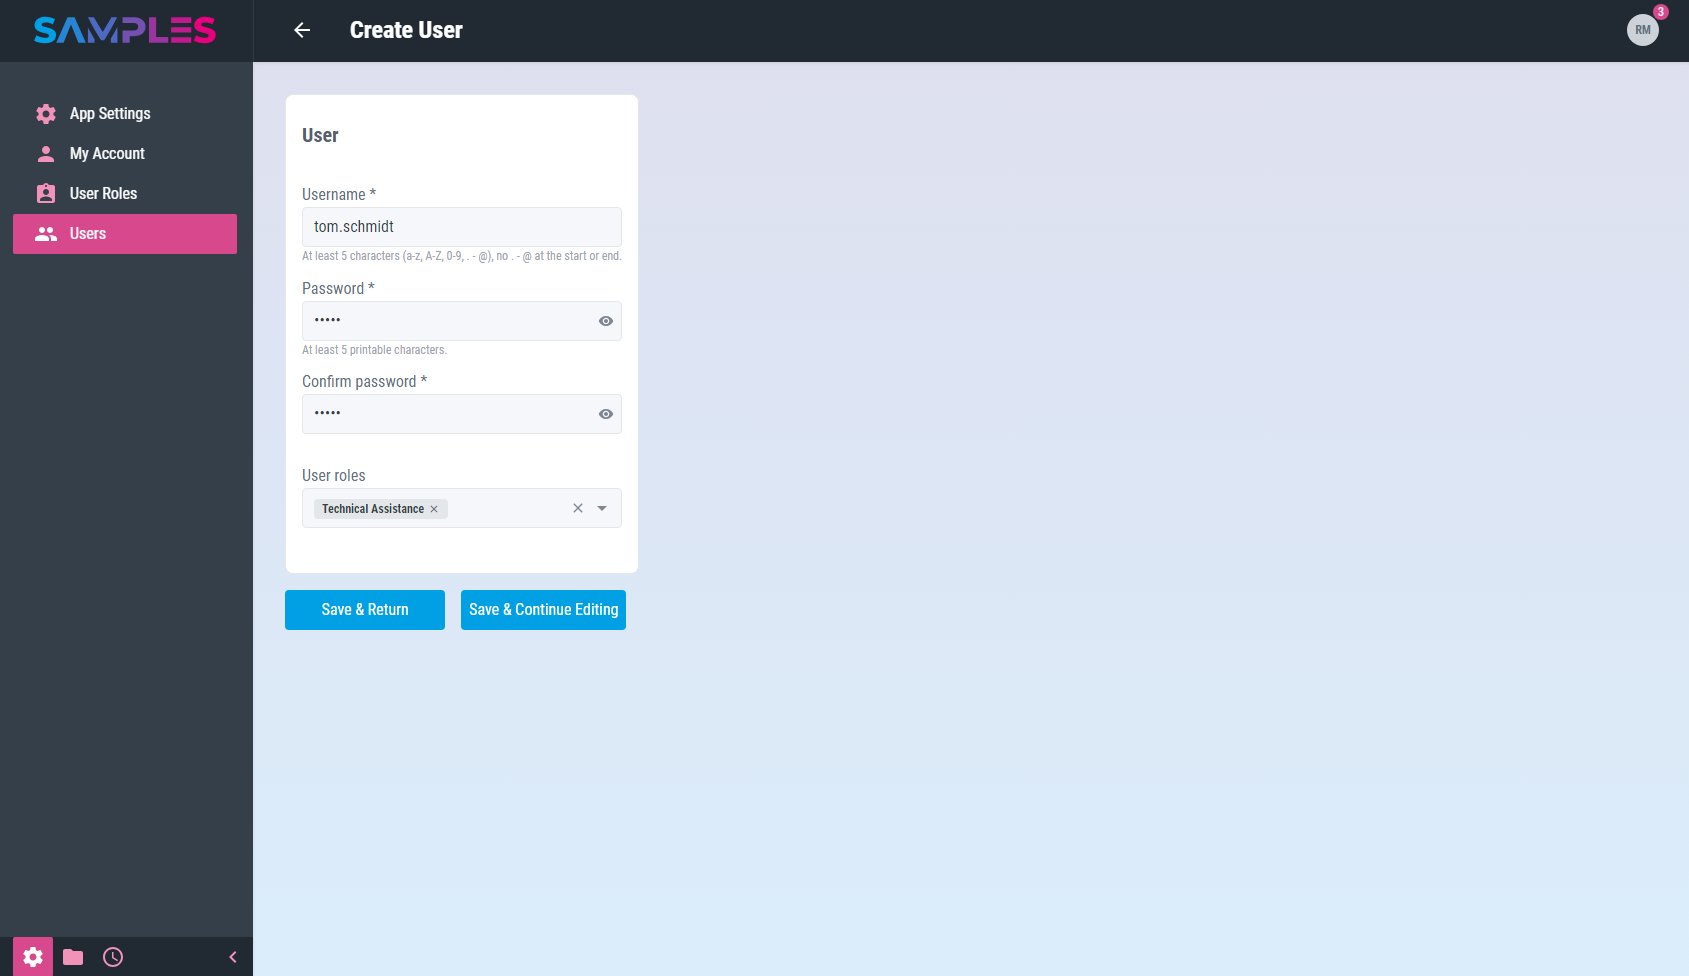
This includes:
| Input field | Meaning | Remarks |
|---|---|---|
Username |
Name for log-in into the app |
unique mandatory information |
Password |
Password for log-in to the app |
mandatory information, at least 5 characters |
Confirm Password |
Password for log-in to the app |
mandatory information, identical with password |
User roles |
List of assigned user roles |
|
|
For unique usernames, we recommend using the email addresses of colleagues, as they are catchy and easy to remember on the one hand, and are also unique on the other. Good and secure passwords are 10-20 characters long and composed of a combination of upper and lower case letters, numbers and some special characters. For this purpose, counting rhymes or proverbs are particularly suitable, of which you only use the first letters and in which you insert random digits and special characters. |
Only the click on the button Finish completes the assistant.
Your input is checked by the app for completeness and correctness before it is permanently saved. In case of errors in the input, a hint message is displayed and the corresponding input field is highlighted.
The time and editor of the input are recorded in the history of the new entry. Finally, the updated list of users is opened again.
|
|
Related articles with additional content: |
Edit user
To display and edit all information about a user, call up the desired list entry by clicking on it in the Administration / Users view.
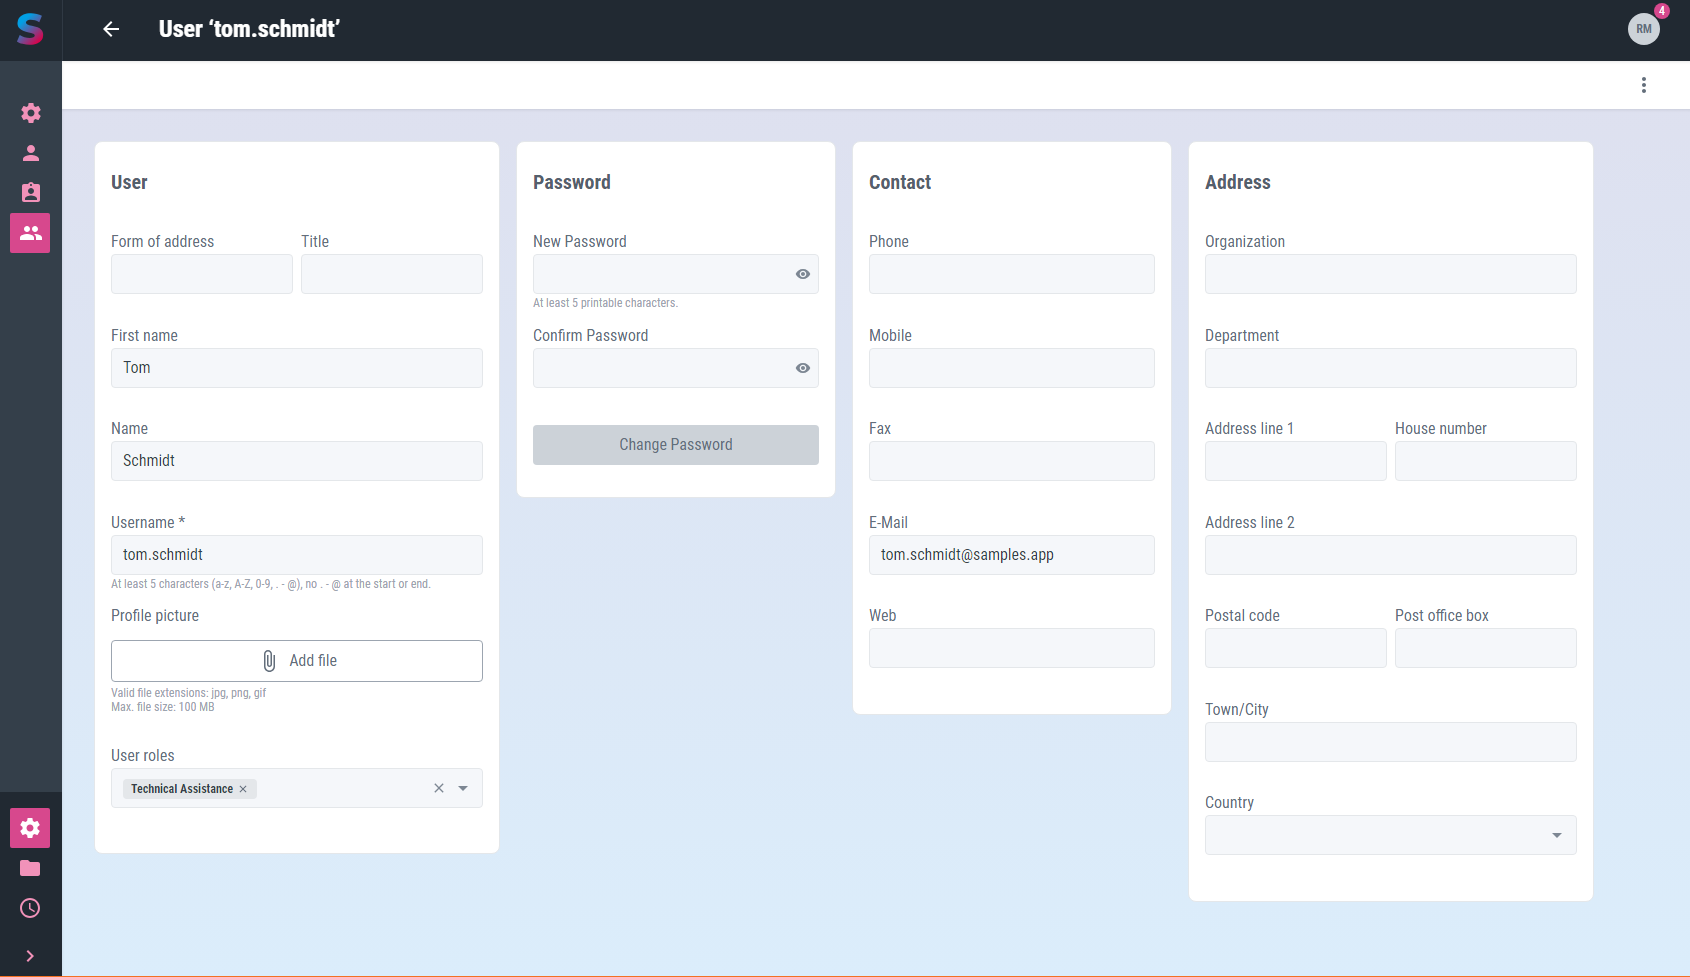
This opens the editing screen with the following information:
| Input field | Meaning | Remarks |
|---|---|---|
Username |
Name for log-in into the app |
unique mandatory information |
New Password |
Password for log-in to the app |
mandatory information, at least 5 characters |
User roles |
List of assigned user roles |
Edit the selection list in Administration / User Roles |
Organization |
Name of the organization to which this user belongs |
|
Department |
Name of the department to which this user belongs |
|
Phone |
Landline phone number for contacting the user |
|
Mobile |
Mobile phone number for contacting the user |
|
Fax |
Phone number of the fax machine to contact the user |
|
Electronix mail address to contact the user |
||
Web |
Homepage or social media profile for contact with the user |
|
Form of address |
Salutation from the postal address of the user |
e.g. Mrs. or Mr. |
Title |
Academic title from the user’s postal address |
e.g. Prof. or Dr. |
Name |
Family name of the user |
|
First name |
Given name of the user |
|
Adress line 1 |
Street name from the user’s postal address |
|
House number |
House number from the user’s postal address |
|
Adress line 2 |
Additional information to the user’s postal address |
e.g. part of town |
Postal code |
Postal code from the user’s postal address |
|
Post office box |
Post office box from the user’s postal address |
|
Town/City |
Name of the city from the user’s postal address |
|
Country |
Name of the country from the user’s postal address |
Edit the selection list in Master Data / Countries |
|
|
Your input is checked, processed and saved immediately. |
Any input errors are displayed as a message and the relevant input fields are highlighted accordingly. The time and the editor are recorded in the history of the entry.
In the toolbar of the view you can find even more functions for editing users:
- History
-
shows the editors and the time for the creation and last editing of the item
- Delete
-
removes the user from the app’s memory
Calling the Back function in the toolbar closes the view and takes you back to the list view.
|
|
Related articles with additional content: |
Lock user
To lock a user and thus deactivate the user account and prevent further logins, open the appropriate list item in the Administration / Users view and call the Archive function in the 3-point menu of the toolbar.

|
|
For understandable reasons, of course, a user may not lock himself. |
After confirming the action, the item is locked.
The editor and the time of the action are recorded in the history of the archived item. The user can no longer be edited and does not appear in the overview list (unless you activate the Show archived option there). It is no longer possible to log in with this user until the lock is released.
|
|
Related articles with additional content: |
Release locked user
To release the lock of a user, first perform an archive search (with the Show archived option) for the desired list item in the Administration / Users view. Then open its edit view by clicking on the item in the list.
Since this is still a locked item, editing is not possible. To release, i.e. removing the lock, now call the Restore function in the 3-point menu of the toolbar.
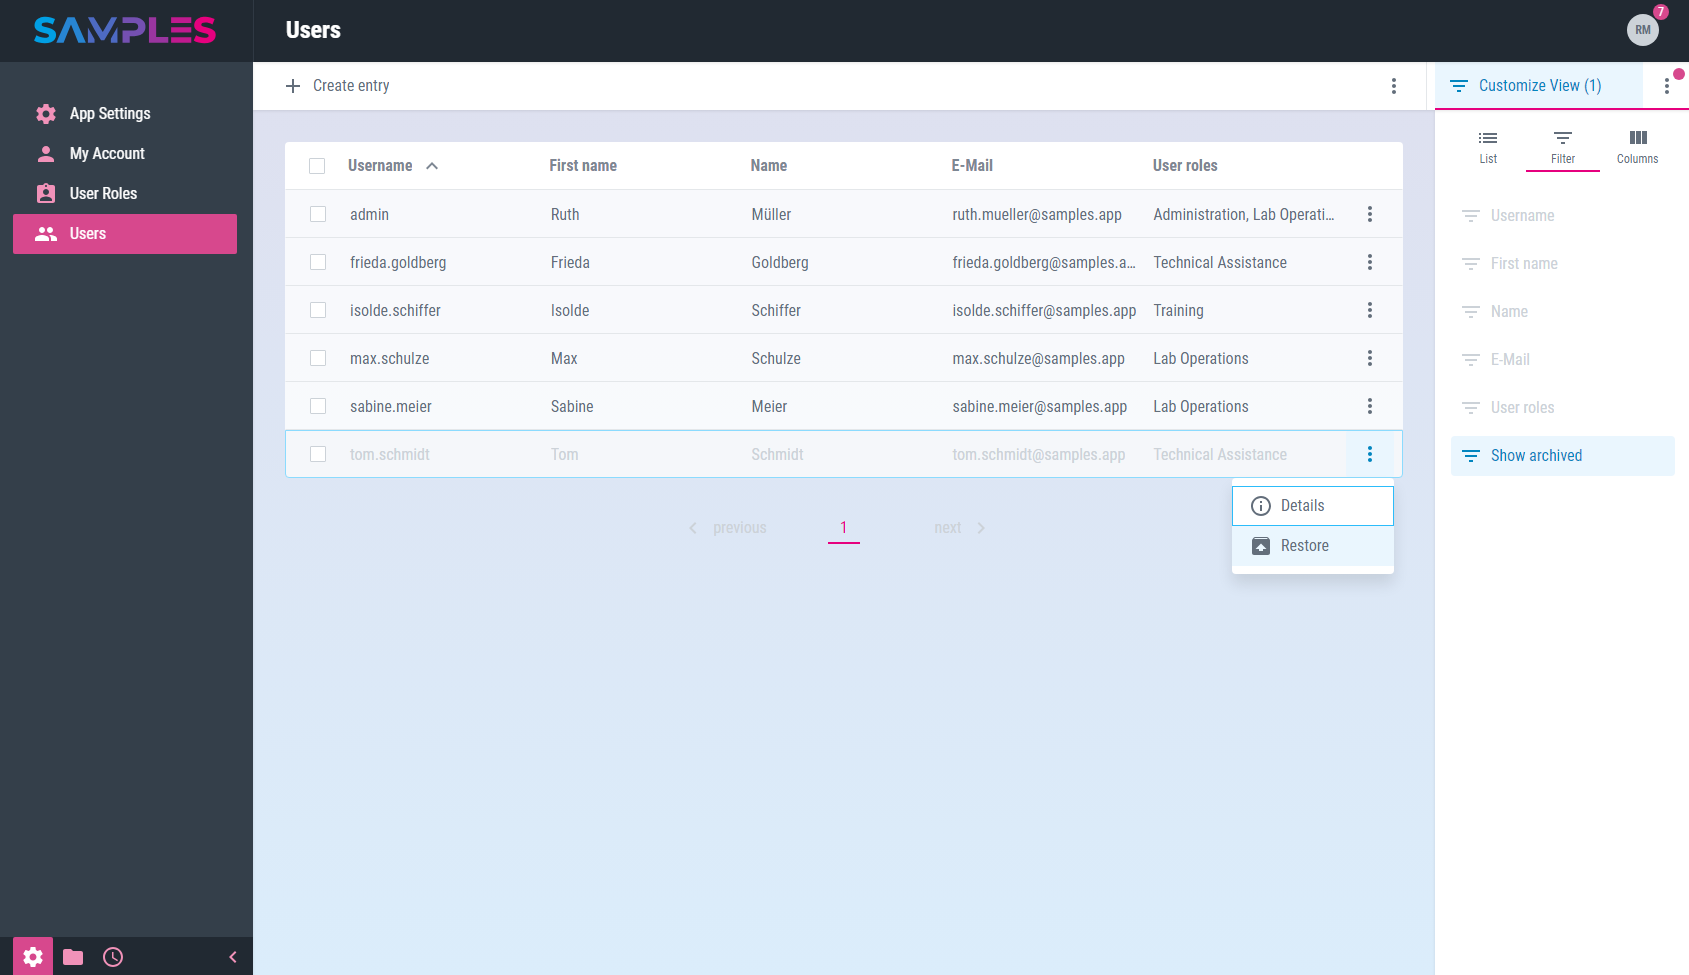
The editor and time of the action are recorded in the history of the item. The user that has now been restored can now be edited and also appears again in the overview list without the need for an archive search. The user can now log in again.
|
|
Related articles with additional content: |
App Settings
Some settings influence the behavior of the entire application and all users. They are made in a central place by administrative users.
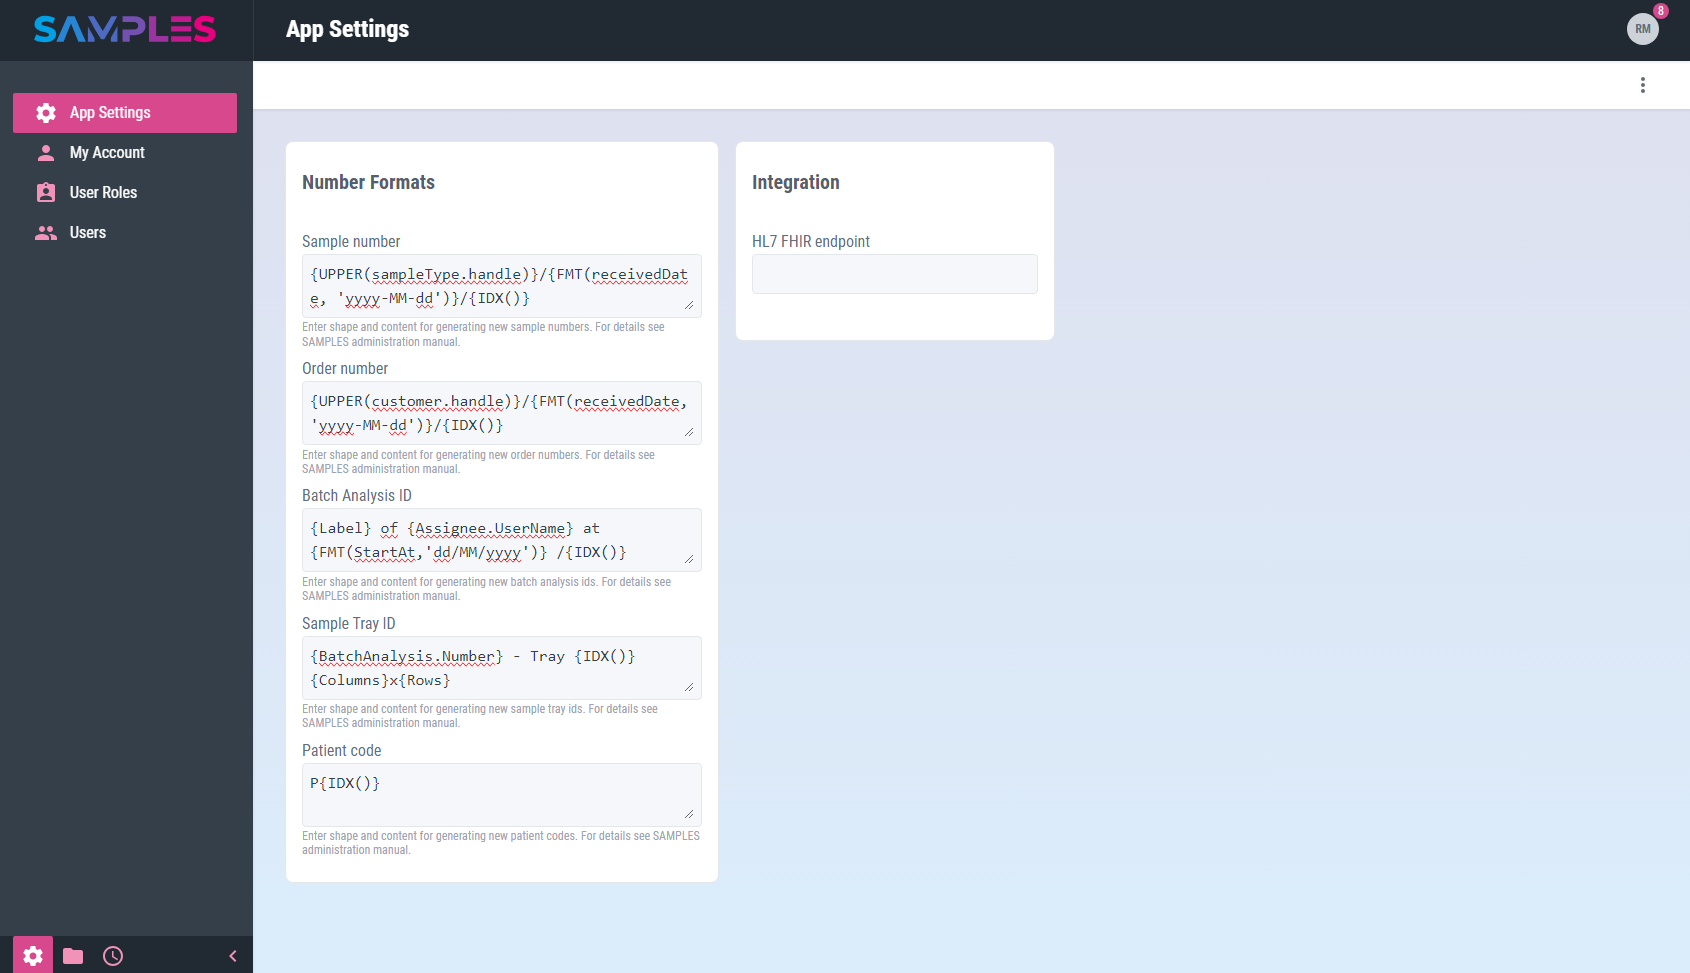
This includes in particular the settings for the generation of new identification numbers by the app.
|
|
Ideally, these settings should be made immediately after the first start of a sample installation, since subsequent changes to them will not affect numbers that have already been generated. |
Set format for new sample numbers
To view and edit the format for generating new sample numbers, the Administration / Application Settings view is opened.
The Sample number field shows the current setting:
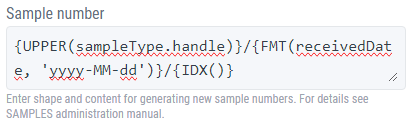
In addition to some general number generation instructions, the following sample-specific properties are available:
| Format | Meaning |
|---|---|
|
External identification number (of the customer) of the sample |
|
Supplementary label of the sample |
|
Readable label of the type of sample material |
|
Short label of the type of sample material |
|
Additional information stored in the barcode label of the sample |
|
Date of receipt of the sample in the laboratory |
|
Current processing status of the sample |
|
Priority for processing the sample |
|
Number of sample tubes |
|
Size of the sample tubes |
|
Label of the unit associated to the size |
|
Readable label of a currently conducted clinical trial this sample is associated to |
|
Short label of a currently conducted clinical trial this sample is associated to |
|
Date and time of collection of the samples from the patient |
|
External identification number (of the customer) of the order |
|
Internal identification number (of the lab) of the order |
|
Date of order entry |
|
Readable name of the customer |
|
Short name of the customer |
|
Pseudonymized or anonymized coding of the patient |
|
Given name of the patient |
|
Family name of the patient |
|
Date of birth of the patient |
Embedded in curly brackets ({}), they are interpreted as placeholders and replaced by the current value of the sample information referenced by them when the new number is generated.
If no value can be determined for one of the format statements when generating a new number, no substitution takes place, i.e. the respective content of the number remains empty.
Following there are some examples of sample number formats:
| Example | Format | Sample number |
|---|---|---|
Patient code, clinical trial, sample collection, sample type and sequence number |
|
|
Sample type, sample registration date and sequence number |
|
|
|
|
All entries are checked, processed and saved immediately. The changes thus become effective immediately and apply to each newly generated sample number. |
Any input errors are displayed as a hint message and the relevant input fields are highlighted accordingly.
|
|
Related articles with additional content: |
Set format for new order numbers
To view and edit the format for generating new order numbers, the Administration / Application Settings view is opened.
The Order number field shows the current setting:
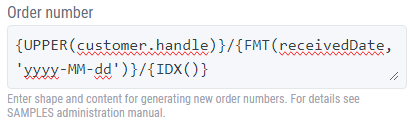
In addition to some general number generation instructions, the following order-specific properties are available:
| Format | Meaning |
|---|---|
|
Date of order entry |
|
Readable name of the customer |
|
Short name of the customer |
|
Pseudonymized or anonymized coding of the patient |
|
Given name of the patient |
|
Family name of the patient |
|
Date of birth of the patient |
Embedded in curly brackets ({}), they are interpreted as placeholders and replaced by the current value of the order information referenced by them when the new number is generated.
If no value can be determined for one of the format statements when generating a new number, no substitution takes place, i.e. the respective content of the number remains empty.
Following there are some examples of order number formats:
| Example | Format | Order number |
|---|---|---|
Customer handle, order entry date and sequence number |
|
|
Same example with better readable format |
|
|
|
|
All entries are checked, processed and saved immediately. The changes thus become effective immediately and apply to each newly generated order number. |
Any input errors are displayed as a hint message and the relevant input fields are highlighted accordingly.
|
|
Related articles with additional content: |
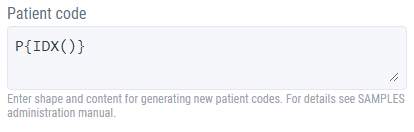
Set format for new patient codes
To view and edit the format for generating new patient codes, the Administration / Application Settings view is opened.
The Patient code field shows the current setting:
In addition to some general number generation instructions, the following patient-specific properties are available:
| Format | Meaning |
|---|---|
|
Family name of the patient |
|
Given name of the patient |
|
Date of birth of the patient |
Embedded in curly brackets ({}), they are interpreted as placeholders and replaced by the current value of the patient information referenced by them when the new code is generated.
If no value can be determined for one of the format statements when generating a new code, no substitution takes place, i.e. the respective content of the code remains empty.
Following there are some examples of patient code formats:
| Example | Format | Patient code |
|---|---|---|
first character of firstname and lastname in uppercase format and date of birth (pseudonymized) |
|
|
anonymized patient code |
|
|
|
|
All entries are checked, processed and saved immediately. The changes thus become effective immediately and apply to each newly generated patient code. |
Any input errors are displayed as a hint message and the relevant input fields are highlighted accordingly.
|
|
Related articles with additional content: |
Set format for new batch analysis identifiers
To view and edit the format for generating new batch analysis identifier, the Administration / Application Settings view is opened.
The Batch Analysis ID field shows the current setting:

In addition to some general number generation instructions, the following analysis-specific properties are available:
| Format | Meaning |
|---|---|
|
Readable name or short name of the batch analysis |
|
Start of the analysis |
|
Due date or deadline for the completion of the batch analysis |
|
Login name of the current batch analysis editor |
Embedded in curly brackets ({}), they are interpreted as placeholders and replaced by the current value of the batch analysis information referenced by them when the new identifier is generated.
If no value can be determined for one of the format statements when generating a new identifier, no substitution takes place, i.e. the respective content of the identifier remains empty.
Following there are some examples of batch analysis identifier formats:
| Example | Format | Batch-Analyse-ID |
|---|---|---|
Analysis start date, label and sequence number |
|
|
Analysis label, start date and name of the editor |
|
|
|
|
All entries are checked, processed and saved immediately. The changes thus become effective immediately and apply to each newly generated batch analysis identifier. |
Any input errors are displayed as a hint message and the relevant input fields are highlighted accordingly.
|
|
Related articles with additional content: |
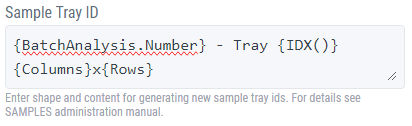
Set format for new sample tray identifiers
To view and edit the format for generating new sample tray identifiers, the Administration / Application Settings view is opened.
The Sample Tray ID field shows the current setting:
In addition to some general number generation instructions, the following tray-specific properties are available:
| Format | Meaning |
|---|---|
|
Readable name of the sample tray |
|
Number of rows (height) of the sample tray |
|
Number of columns (width) of the sample tray |
|
Identification number of the batch analysis |
|
Readable name or short name of the batch analysis |
|
Start of the analysis |
|
Due date or deadline for the completion of the batch analysis |
Embedded in curly brackets ({}), they are interpreted as placeholders and replaced by the current value of the sample tray information referenced by them when the new identifier is generated.
If no value can be determined for one of the format statements when generating a new identifier, no substitution takes place, i.e. the respective content of the identifier remains empty.
Following there are some examples of sample tray identifier formats:
| Example | Format | Sample tray ID |
|---|---|---|
Batch analysis ID (see above) and sequence number (of the sample tray) |
|
|
Same example, better formatted with a bit more information |
|
|
|
|
All entries are checked, processed and saved immediately. The changes thus become effective immediately and apply to each newly generated sample tray identifier. |
Any input errors are displayed as a hint message and the relevant input fields are highlighted accordingly.
|
|
Related articles with additional content: |
General instructions for number generation
Some instructions for number generation are generally valid and can thus be used in all formats:
| Format | Meaning |
|---|---|
|
Character of |
|
convert all characters of |
|
convert the value of |
|
generate sequence number |
Laboratory process and procedures
After the first steps, this section describes how to set-up the essential laboratory process objects and the procedures to be used. In addition to the objects already included in the app, such as units, parameters and methods, your own user-defined content can also be set up in order to be used in the daily routine.
Sample types
Sample types are used to classify the samples to be processed according to their material nature or the purpose of their examination.
Goals can be described specifically for certain sample types, which greatly simplifies the work for the client and the laboratory.
List and search sample types
A searchable listing of all available data about sample types can be found in view Master Data / Sample Types.

The listing contains information about:
| Title | Meaning |
|---|---|
Label |
Readable name of the sample type |
Abbreviation |
Short name to identify and reference the sample type in other parts of the app |
Description |
Technical description and meaning of the sample type |
In the toolbar of the view you can find even more functions for processing sample types:
- Create entry
-
adds a new sample type
- Reload list
-
updates the content of the listing
- Delete selected entries
-
removes the selected list entries
|
|
Related articles with additional content: |
Add new sample type
To add a new sample type open view Master Data / Sample Types and call the function Create entry.
A wizard opens for entering all the necessary information for the new entry:
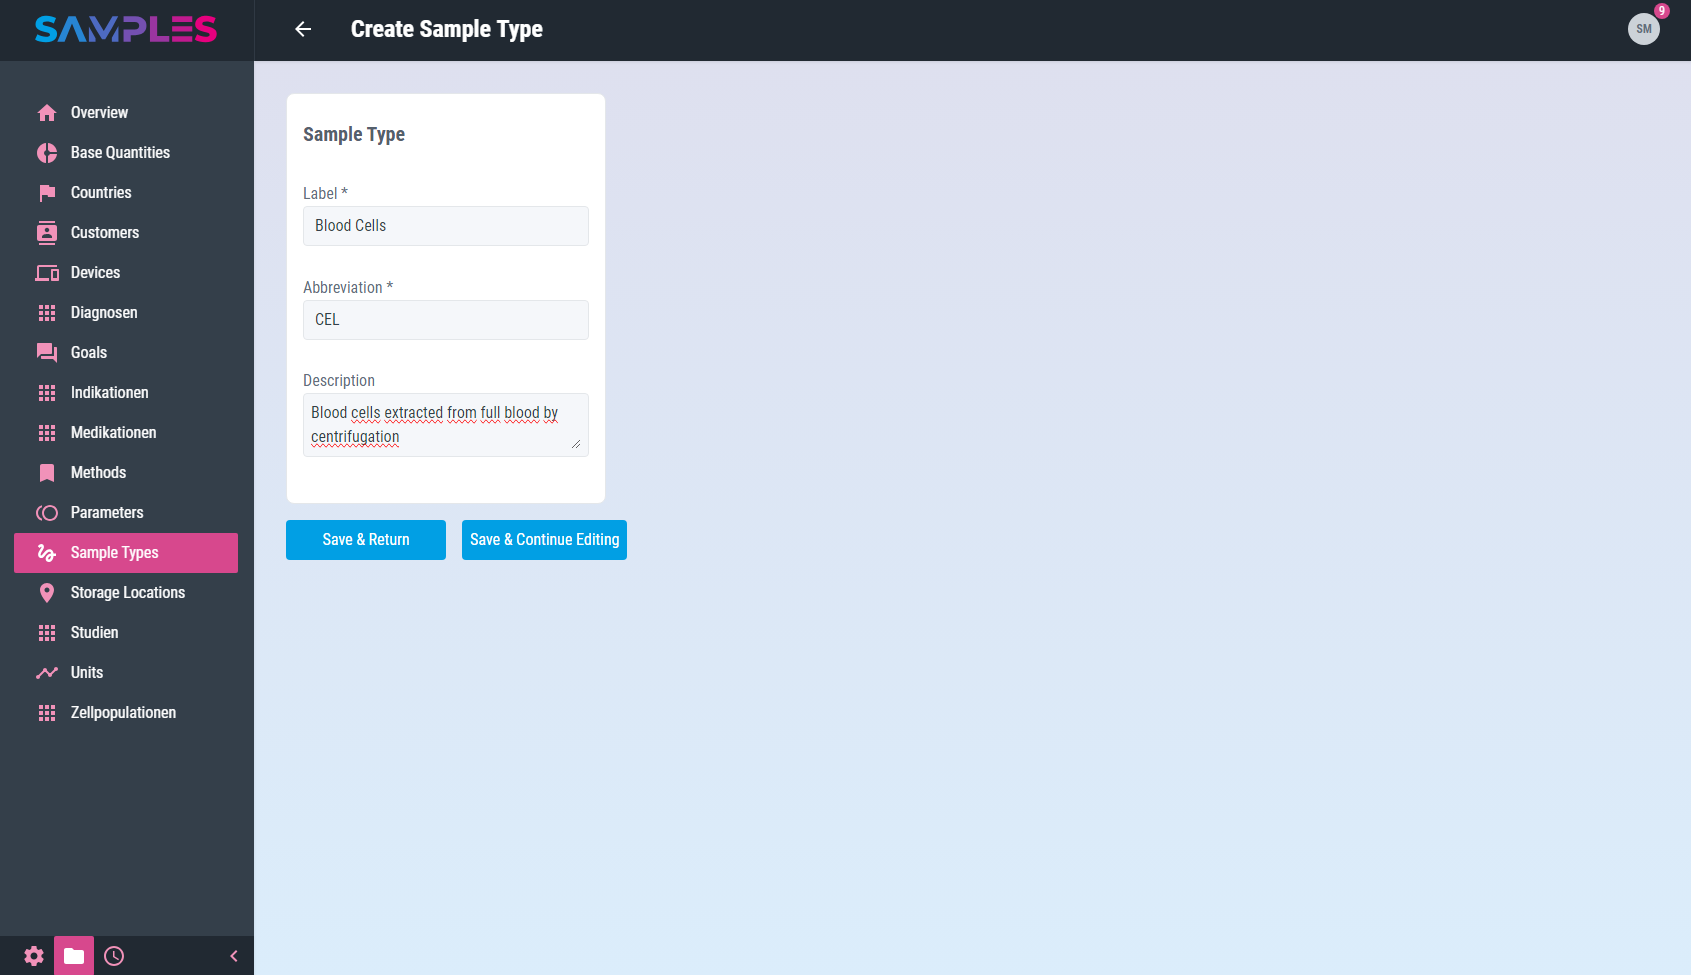
This includes:
| Input field | Meaning | Remarks |
|---|---|---|
Label |
Readable name of the sample type |
unique mandatory information |
Abbreviation |
Short name to identify and reference the sample type in other parts of the app |
unique mandatory information |
Description |
Technical description and meaning of the sample type |
Only the click on the button Finish completes the assistant.
Your input is checked by the app for completeness and correctness before it is permanently saved. In case of errors in the input, a hint message is displayed and the corresponding input field is highlighted.
The time and editor of the input are recorded in the history of the new entry. Finally, the updated list of sample types is opened again.
|
|
Related articles with additional content: |
Edit sample type
To display and edit all information about a sample type, call up the desired list entry by clicking on it in the Master Data / Sample Types view.
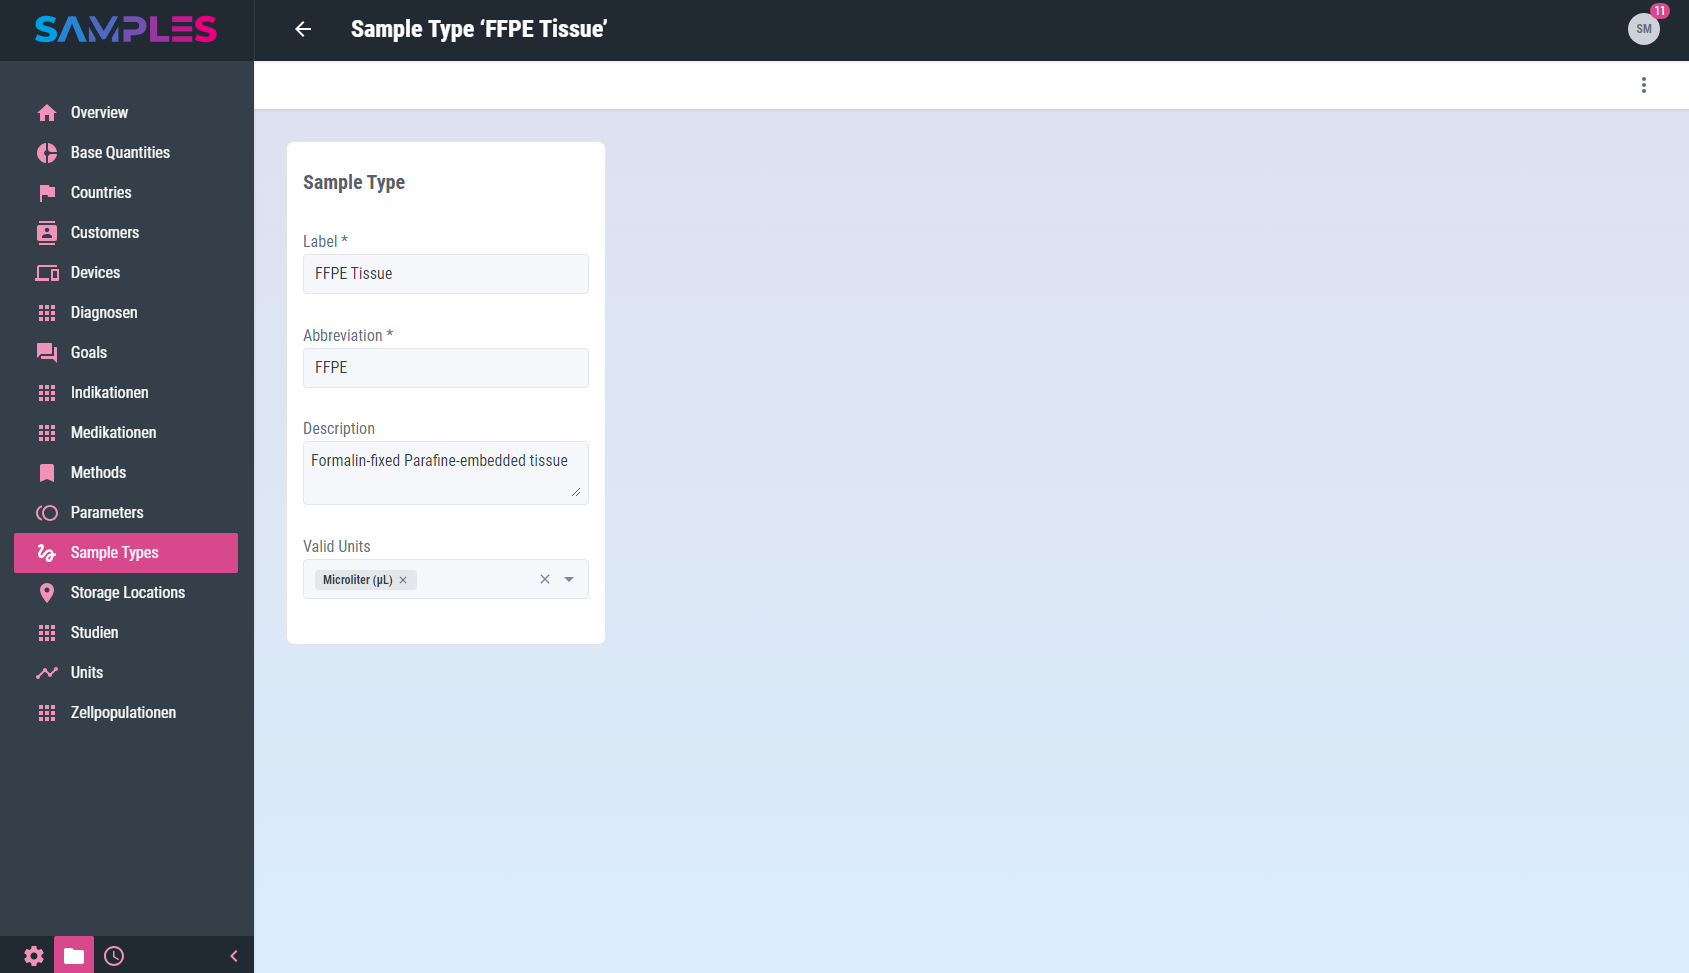
This opens the editing screen with the following information:
| Input field | Meaning | Remarks |
|---|---|---|
Label |
Readable name of the sample type |
unique mandatory information |
Abbreviation |
Short name to identify and reference the sample type in other parts of the app |
unique mandatory information |
Description |
Technical description and meaning of the sample type |
|
Units |
Units available for samples of this type |
Edit the selection list in Master Data / Units |
|
|
Your input is checked, processed and saved immediately. |
Any input errors are displayed as a message and the relevant input fields are highlighted accordingly. The time and the editor are recorded in the history of the entry.
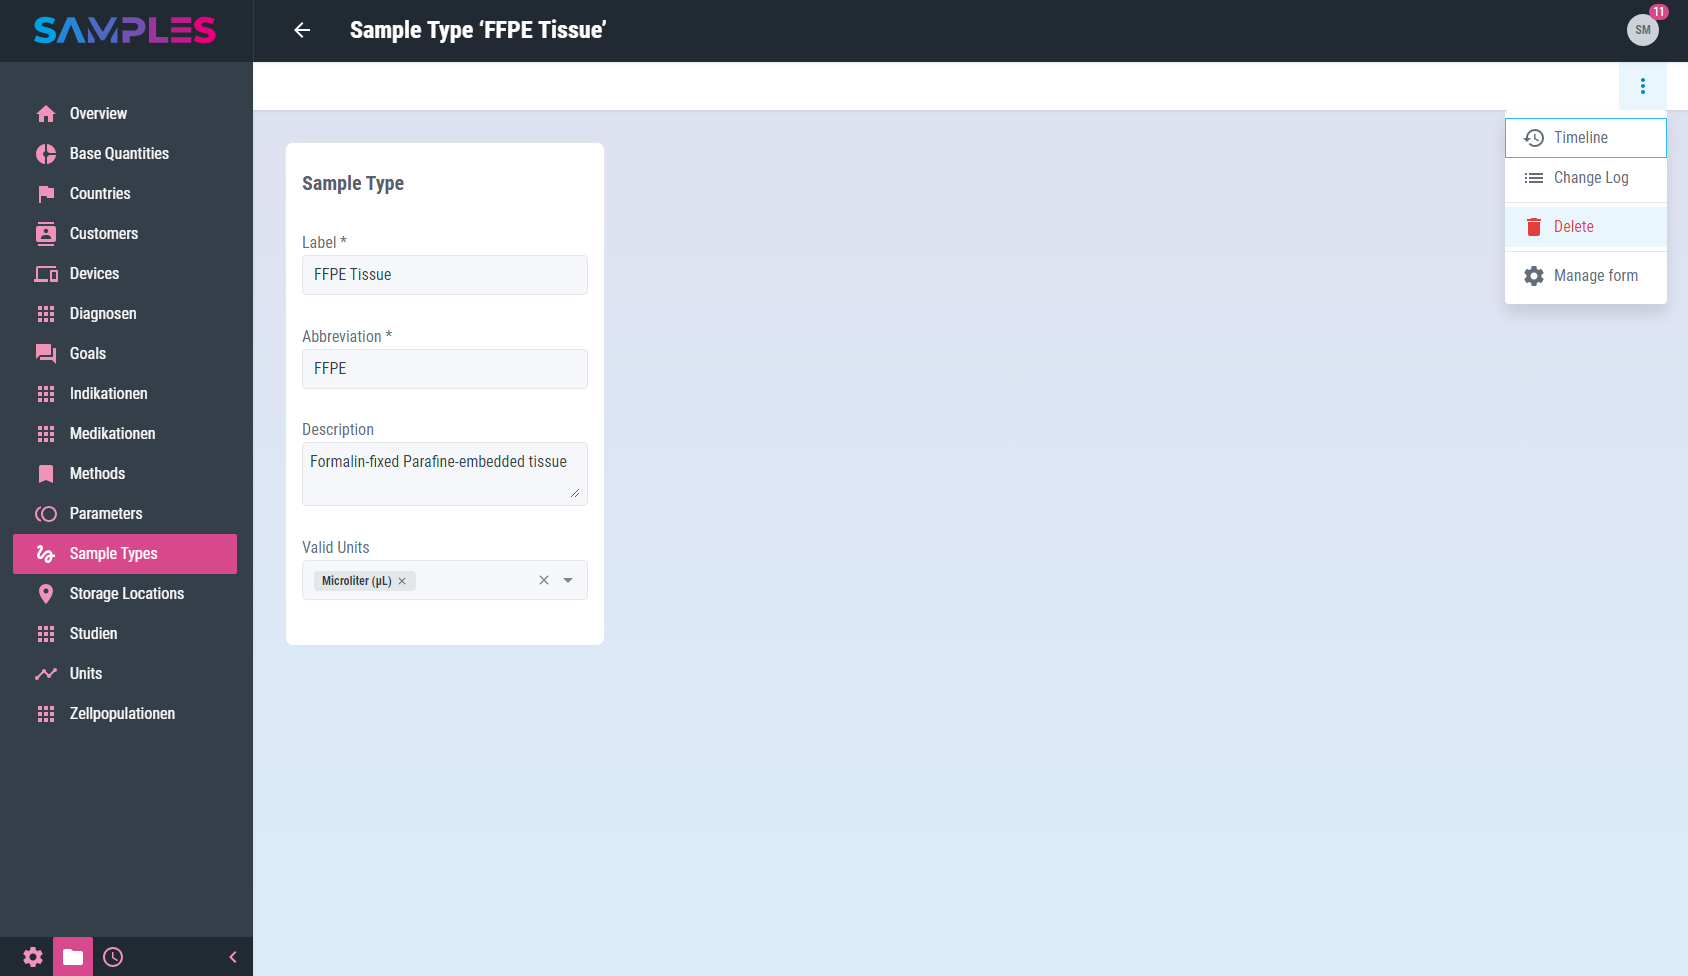
In the toolbar of the view you can find even more functions for editing sample types:
- History
-
shows the editors and the time for the creation and last editing of the item
- Delete
-
removes the sample type from the app’s memory
Calling the Back function in the toolbar closes the view and takes you back to the list view.
|
|
Related articles with additional content: |
Remove sample type
To remove a sample type, call the Delete entry function in the 3-dot-menu of the list item in the Master Data / Sample Types view.
Alternatively, open the desired sample type for editing and call the Delete function there in the 3-dot-menu of the toolbar.
In addition, it is also possible to remove several sample types at the same time. To do this, select the list items to be removed in the Master Data / Sample Types view and then call the Delete function in the 3-dot-menu of the toolbar.
In all 3 cases, a message is then displayed to confirm the action. Only after the confirmation of the user the removal of the selected item takes place.
|
|
The removal of a sample type is not logged in the history and cannot be undone or retraced after confirmation. |
|
|
Related articles with additional content: |
Base quantities
Similar units (or measurement units) that can be converted into each other are combined into base quantities (or simply quantities).
One base quantity comprises one or more units, each of which itself may be contained in one or more base quantities. Each base quantity declares one of the contained units (mostly the commonly used one) to be its standard unit.
List and search base quantities
A searchable listing of all available data about base quantities can be found in view Master Data / Base Quantities.
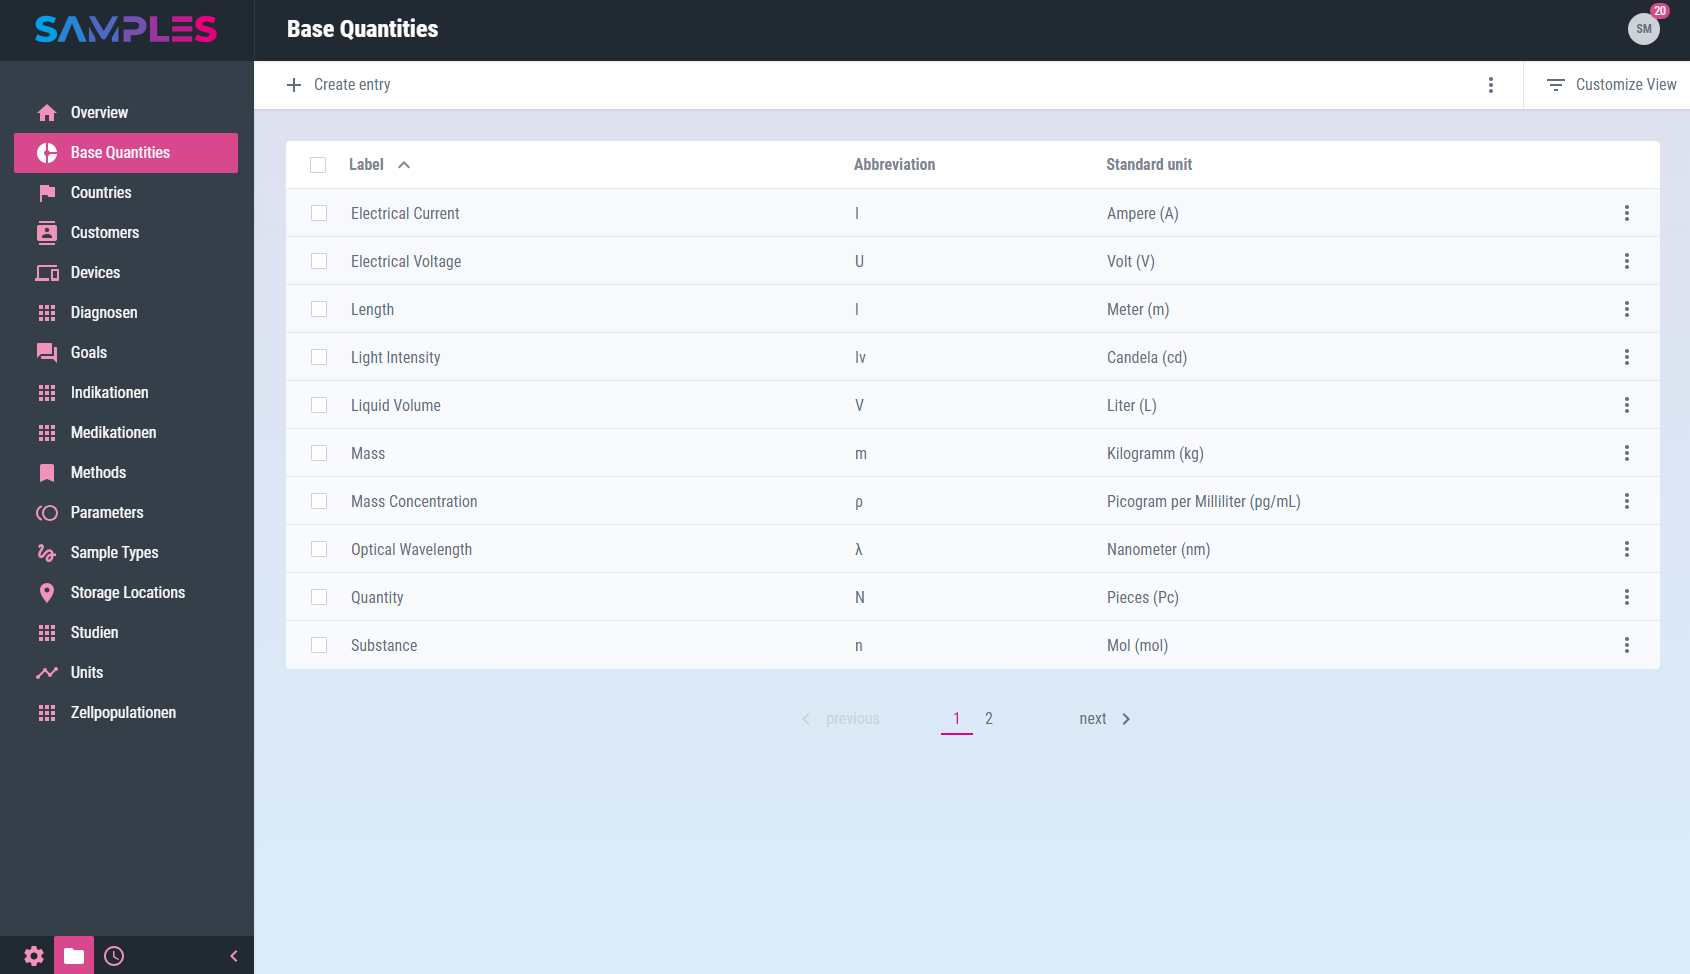
The listing contains information about:
| Title | Meaning |
|---|---|
Label |
Readable name of the base quantity |
Abbreviation |
Short name to identify and reference the base quantity in other parts of the app |
Standard unit |
Frequently used unit for values and basis for conversion of other units of this dimension. |
In the toolbar of the view you can find even more functions for processing base quantities:
- Create entry
-
adds a new base quantity
- Reload list
-
updates the content of the listing
- Delete selected entries
-
removes the selected list entries
|
|
Related articles with additional content: |
Add new base quantity
To add a new base quantity open view Master Data / Base Quantities and call the function Create entry.
A wizard opens for entering all the necessary information for the new entry:
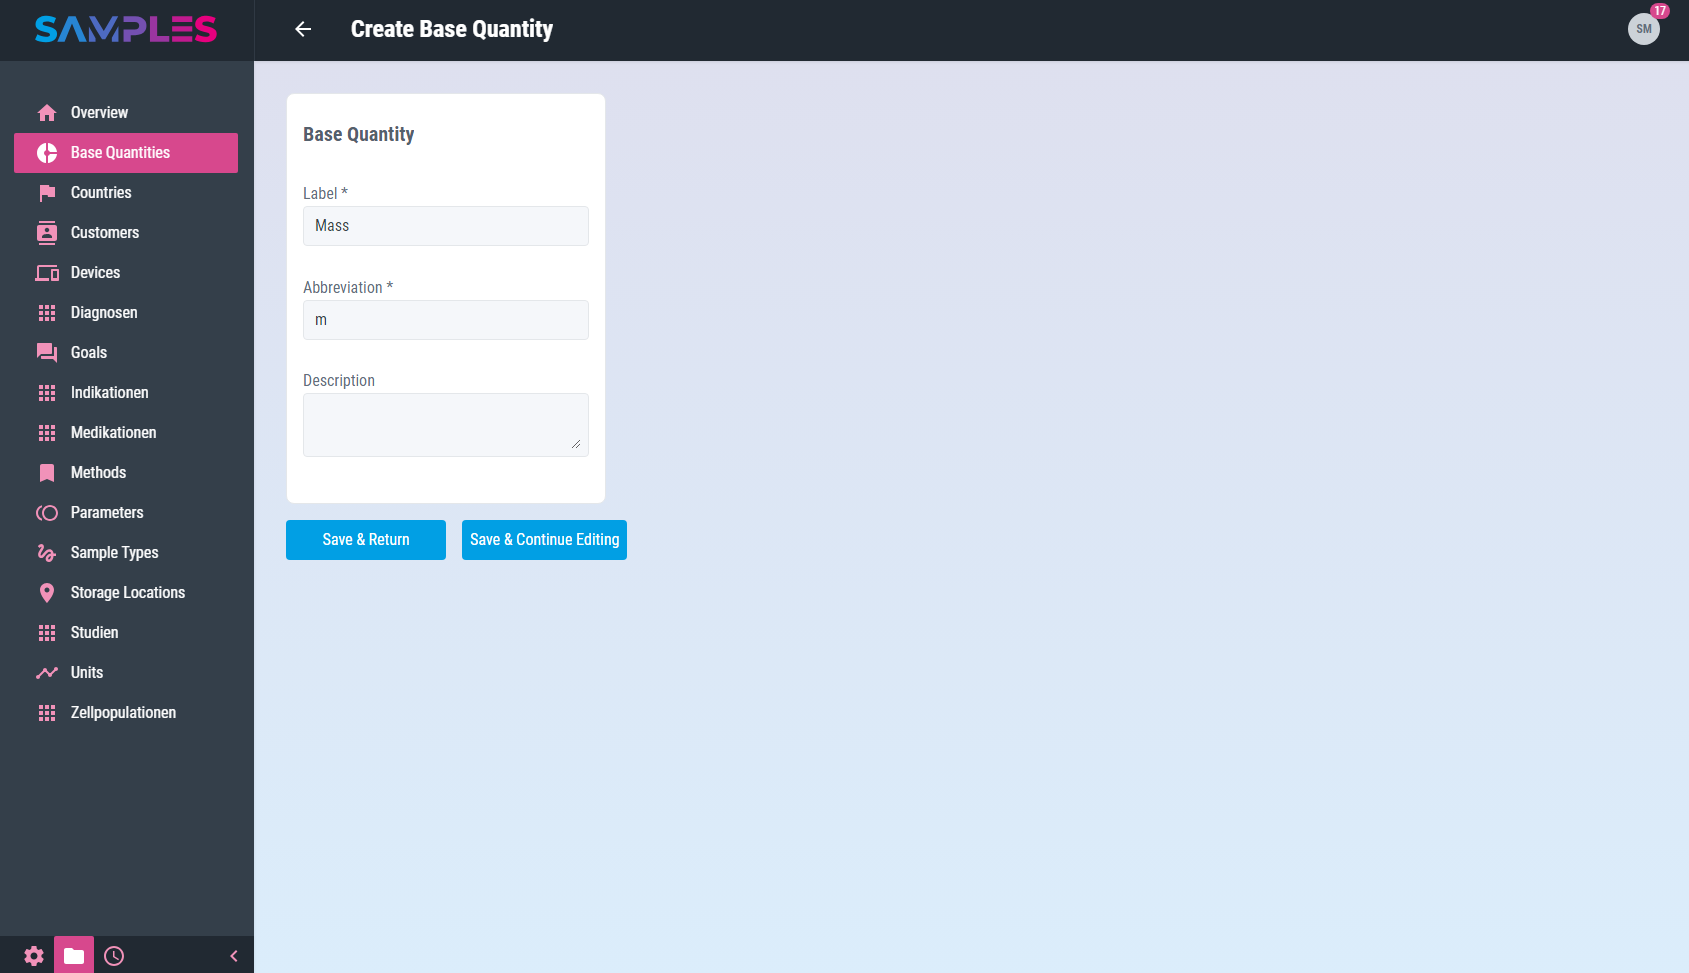
This includes:
| Input field | Meaning | Remarks |
|---|---|---|
Label |
Readable name of the base quantity |
unique mandatory information |
Abbreviation |
Short name to identify and reference the base quantity in other parts of the app |
unique mandatory information |
Description |
Technical description and meaning of the base quantity |
Only the click on the button Finish completes the assistant.
Your input is checked by the app for completeness and correctness before it is permanently saved. In case of errors in the input, a hint message is displayed and the corresponding input field is highlighted.
The time and editor of the input are recorded in the history of the new entry. Finally, the updated list of base quantities is opened again.
|
|
Related articles with additional content: |
Edit base quantity
To display and edit all information about a base quantity, call up the desired list entry by clicking on it in the Master Data / Base Quantities view.
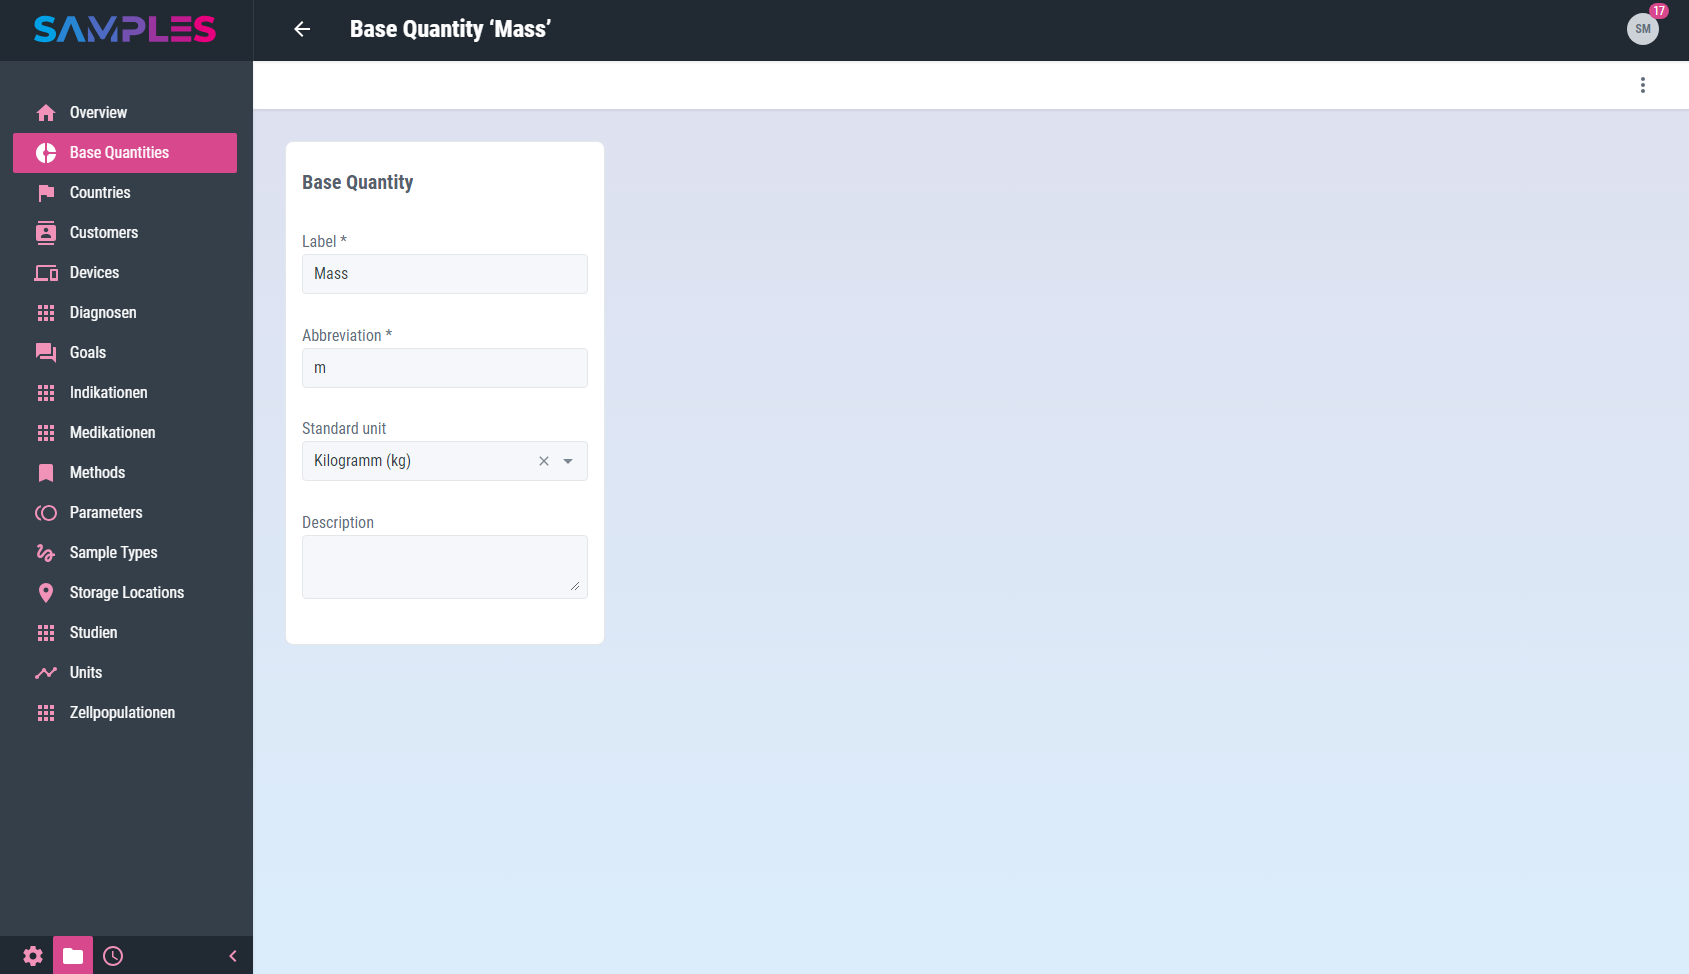
This opens the editing screen with the following information:
| Input field | Meaning | Remarks |
|---|---|---|
Label |
Readable name of the base quantity |
unique mandatory information |
Abbreviation |
Short name to identify and reference the base quantity in other parts of the app |
unique mandatory information |
Standard unit |
unit considered as the standard unit of this basic quantity |
Edit the selection list in Master Data / Units |
Description |
Technical description and meaning of the base quantity |
|
|
Your input is checked, processed and saved immediately. |
Any input errors are displayed as a message and the relevant input fields are highlighted accordingly. The time and the editor are recorded in the history of the entry.
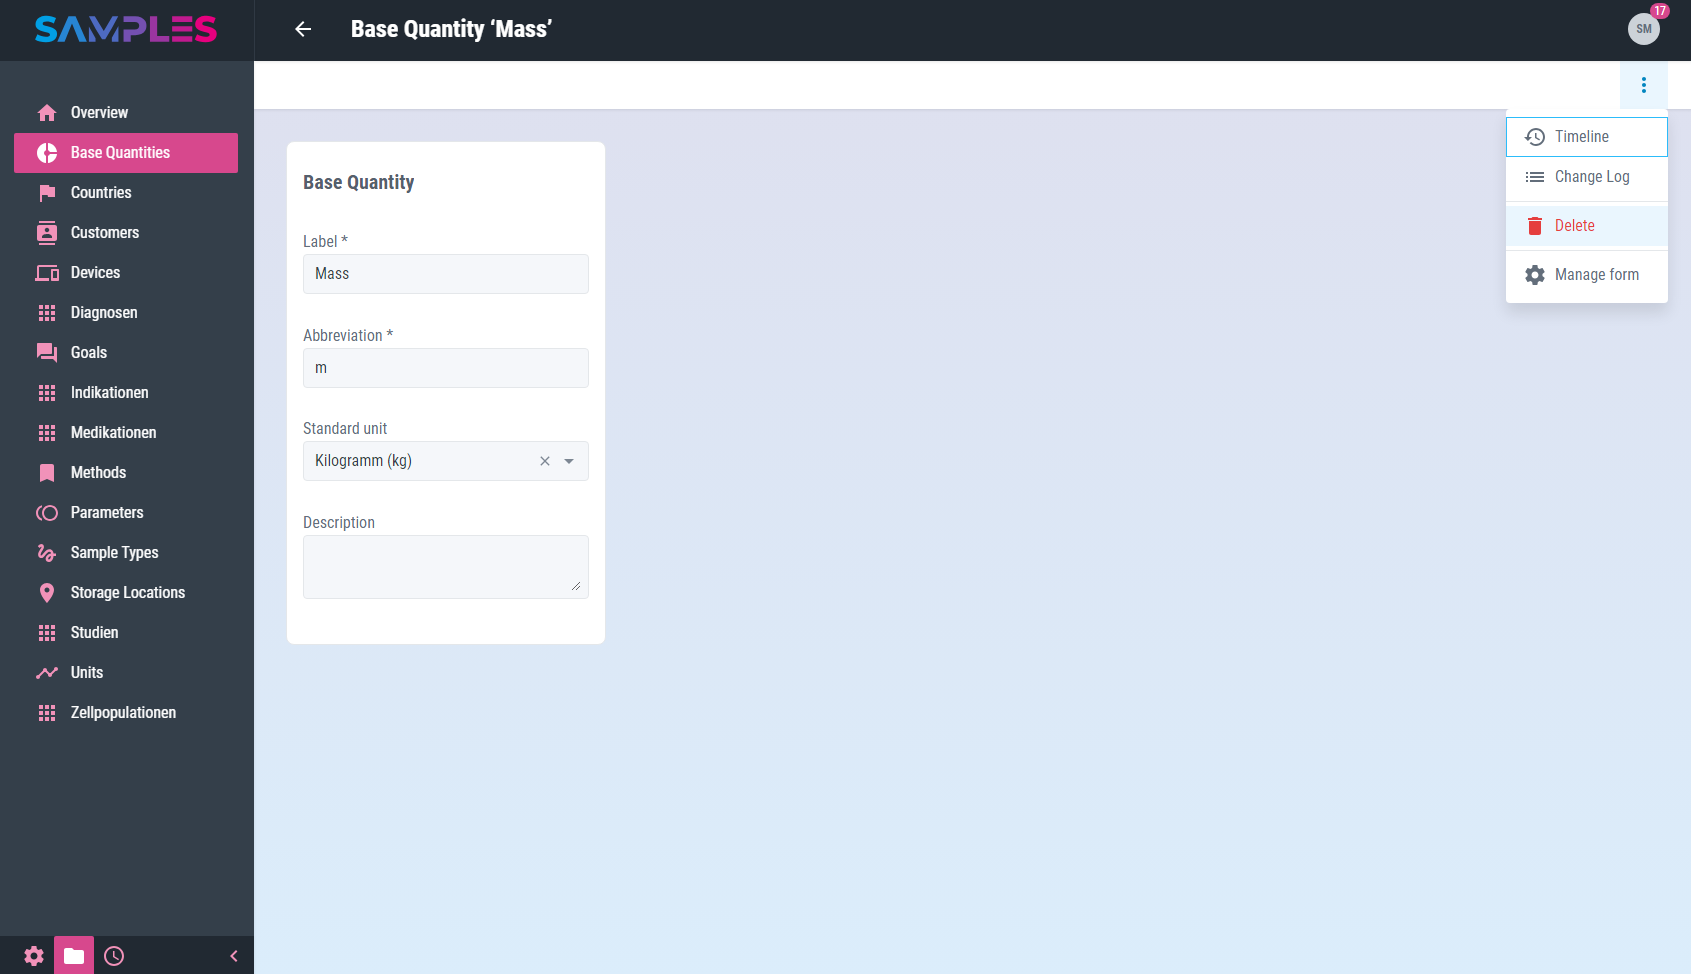
In the toolbar of the view you can find even more functions for editing base quantities:
- History
-
shows the editors and the time for the creation and last editing of the item
- Delete
-
removes the base quantity from the app’s memory
Calling the Back function in the toolbar closes the view and takes you back to the list view.
|
|
Related articles with additional content: |
Remove base quantity
To remove a base quantity, call the Delete entry function in the 3-dot-menu of the list item in the Master Data / Base Quantities view.
Alternatively, open the desired base quantity for editing and call the Delete function there in the 3-dot-menu of the toolbar.
In addition, it is also possible to remove several base quantities at the same time. To do this, select the list items to be removed in the Master Data / Base Quantities view and then call the Delete function in the 3-dot-menu of the toolbar.
In all 3 cases, a message is then displayed to confirm the action. Only after the confirmation of the user the removal of the selected item takes place.
|
|
The removal of a base quantity is not logged in the history and cannot be undone or retraced after confirmation. |
|
|
Related articles with additional content: |
Units
The assignment of a unit (or measurement unit) makes different measured values comparable in the first place and assigns them a technically relevant meaning.
With the help of base quantities, units of the same dimension can be converted into each other.
List and search units
A searchable listing of all available data about units can be found in view Master Data / Units.
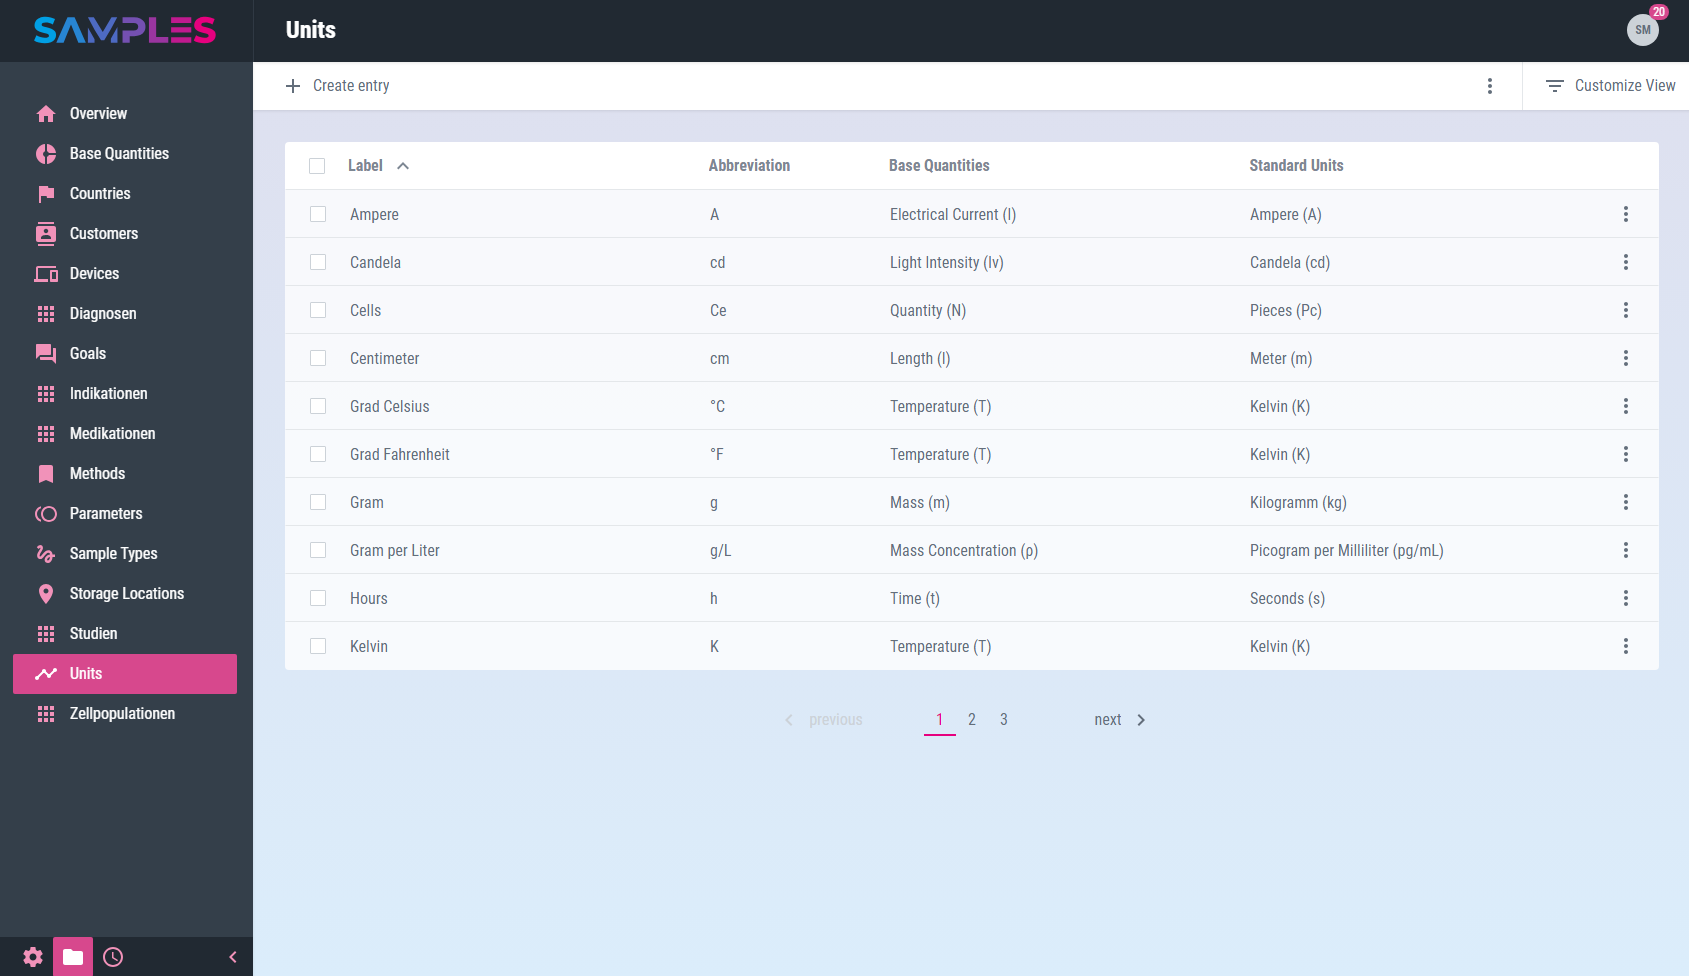
The listing contains information about:
| Title | Meaning |
|---|---|
Label |
Readable name of the unit |
Abbreviation |
Technical symbol and short name for identifying the unit |
Base Quantities |
Base quantities (or dimensions) to which this unit belongs |
Standard Units |
Standard units of the base quantities to which this unit belongs |
In the toolbar of the view you can find even more functions for processing units:
- Create entry
-
adds a new unit
- Reload list
-
updates the content of the listing
- Delete selected entries
-
removes the selected list entries
|
|
Related articles with additional content: |
Add new unit
To add a new unit open view Master Data / Units and call the function Create entry.
A wizard opens for entering all the necessary information for the new entry:
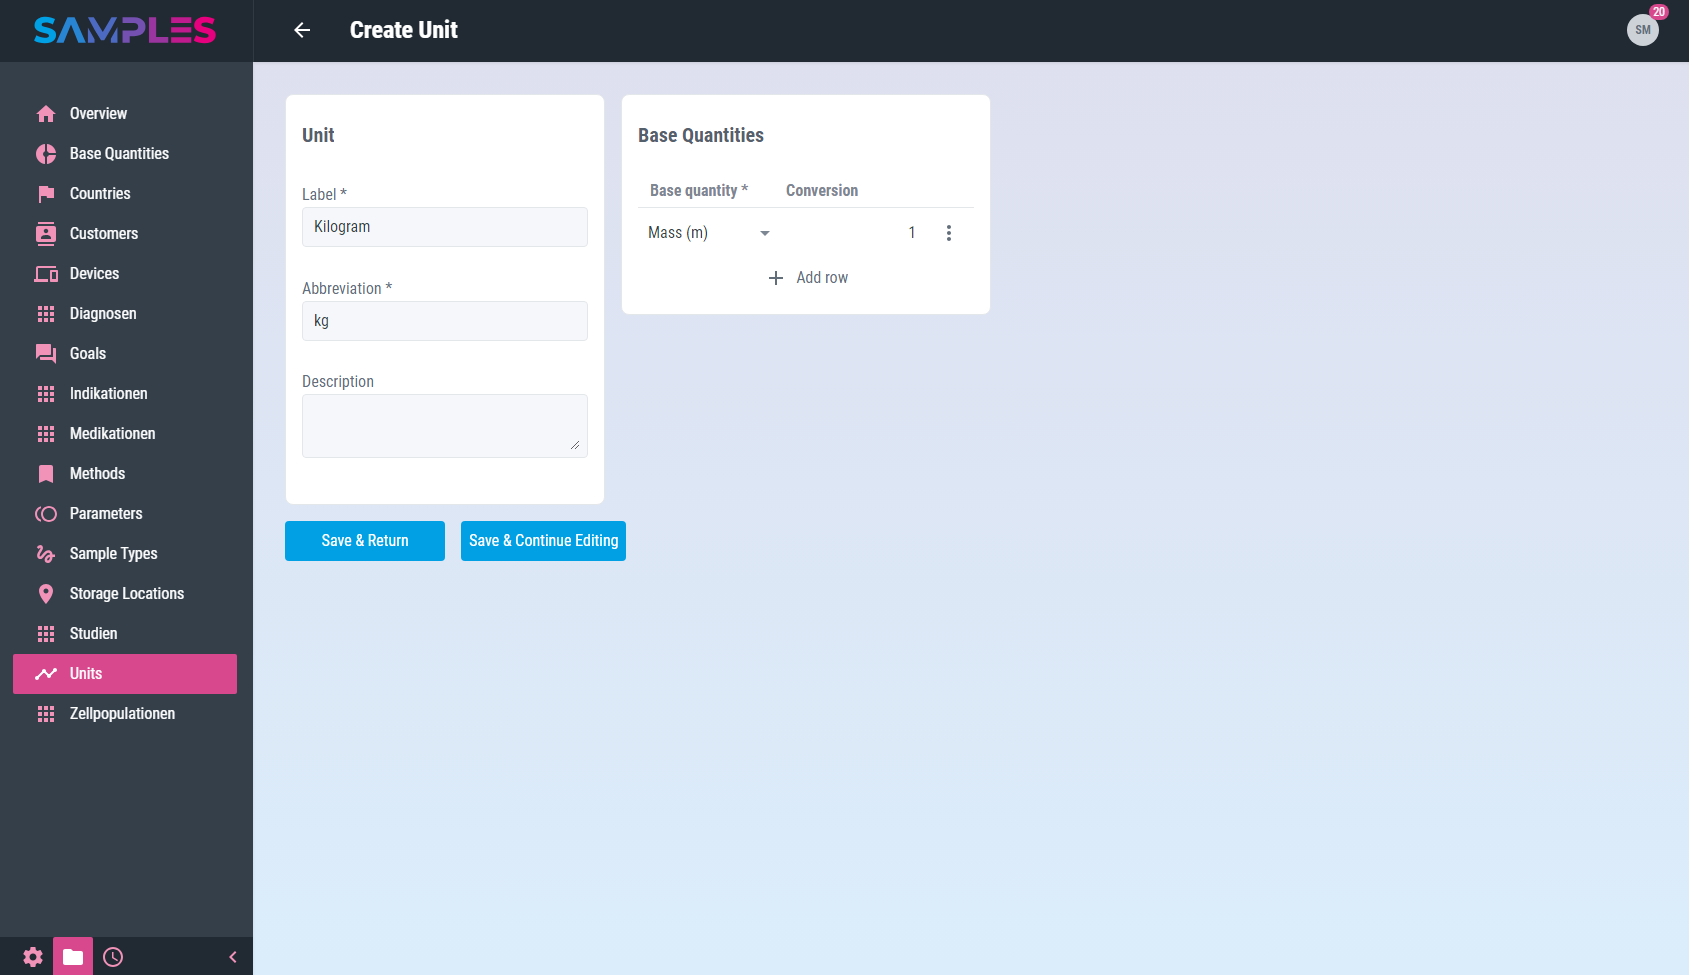
This includes:
| Input field | Meaning | Remarks |
|---|---|---|
Label |
Readable name of the unit |
unique mandatory information |
Abbreviation |
Technical symbol and short name for identifying the unit |
unique mandatory information |
Description |
Technical description and meaning of the unit |
|
Base quantity |
Base quantity (or dimension) to which this unit belongs |
Edit selection list in Master Data / Base Quantities |
Conversion |
Standard unit of the base quantity to which this unit belongs |
Only the click on the button Finish completes the assistant.
Your input is checked by the app for completeness and correctness before it is permanently saved. In case of errors in the input, a hint message is displayed and the corresponding input field is highlighted.
The time and editor of the input are recorded in the history of the new entry. Finally, the updated list of units is opened again.
|
|
Related articles with additional content: |
Edit unit
To display and edit all information about a unit, call up the desired list entry by clicking on it in the Master Data / Units view.
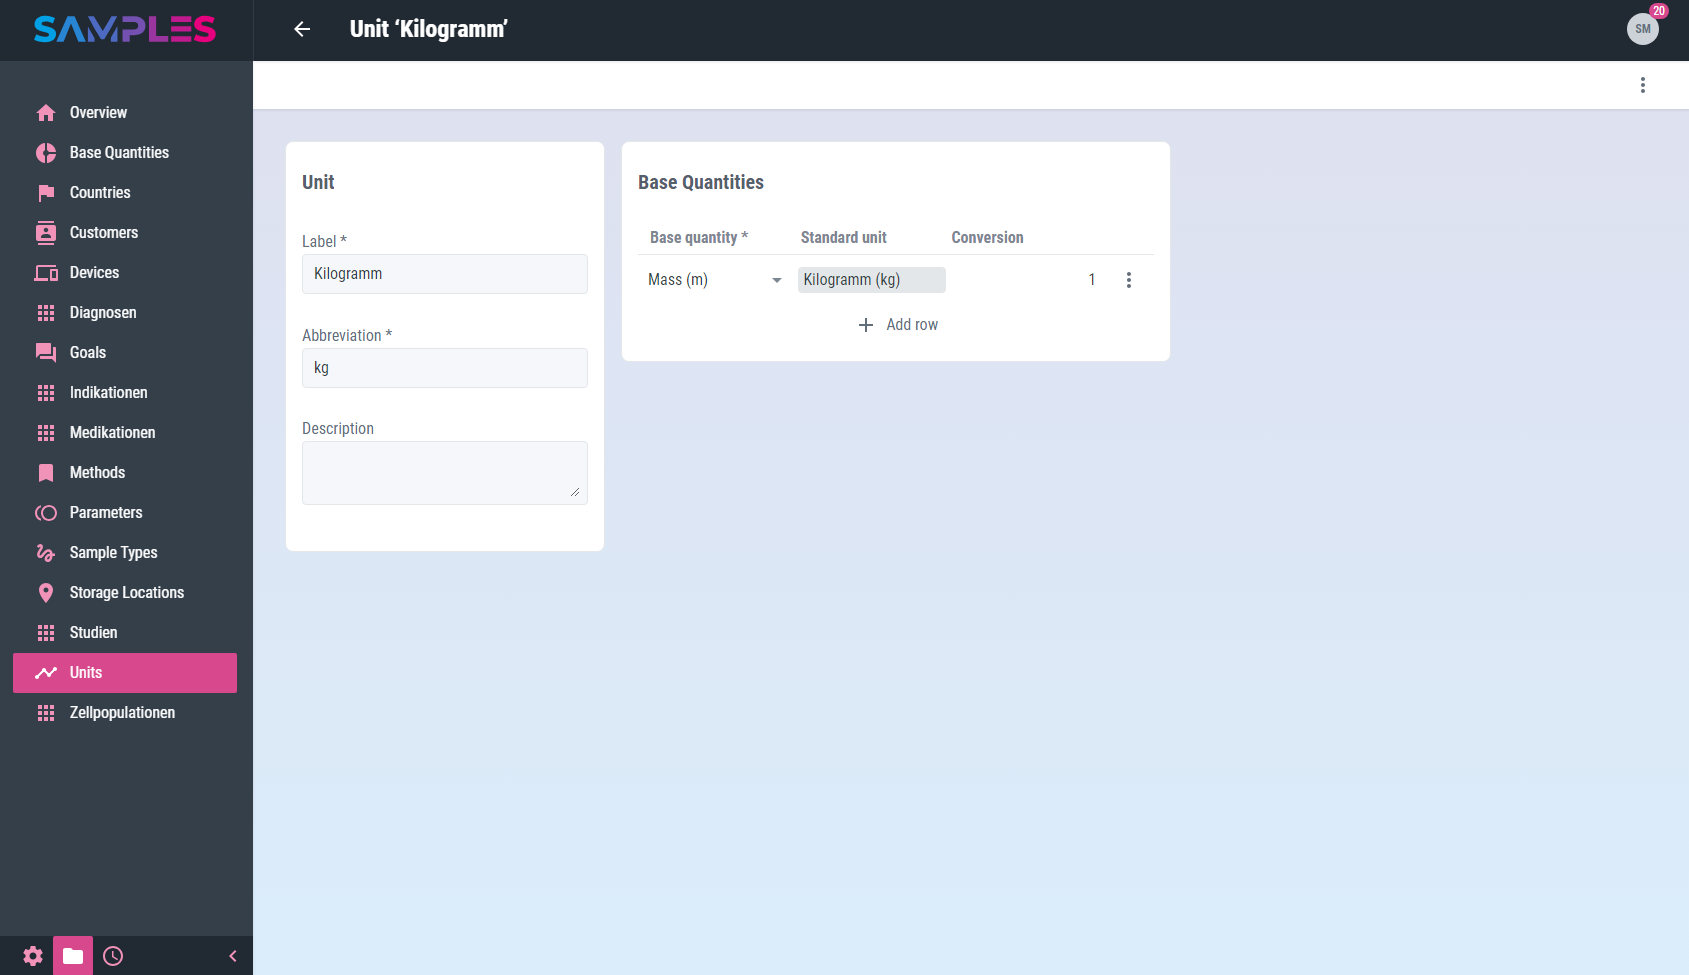
This opens the editing screen with the following information:
| Input field | Meaning | Remarks |
|---|---|---|
Label |
Readable name of the unit |
unique mandatory information |
Abbreviation |
Technical symbol and short name for identifying the unit |
unique mandatory information |
Description |
Technical description and meaning of the unit |
|
Base quantity |
Base quantity (or dimension) to which this unit belongs |
Edit selection list in Master Data / Base Quantities |
Standard unit |
Standard unit of the base quantity |
read-only |
Conversion |
Standard unit of the base quantity to which this unit belongs |
|
|
Your input is checked, processed and saved immediately. |
Any input errors are displayed as a message and the relevant input fields are highlighted accordingly. The time and the editor are recorded in the history of the entry.
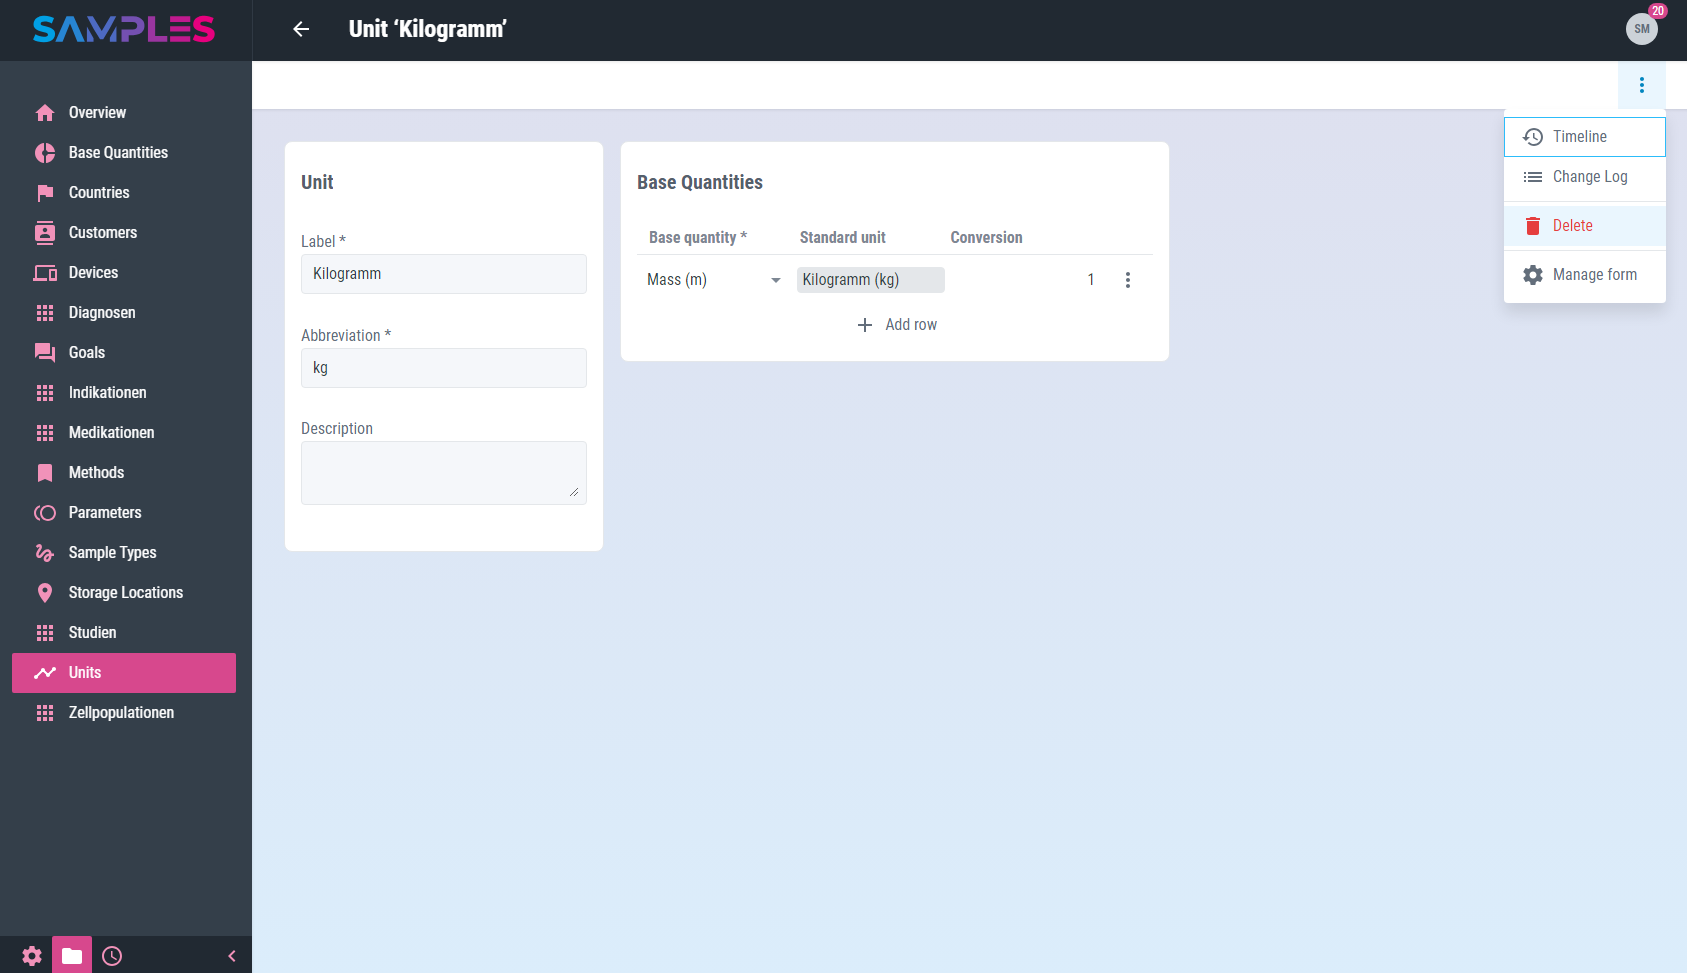
In the toolbar of the view you can find even more functions for editing units:
- History
-
shows the editors and the time for the creation and last editing of the item
- Delete
-
removes the unit from the app’s memory
Calling the Back function in the toolbar closes the view and takes you back to the list view.
|
|
Related articles with additional content: |
Remove unit
To remove a unit, call the Delete entry function in the 3-dot-menu of the list item in the Routine / Units view.
Alternatively, open the desired unit for editing and call the Delete function there in the 3-dot-menu of the toolbar.
In addition, it is also possible to remove several units at the same time. To do this, select the list items to be removed in the Routine / Units view and then call the Delete function in the 3-dot-menu of the toolbar.
In all 3 cases, a message is then displayed to confirm the action. Only after the confirmation of the user the removal of the selected item takes place.
|
|
The removal of a unit is not logged in the history and cannot be undone or retraced after confirmation. |
|
|
Related articles with additional content: |
Parameters
In the daily laboratory routine, frequently used test results of a sample (e.g. input values, settings, measurement or analysis results) to be measured under specific conditions are defined as parameters.
Clearly defined data types and units make parameter values comparable. SOPs, standards and guidelines define the technical framework for measurement.
List and search parameters
A searchable listing of all available data about parameters can be found in view Master Data / Parameters.
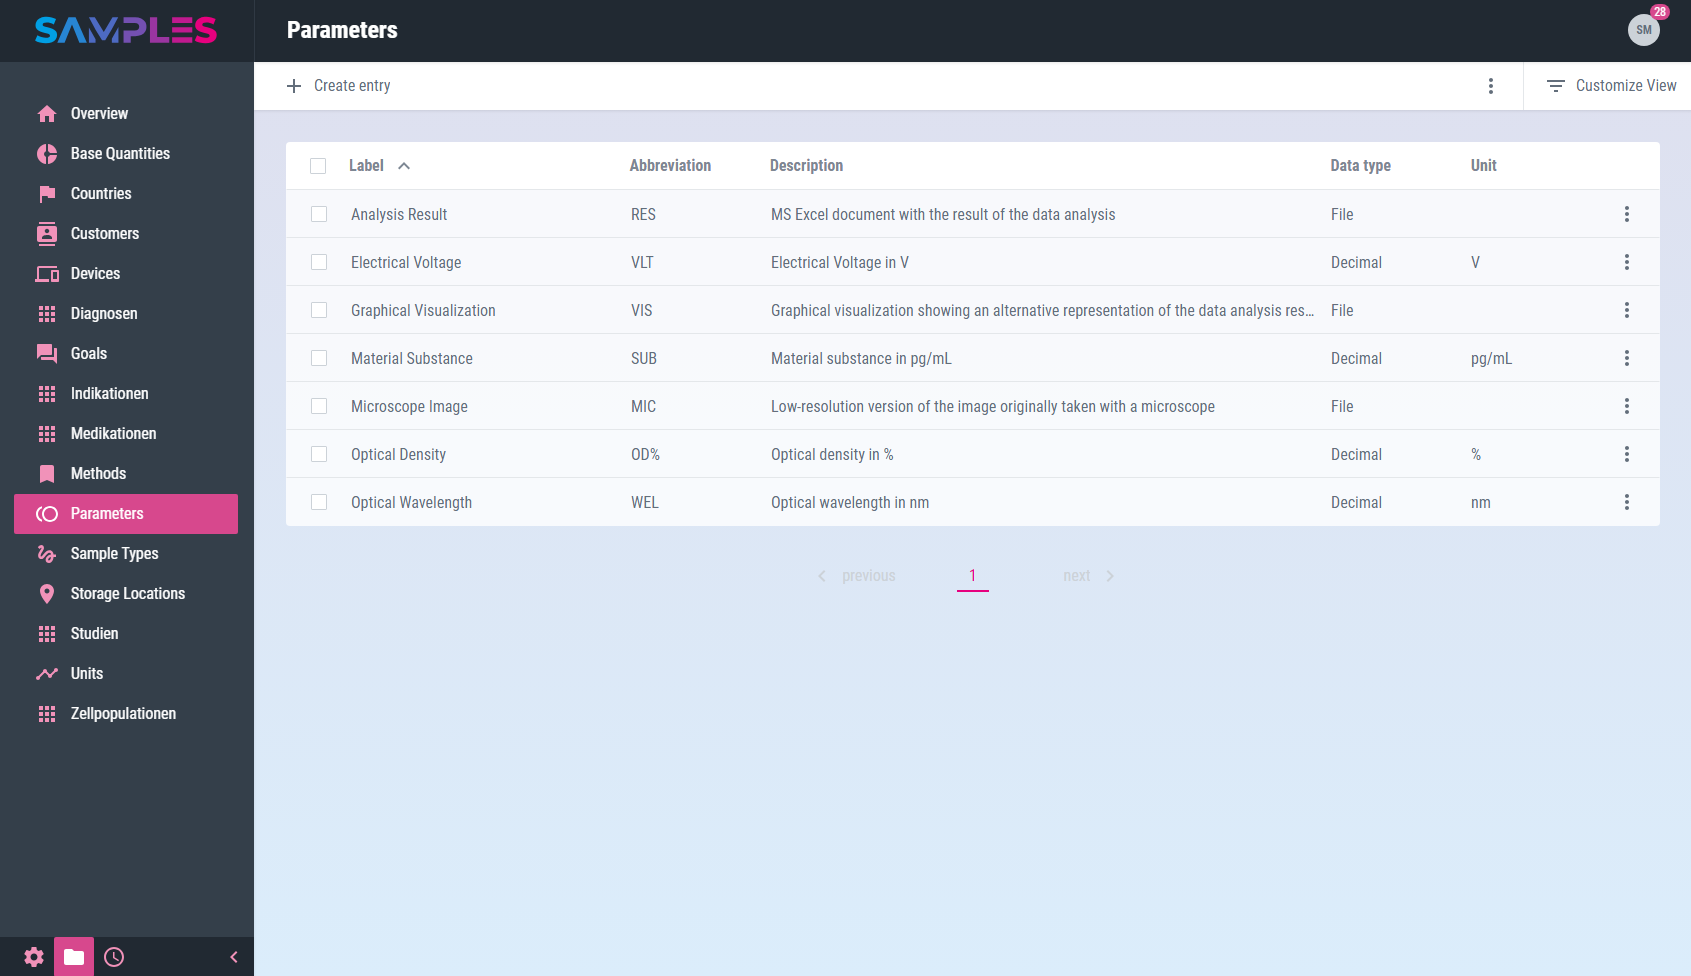
The listing contains information about:
| Title | Meaning |
|---|---|
Label |
Readable name of the parameter |
Abbreviation |
Short name to identify and reference the parameter in other parts of the app |
Description |
Technical description and meaning of the parameter |
Data type |
Technical form and content of values of this parameter |
Unit |
Commonly used unit for values of this parameter |
In the toolbar of the view you can find even more functions for processing parameters:
- Create entry
-
adds a new parameter
- Reload list
-
updates the content of the listing
- Delete selected entries
-
removes the selected list entries
|
|
Related articles with additional content: |
Add new parameter
To add a new parameter open view Master Data / Parameters and call the function Create entry.
A wizard opens for entering all the necessary information for the new entry:
This includes:
| Input field | Meaning | Remarks |
|---|---|---|
Label |
Readable name of the parameter |
unique mandatory information |
Abbreviation |
Short name to identify and reference the parameter in other parts of the app |
unique mandatory information |
Description |
Technical description and meaning of the parameter |
|
Data type |
Technical form and content of values of this parameter |
mandatory information, see Data types for parameters for details |
Unit |
Commonly used unit for values of this parameter |
optional, depending on selected data type, input, edit selection list in Master Data / Units |
Only the click on the button Finish completes the assistant.
Your input is checked by the app for completeness and correctness before it is permanently saved. In case of errors in the input, a hint message is displayed and the corresponding input field is highlighted.
The time and editor of the input are recorded in the history of the new entry. Finally, the updated list of parameters is opened again.
|
|
Related articles with additional content: |
Edit parameter
To display and edit all information about a parameter, call up the desired list entry by clicking on it in the Master Data / Parameters view.
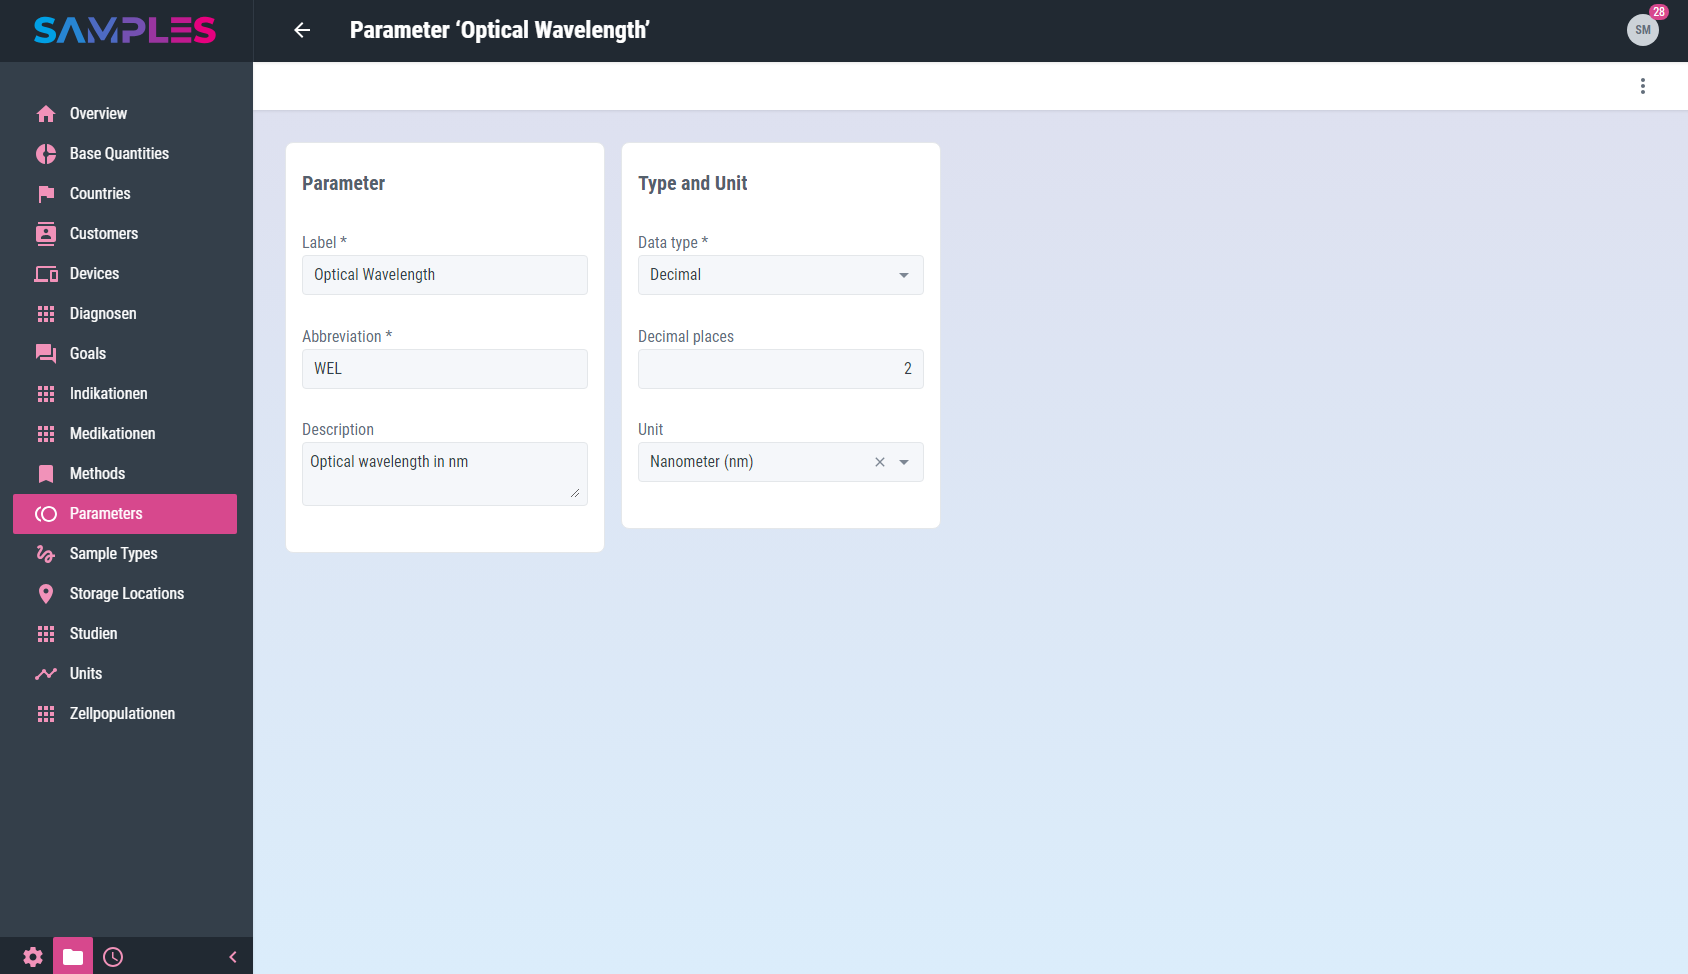
This opens the editing screen with the following information:
| Input field | Meaning | Remarks |
|---|---|---|
Label |
Readable name of the parameter |
unique mandatory information |
Abbreviation |
Short name to identify and reference the parameter in other parts of the app |
unique mandatory information |
Description |
Technical description and meaning of the parameter |
|
Data type |
Technical form and content of values of this parameter |
mandatory information, see Data types for parameters for details |
Unit |
Commonly used unit for values of this parameter |
optional, depending on selected data type, input, edit selection list in Master Data / Units |
|
|
Your input is checked, processed and saved immediately. |
Any input errors are displayed as a message and the relevant input fields are highlighted accordingly. The time and the editor are recorded in the history of the entry.
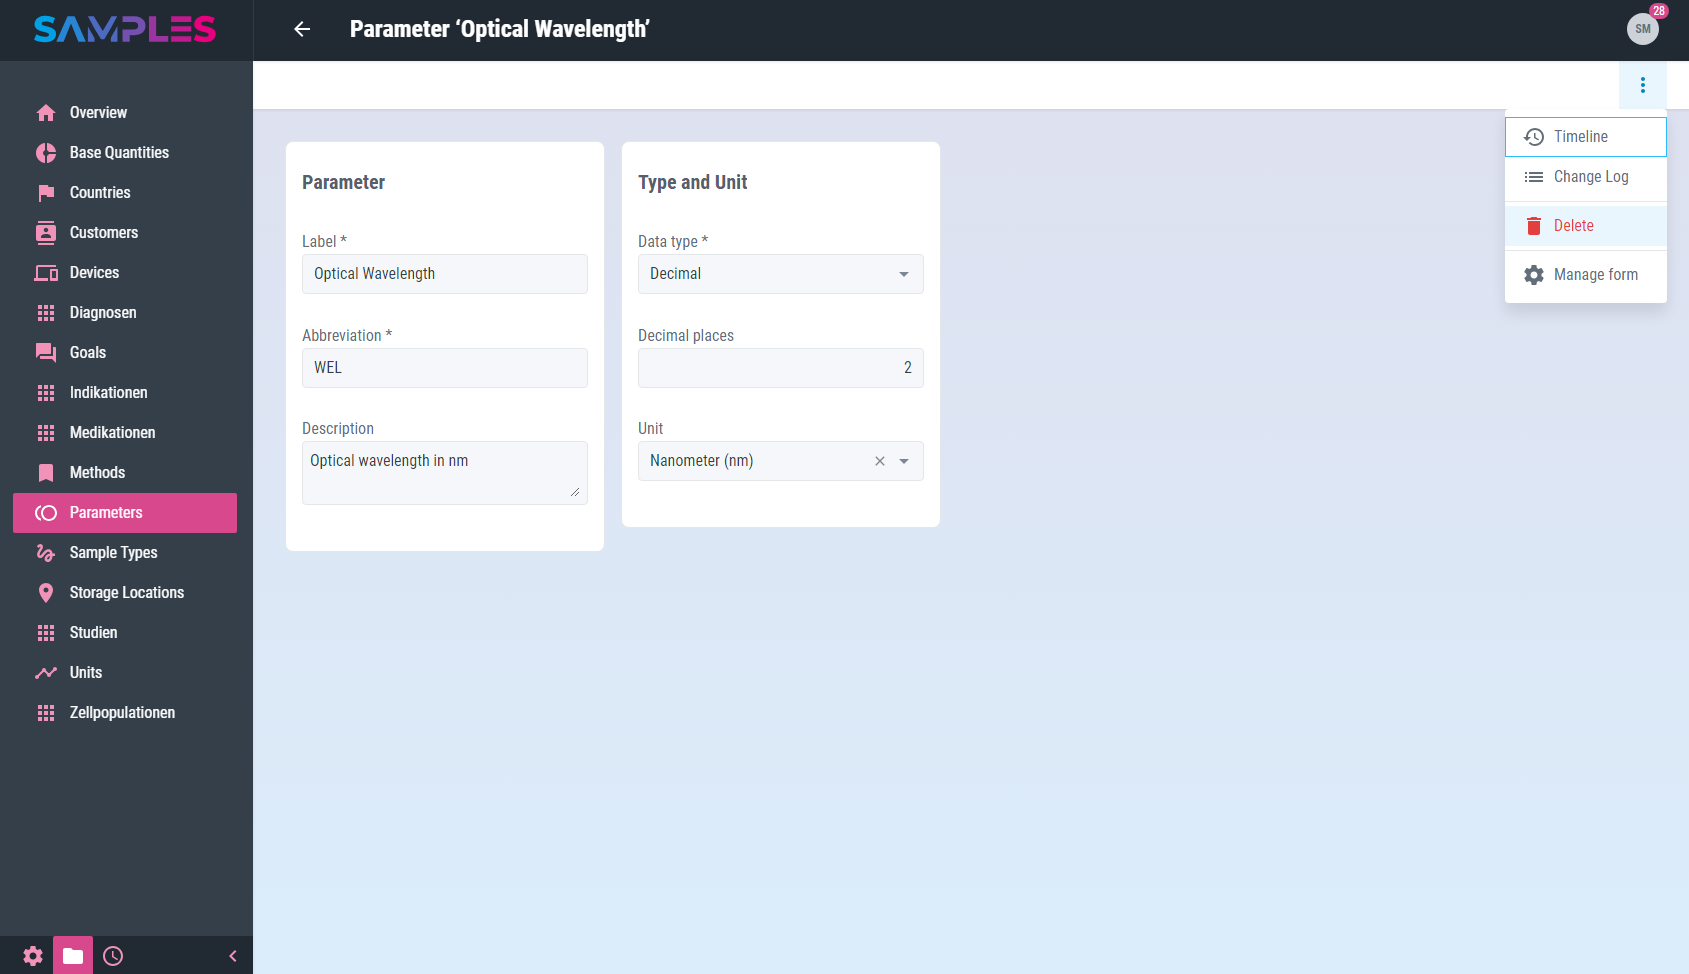
In the toolbar of the view you can find even more functions for editing parameters:
- History
-
shows the editors and the time for the creation and last editing of the item
- Delete
-
removes the parameter from the app’s memory
Calling the Back function in the toolbar closes the view and takes you back to the list view.
|
|
Related articles with additional content: |
Data types for parameters
Each parameter can store and represent very different values. The data type of a parameter is a technical specification for what kind of information can be stored in it. Users of SAMPLES can use parameters with the following data types:
| Data type | Meaning |
|---|---|
Text |
simple Text, e.g. "high strength |
Integer |
integer (natural) numbers, e.g. "314" |
Decimal |
Numbers in decimal notation, e.g. "3.14" |
Yes/No |
two-valued (boolean) Yes/No-decisions |
File |
File attachments, e.g. images or documents with analysis results |
Table |
Tabular content |
Custom catalog |
exact values selected from user-defined catalogs |
Remove parameter
To remove a parameter, call the Delete entry function in the 3-dot-menu of the list item in the Master Data / Parameters view.
Alternatively, open the desired parameter for editing and call the Delete function there in the 3-dot-menu of the toolbar.
In addition, it is also possible to remove several parameters at the same time. To do this, select the list items to be removed in the Master Data / Parameters view and then call the Delete function in the 3-dot-menu of the toolbar.
In all 3 cases, a message is then displayed to confirm the action. Only after the confirmation of the user the removal of the selected item takes place.
|
|
The removal of a parameter is not logged in the history and cannot be undone or retraced after confirmation. |
|
|
Related articles with additional content: |
Methods
Once work instructions have been proven through numerous experiments and have reached the level of maturity required by organisational standards and guidelines, they are described as methods (also procedures) for the daily laboratory routine.
A method bundles a series of successive work steps with instructions and parameters.
List and search methods
A searchable listing of all available data about methods can be found in view Master Data / Methods.
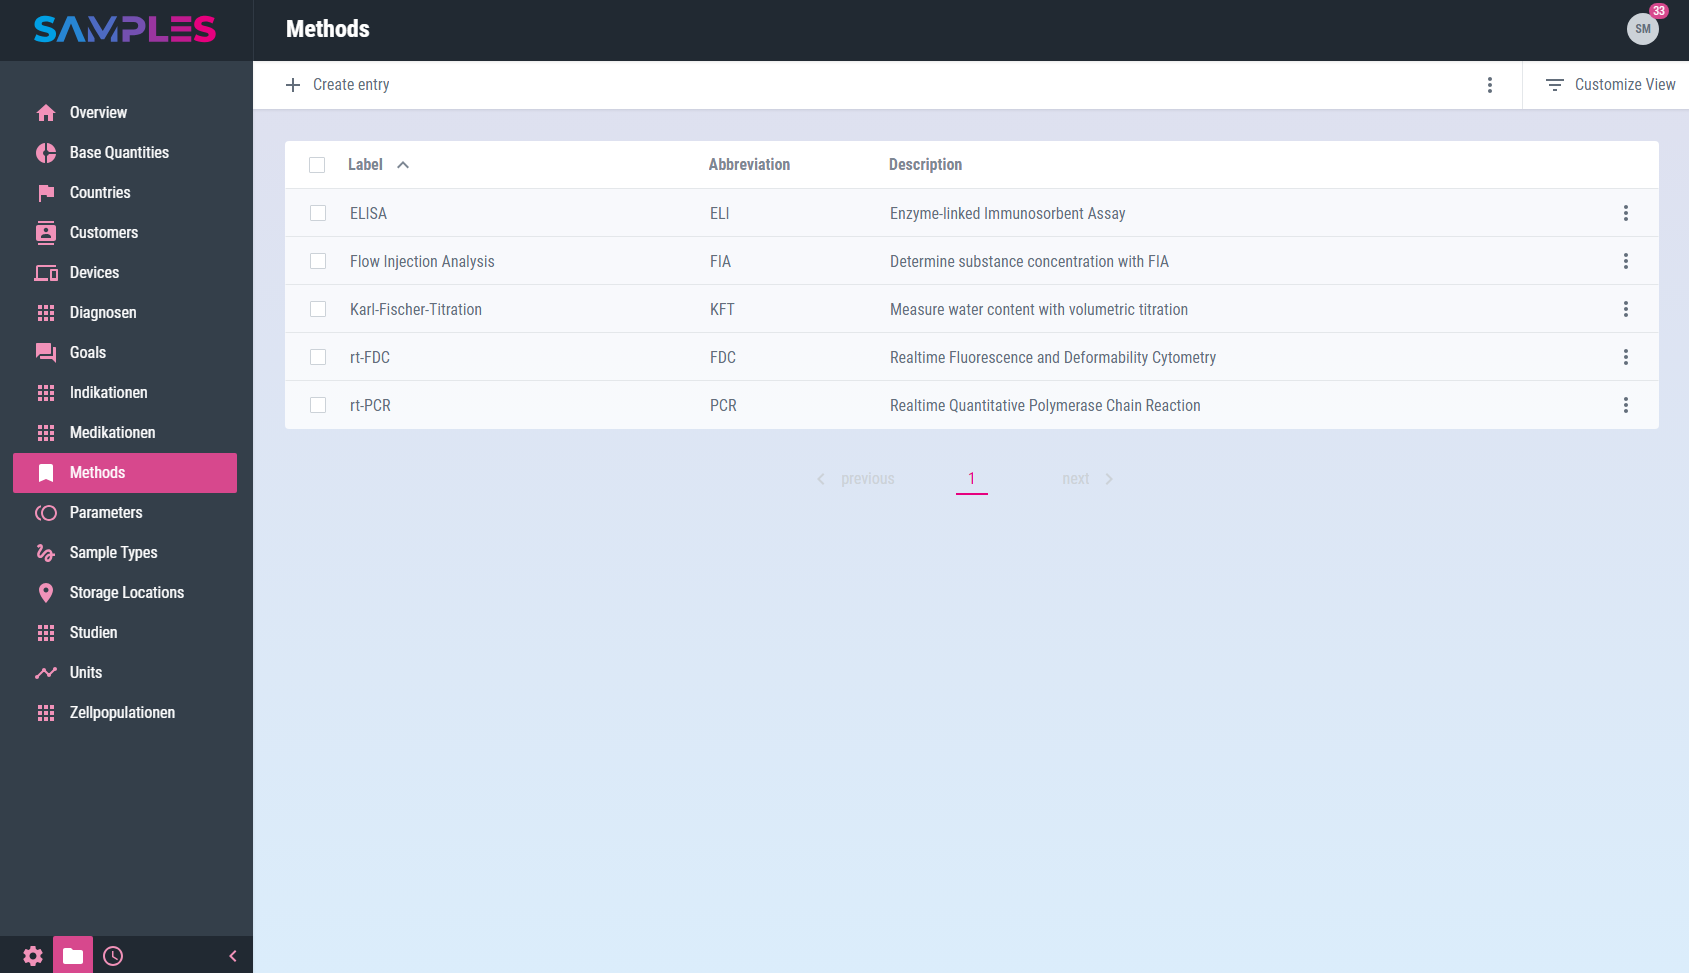
The listing contains information about:
| Title | Meaning |
|---|---|
Label |
Readable name of the method |
Abbreviation |
Short name to identify and reference the method in other parts of the app |
Description |
Technical description and meaning of the method |
In the toolbar of the view you can find even more functions for processing methods:
- Create entry
-
adds a new method
- Reload list
-
updates the content of the listing
- Delete selected entries
-
removes the selected list entries
|
|
Related articles with additional content: |
Add new method
To add a new method open view Master Data / Methods and call the function Create entry.
A wizard opens for entering all the necessary information for the new entry:
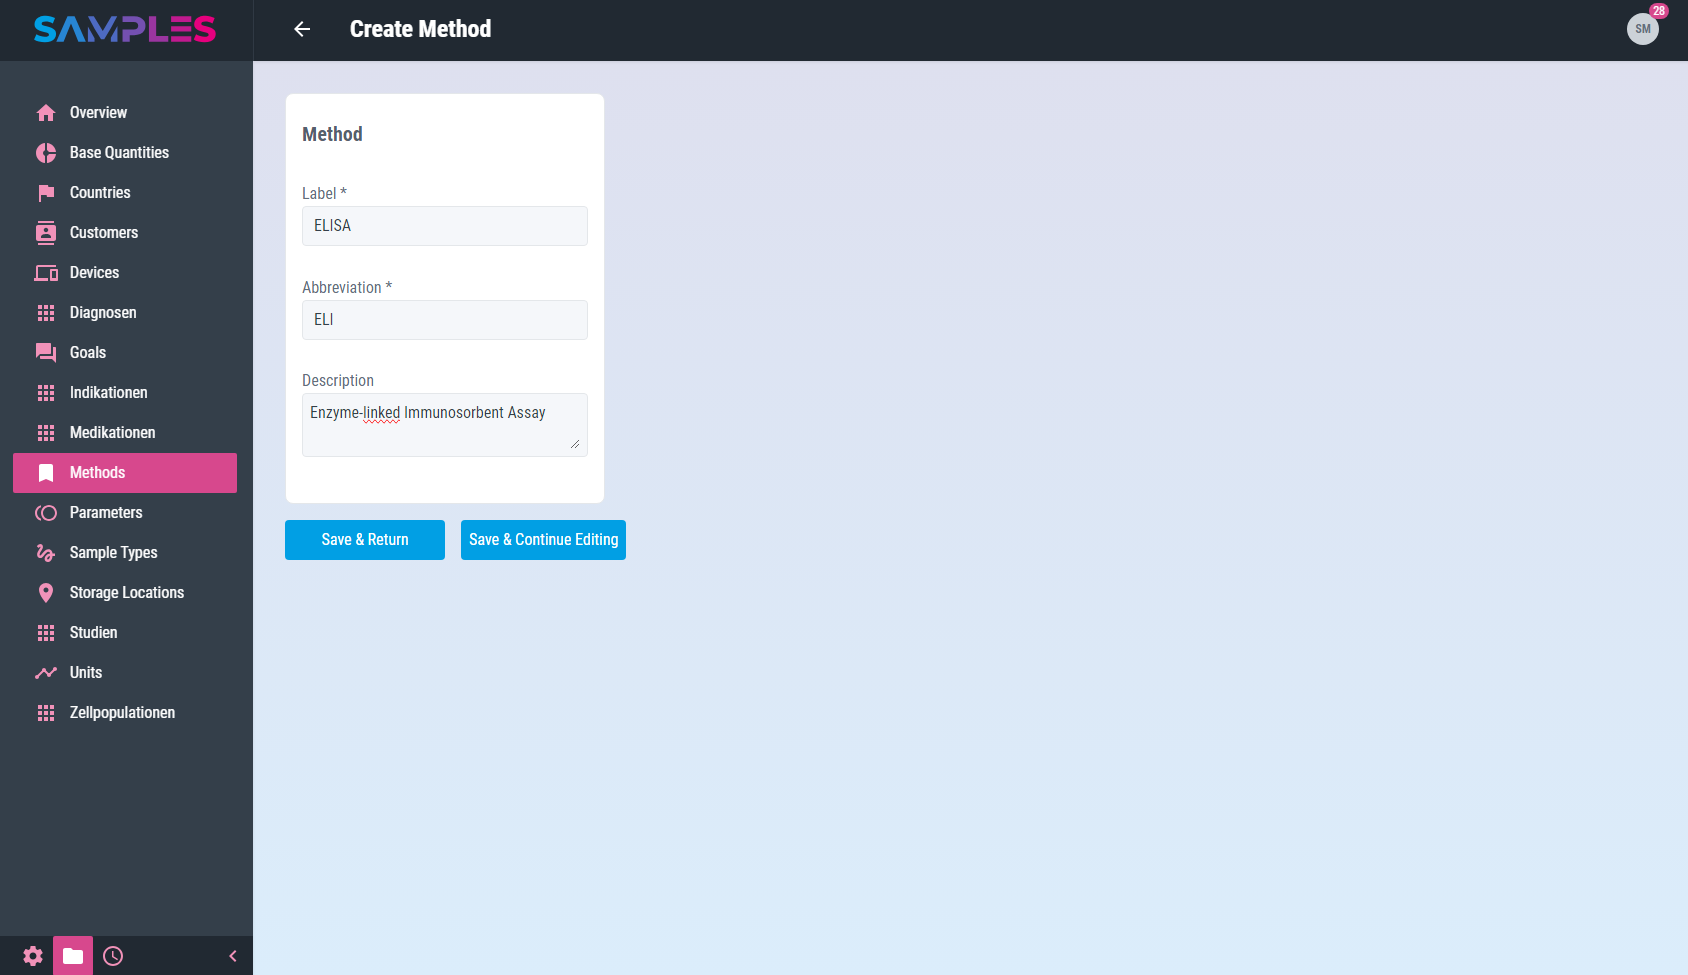
This includes:
| Input field | Meaning | Remarks |
|---|---|---|
Label |
Readable name of the method |
unique mandatory information |
Abbreviation |
Short name to identify and reference the method in other parts of the app |
unique mandatory information |
Only the click on the button Finish completes the assistant.
Your input is checked by the app for completeness and correctness before it is permanently saved. In case of errors in the input, a hint message is displayed and the corresponding input field is highlighted.
The time and editor of the input are recorded in the history of the new entry. Finally, the updated list of methods is opened again.
|
|
Related articles with additional content: |
Edit method
To display and edit all information about a method, call up the desired list entry by clicking on it in the Master Data / Methods view.
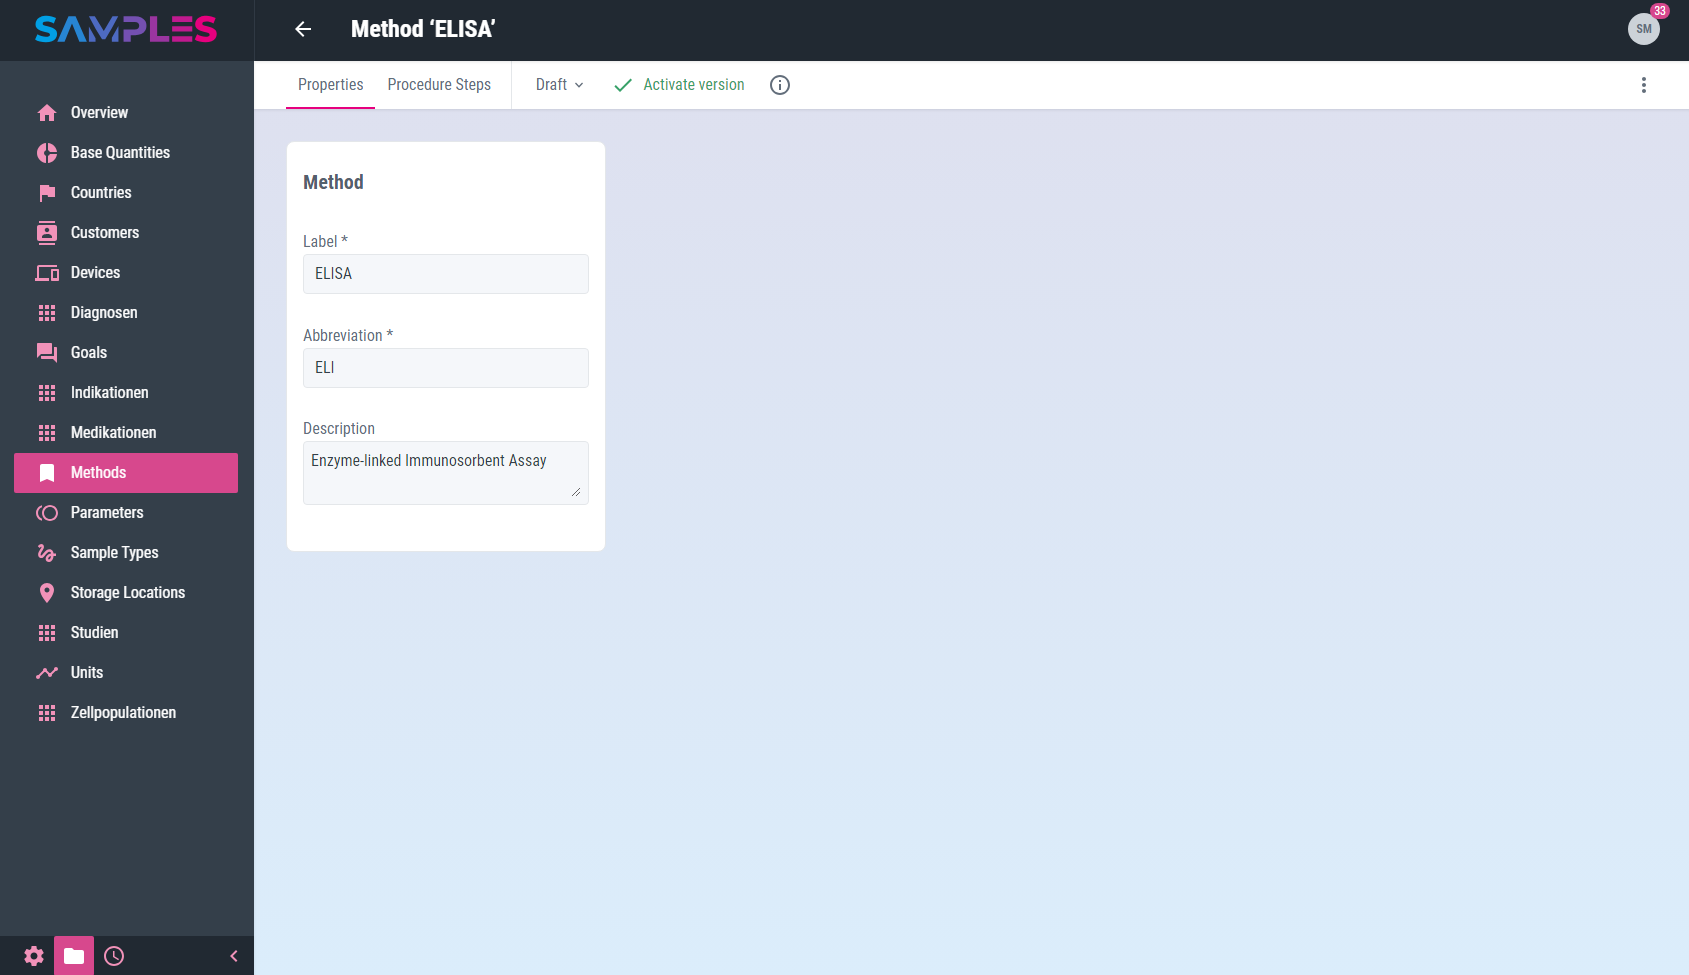
This opens the editing screen with the following information:
| Input field | Meaning | Remarks |
|---|---|---|
Label |
Readable name of the method |
unique mandatory information |
Abbreviation |
Short name to identify and reference the method in other parts of the app |
unique mandatory information |
Description |
Technical description and meaning of the method |
|
|
Your input is checked, processed and saved immediately. |
Any input errors are displayed as a message and the relevant input fields are highlighted accordingly. The time and the editor are recorded in the history of the entry.
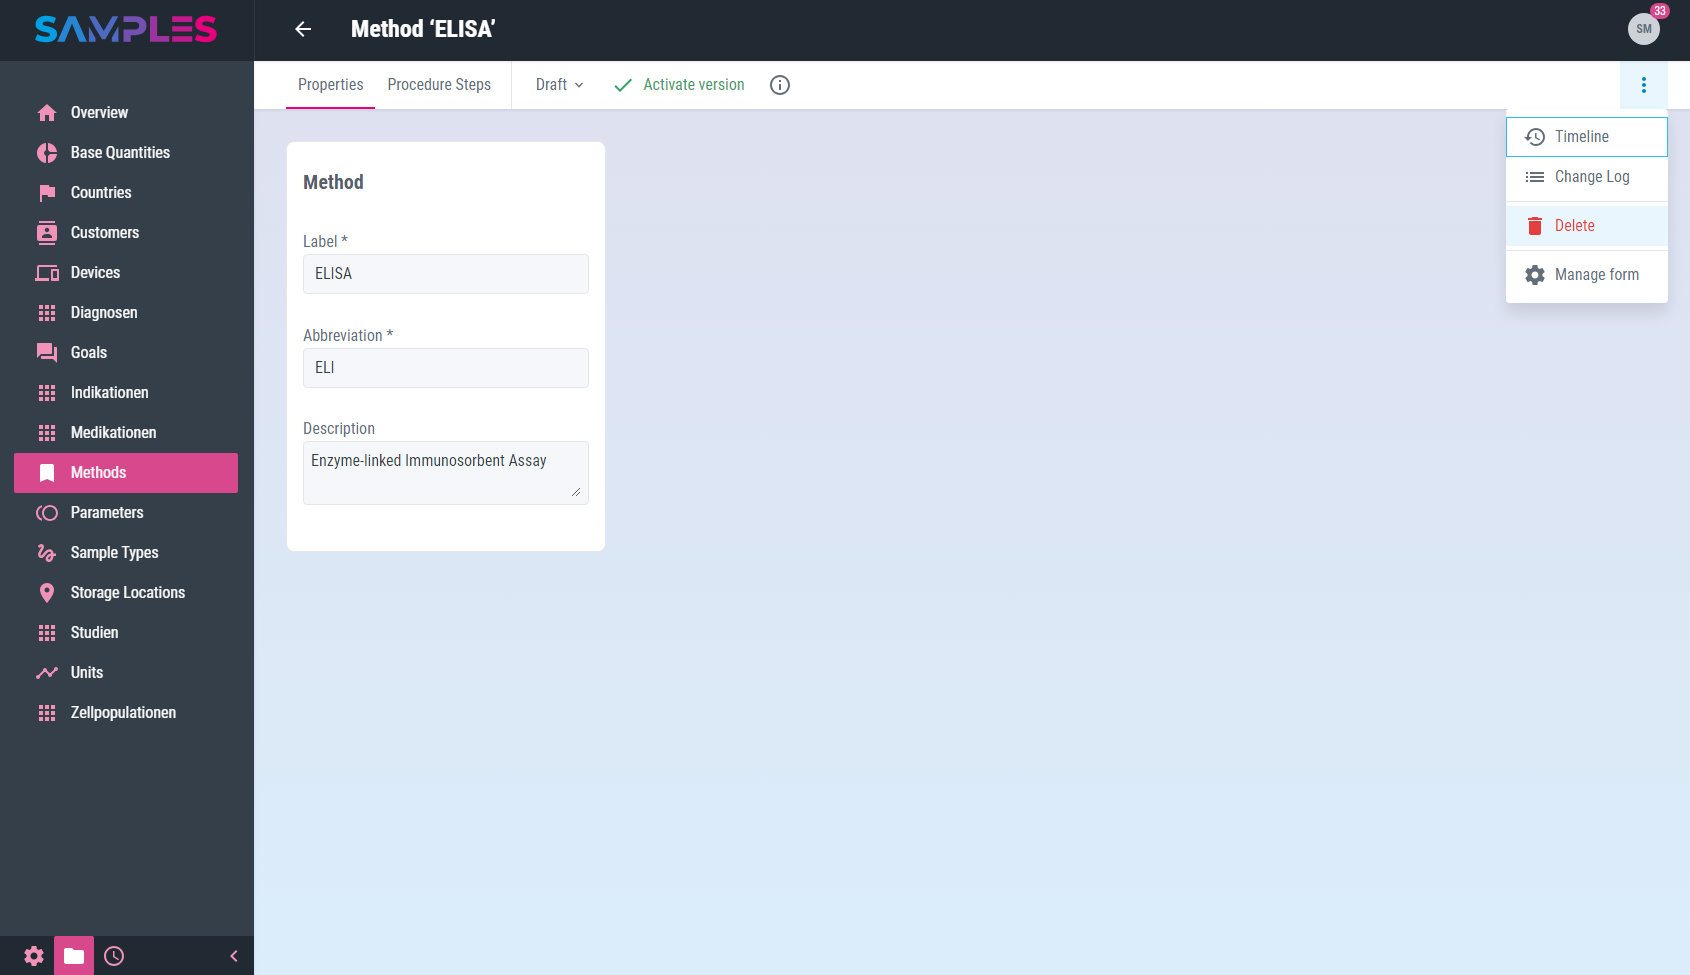
In the toolbar of the view you can find even more functions for editing methods:
- History
-
shows the editors and the time for the creation and last editing of the item
- Delete
-
removes the method from the app’s memory
Calling the Back function in the toolbar closes the view and takes you back to the list view.
|
|
Related articles with additional content: |
Remove method
To remove a method, call the Delete entry function in the 3-dot-menu of the list item in the Master Data / Methods view.
Alternatively, open the desired method for editing and call the Delete function there in the 3-dot-menu of the toolbar.
In addition, it is also possible to remove several methods at the same time. To do this, select the list items to be removed in the Master Data / Methods view and then call the Delete function in the 3-dot-menu of the toolbar.
In all 3 cases, a message is then displayed to confirm the action. Only after the confirmation of the user the removal of the selected item takes place.
|
|
The removal of a method is not logged in the history and cannot be undone or retraced after confirmation. |
|
|
Related articles with additional content: |
Goals
For the definition of complex processes or service requests by external clients, methods can be combined into goals (also examination objectives).
List and search goals
A searchable listing of all available data about goals can be found in view Master Data / Goals.

The listing contains information about:
| Title | Meaning |
|---|---|
Label |
Readable name of the goal |
Abbreviation |
Short name to identify and reference the goal in other parts of the app |
Description |
Technical description and meaning of the goal |
In the toolbar of the view you can find even more functions for processing goals:
- Create entry
-
adds a new goal
- Reload list
-
updates the content of the listing
- Delete selected entries
-
removes the selected list entries
|
|
Related articles with additional content: |
Add new goal
To add a new goal open view Master Data / Goals and call the function Create entry.
A wizard opens for entering all the necessary information for the new entry:
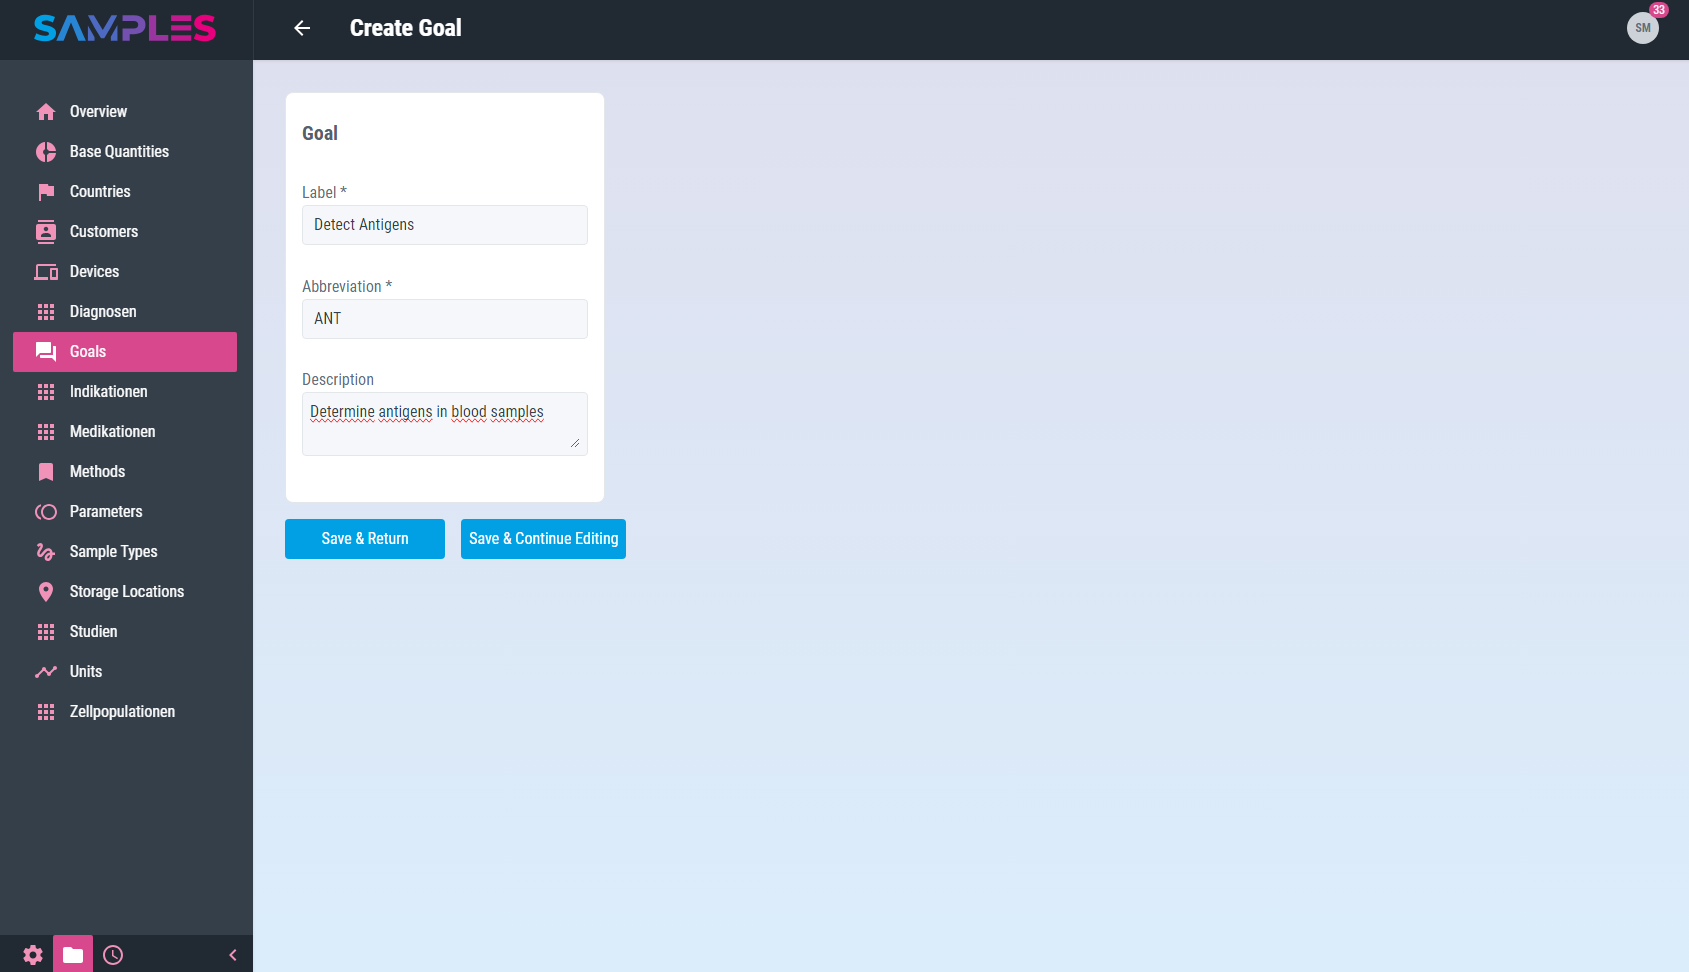
This includes:
| Input field | Meaning | Remarks |
|---|---|---|
Label |
Readable name of the goal |
unique mandatory information |
Abbreviation |
Short name to identify and reference the goal in other parts of the app |
unique mandatory information |
Only the click on the button Finish completes the assistant.
Your input is checked by the app for completeness and correctness before it is permanently saved. In case of errors in the input, a hint message is displayed and the corresponding input field is highlighted.
The time and editor of the input are recorded in the history of the new entry. Finally, the updated list of goals is opened again.
|
|
Related articles with additional content: |
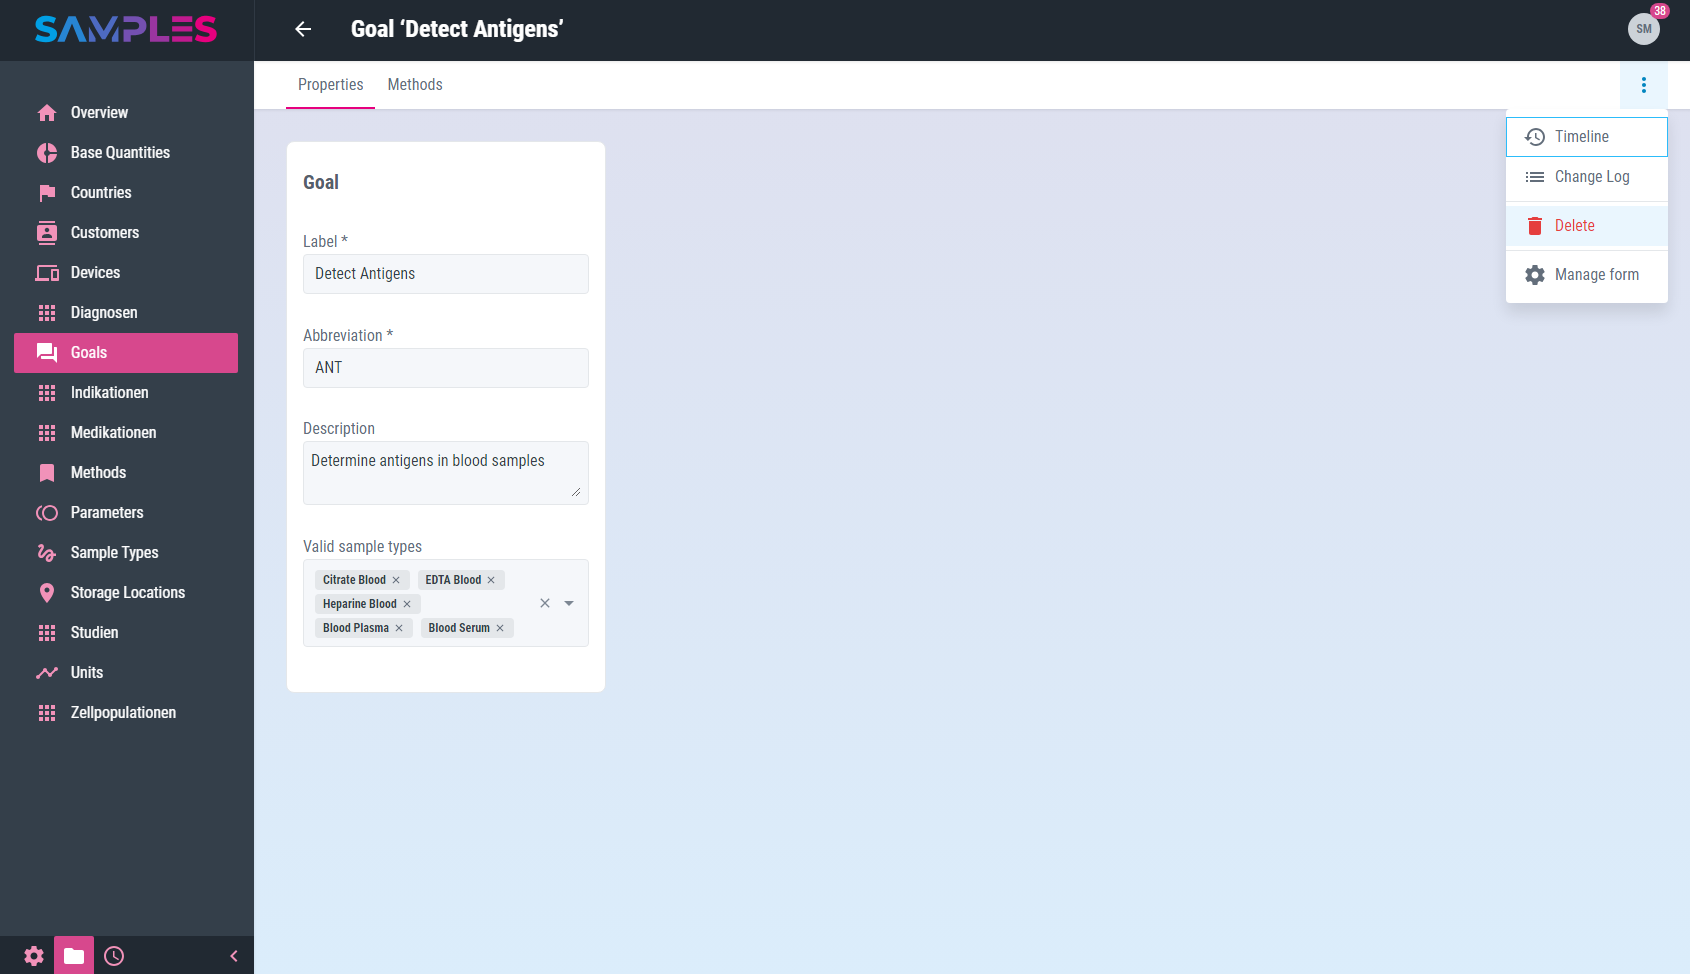
Edit goal
To display and edit all information about a goal, call up the desired list entry by clicking on it in the Master Data / Goals view.
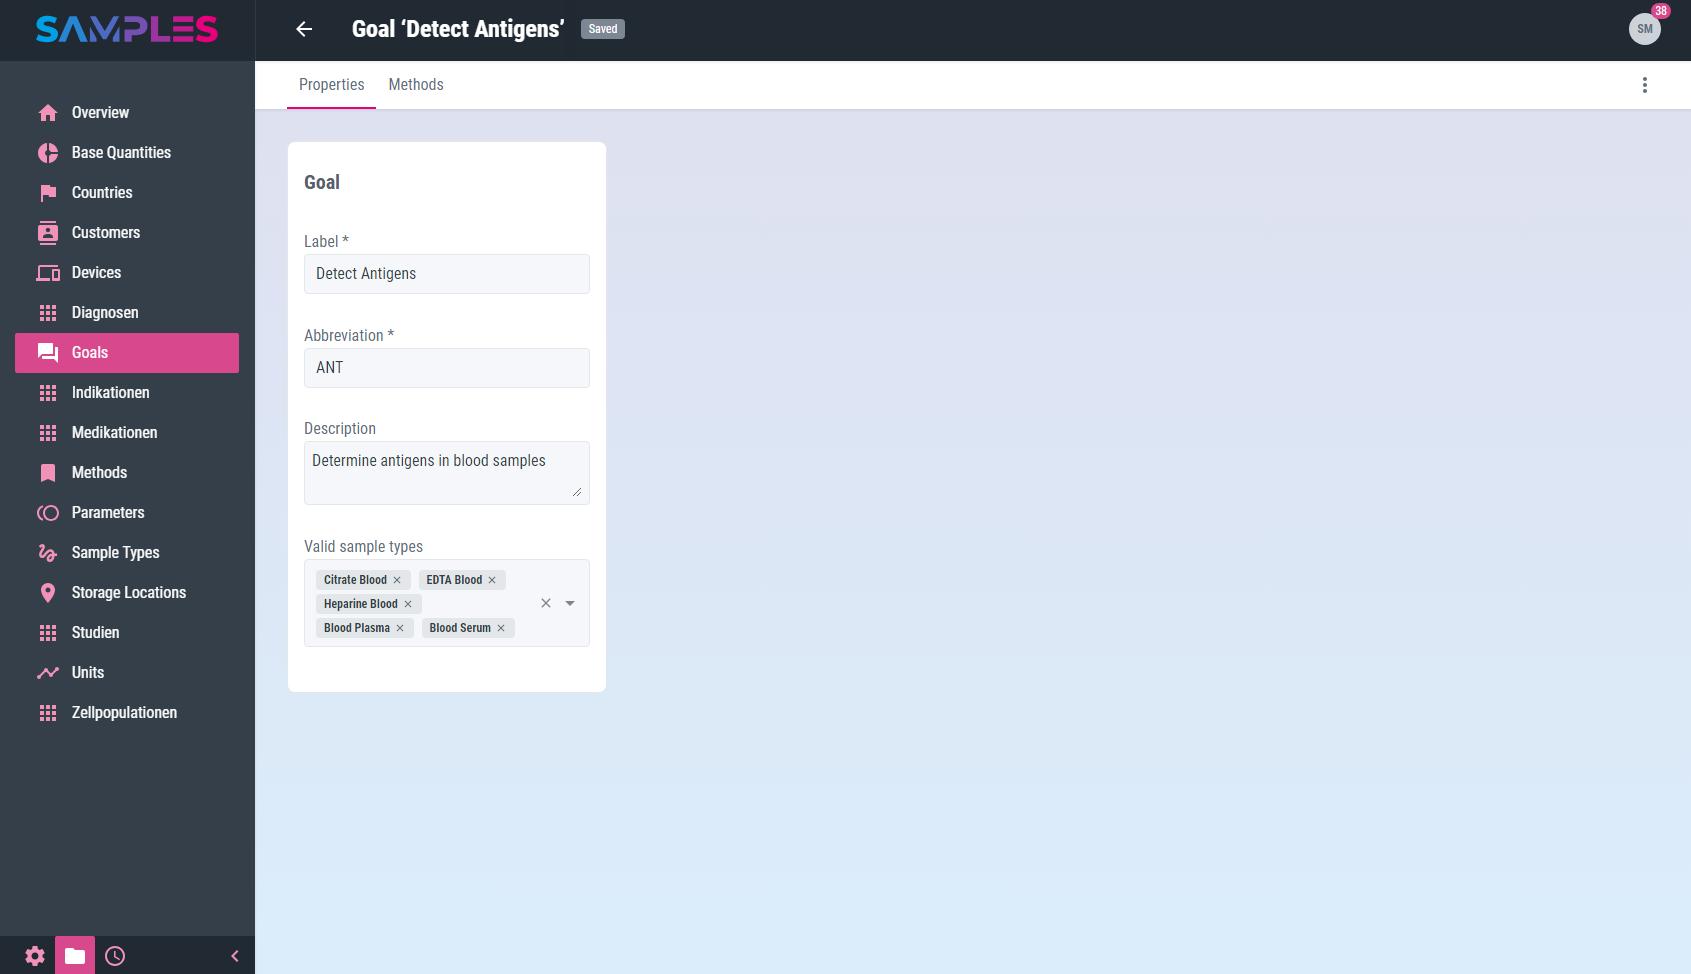
This opens the editing screen with the following information:
| Input field | Meaning | Remarks |
|---|---|---|
Label |
Readable name of the goal |
unique mandatory information |
Abbreviation |
Short name to identify and reference the goal in other parts of the app |
unique mandatory information |
Description |
Technical description and meaning of the goal |
|
Limitation on sample types |
Sample types applicable to this investigation objective |
Edit the selection list in Master Data / Sample Types |
|
|
Your input is checked, processed and saved immediately. |
Any input errors are displayed as a message and the relevant input fields are highlighted accordingly. The time and the editor are recorded in the history of the entry.
In the toolbar of the view you can find even more functions for editing goals:
- History
-
shows the editors and the time for the creation and last editing of the item
- Delete
-
removes the goal from the app’s memory
Calling the Back function in the toolbar closes the view and takes you back to the list view.
|
|
Related articles with additional content: |
Remove goal
To remove a goal, call the Delete entry function in the 3-dot-menu of the list item in the Master Data / Goals view.
Alternatively, open the desired goal for editing and call the Delete function there in the 3-dot-menu of the toolbar.
In addition, it is also possible to remove several goals at the same time. To do this, select the list items to be removed in the Master Data / Goals view and then call the Delete function in the 3-dot-menu of the toolbar.
In all 3 cases, a message is then displayed to confirm the action. Only after the confirmation of the user the removal of the selected item takes place.
|
|
The removal of a goal is not logged in the history and cannot be undone or retraced after confirmation. |
|
|
Related articles with additional content: |
Storage locations
The storage of sample material under precisely defined conditions takes place in storage locations (also storage facilities).
SAMPLES distinguishes between checked and a unchecked/free storage. For free storage, it is sufficient to select a storage location and enter a simple text note for the storage position. The checked storage requires the configuration of the storage locations, specifying the available compartments and boxes per storage location. It is far less flexible, but allows checking the availability/occupancy of storage positions, an exact overview/planning of available storage capacities and the use of the suggestion function for the next free storage position for storing a sample.
List and search storage locations
A searchable listing of all available data about storage locations can be found in view Master Data / Storage Locations.
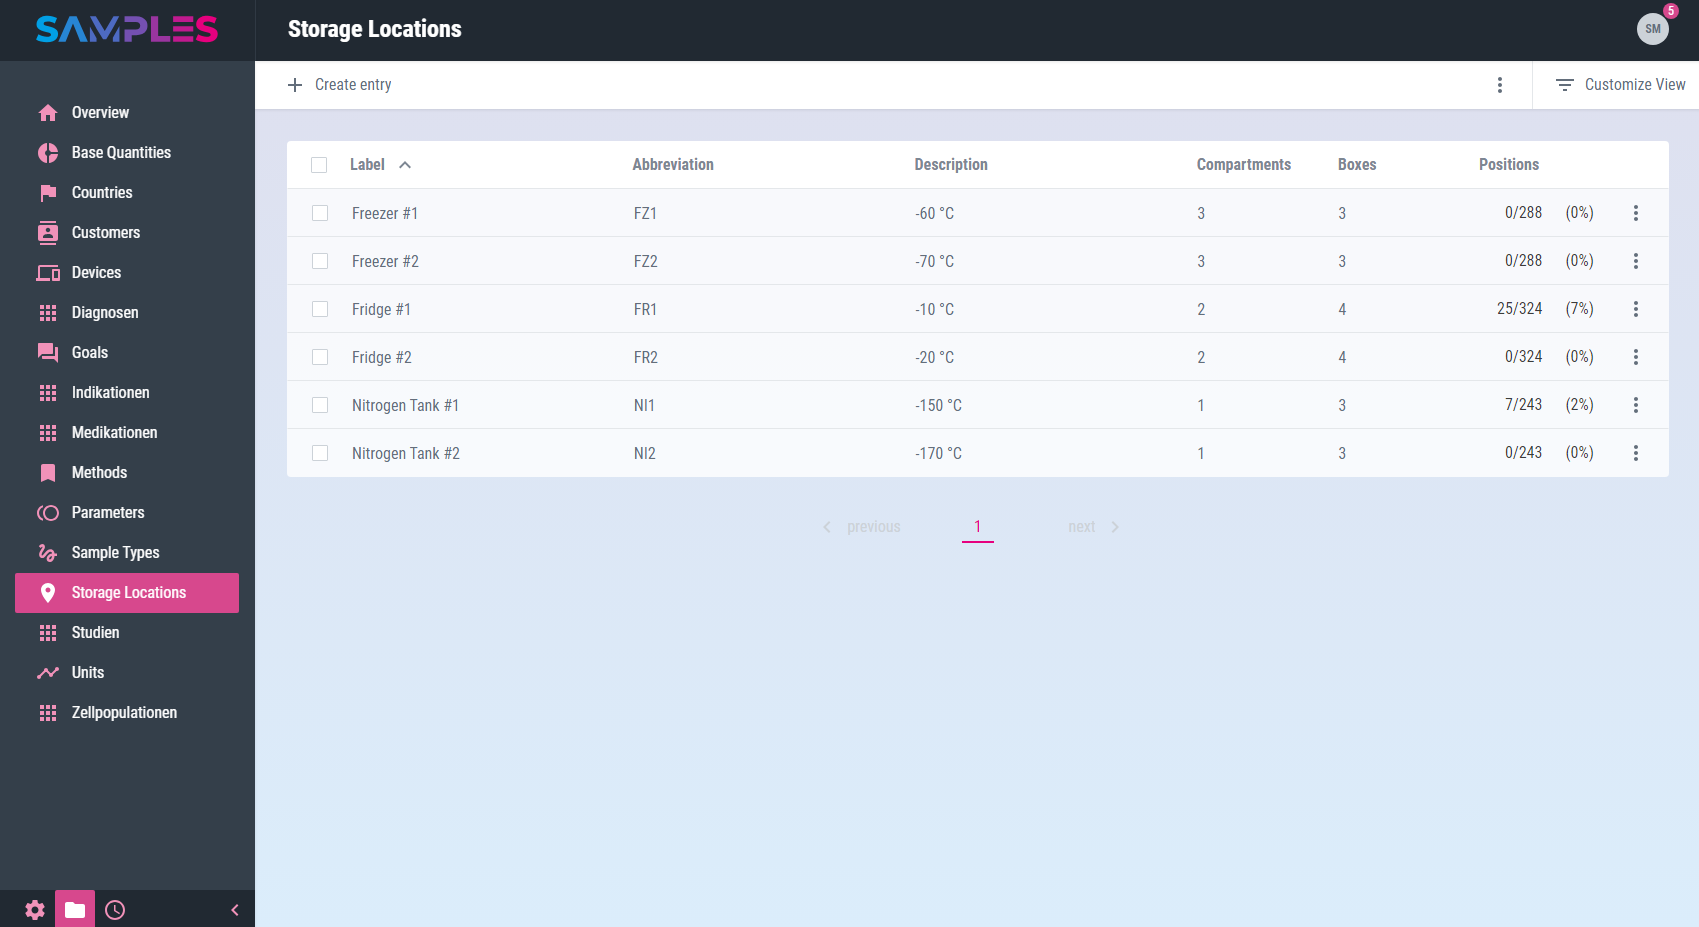
The listing contains information about:
| Title | Meaning |
|---|---|
Label |
Readable name of the storage location |
Abbreviation |
Short name to identify and reference the storage location in other parts of the app |
Description |
Technical description and meaning of the storage location |
Compartments |
Number of compartments in this storage location |
Boxes |
Number of boxes in this storage location |
Wells |
Number of available and occupied storage positions in this storage location |
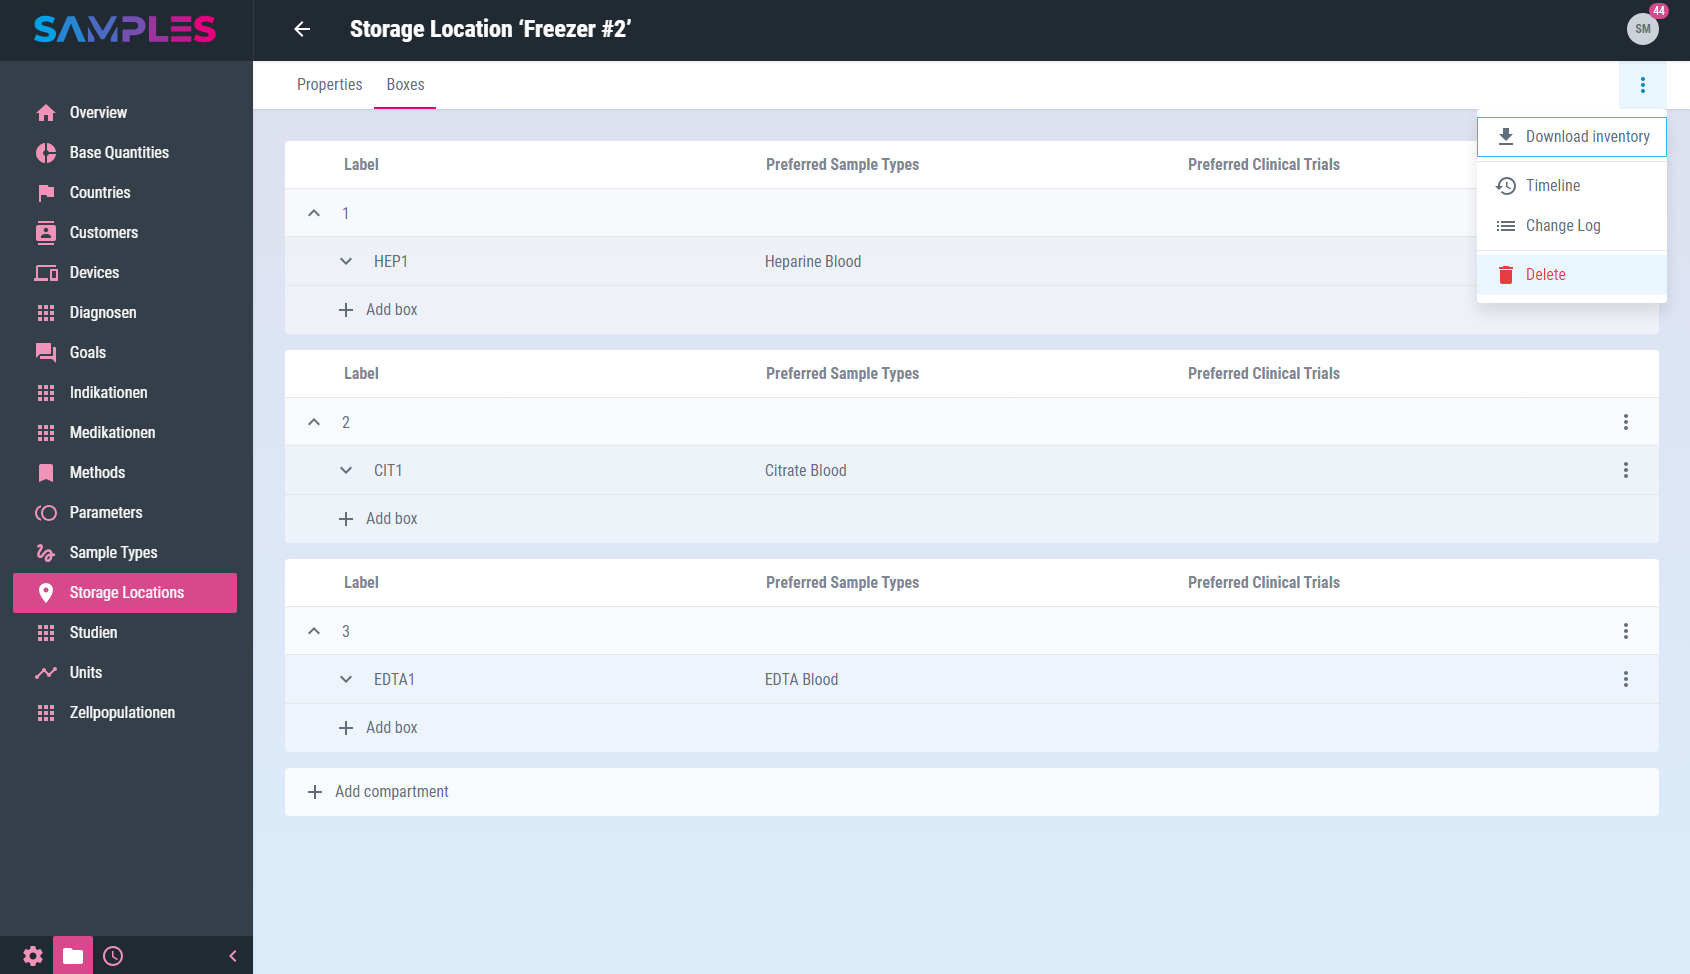
In the toolbar of the view you can find even more functions for processing storage locations:
- Create entry
-
adds a new storage location
- Download storage overview
-
generates an Excel-file with an overview of the content of all storage locations
- Reload list
-
updates the content of the listing
- Delete selected entries
-
removes the selected list entries
|
|
Related articles with additional content: |
Download storage overview
To export and download the current contents of the Master Data / Storage Locations view to a file in MS Excel format (.xlsx), the Download storage overview function is called from the 3-dot menu of the toolbar.
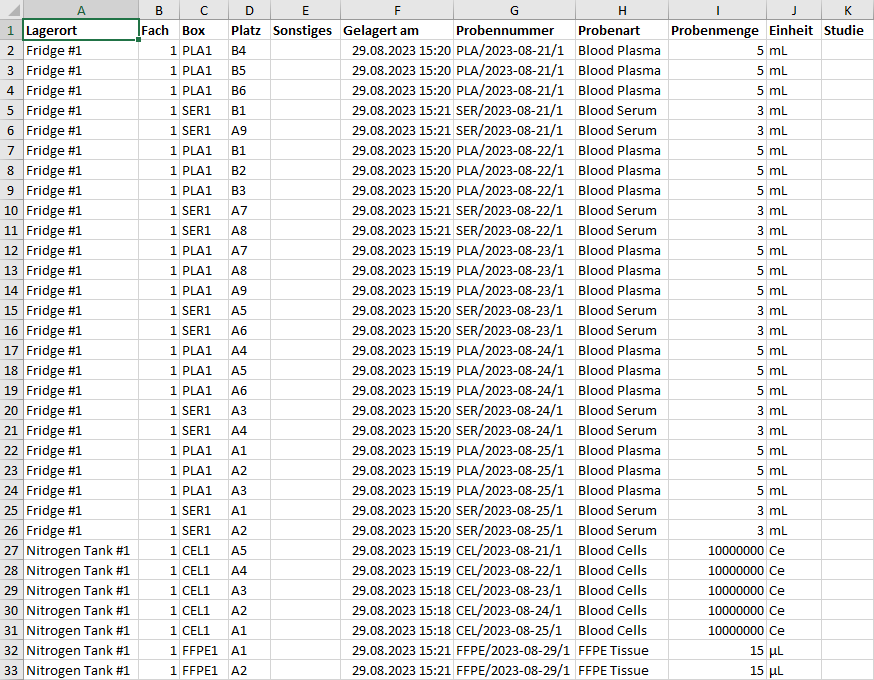
The result is a file with the following content:
| Title | Meaning |
|---|---|
Lagerort |
Readable name of the storage location |
Fach |
Compartment name |
Box |
Box name |
Platz |
Storage position |
Sonstiges |
Storage position description (in case of free storing) |
Gelagert am |
Date and time of sample storing |
Probennummer |
Internal sample identification number |
Probenart |
Type of sample material |
Probenmenge |
Tube volume |
Einheit |
Tube volume unit |
Studie |
Clinical trial associated to the sample |
It is made available in the download folder of the web browser and can be further processed from there.
|
|
Related articles with additional content: |
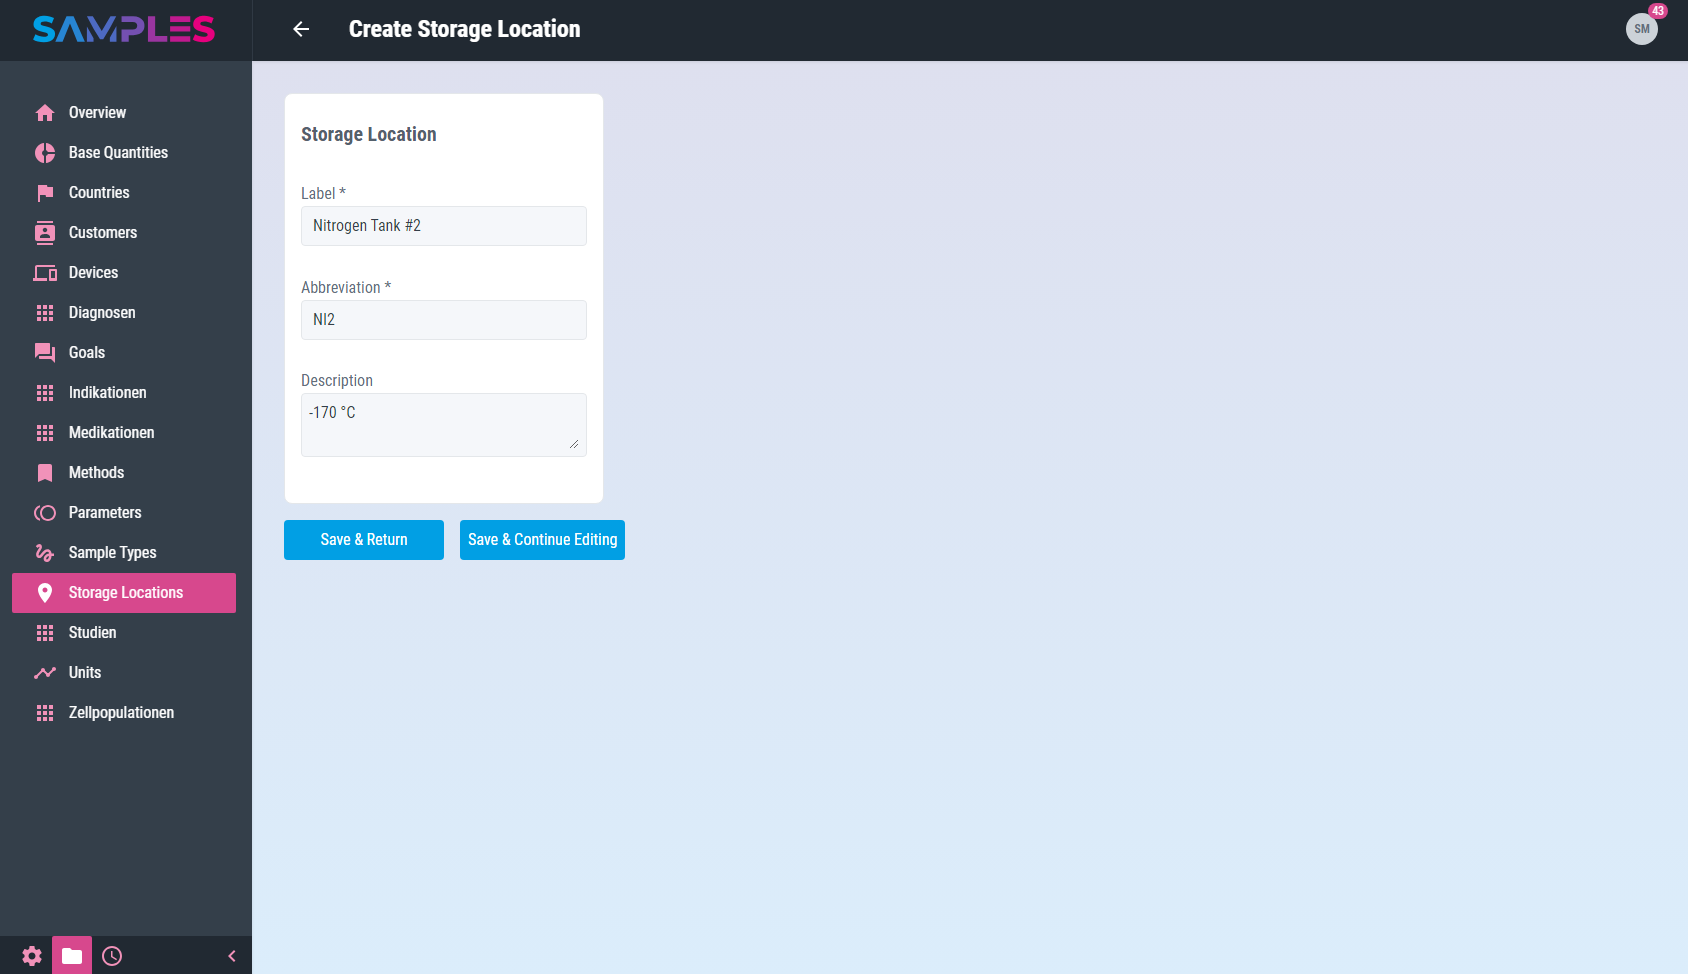
Add new storage location
To add a new storage location open view Master Data / Storage Locations and call the function Create entry.
A wizard opens for entering all the necessary information for the new entry:
This includes:
| Input field | Meaning | Remarks |
|---|---|---|
Label |
Readable name of the storage location |
unique mandatory information |
Abbreviation |
Short name to identify and reference the storage location in other parts of the app |
unique mandatory information |
Description |
Technical description and meaning of the storage location |
Only the click on the button Finish completes the assistant.
Your input is checked by the app for completeness and correctness before it is permanently saved. In case of errors in the input, a hint message is displayed and the corresponding input field is highlighted.
The time and editor of the input are recorded in the history of the new entry. Finally, the updated list of storage locations is opened again.
|
|
Related articles with additional content: |
Edit storage location
To display and edit all information about a storage location, call up the desired list entry by clicking on it in the Master Data / Storage Locations view.
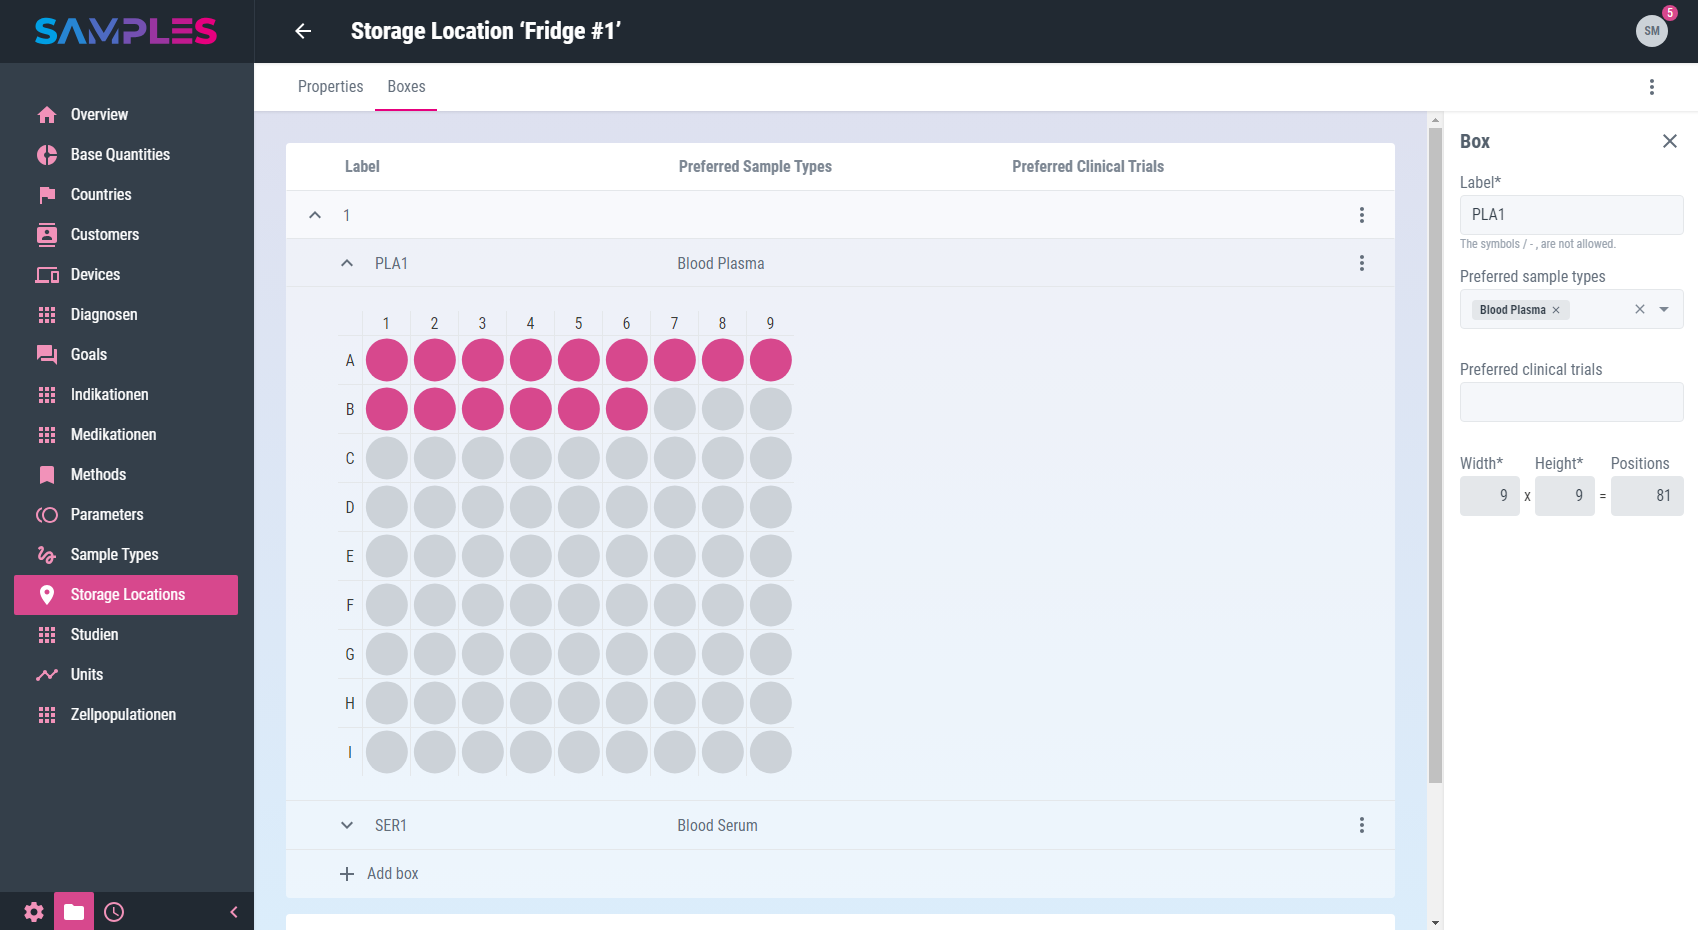
This opens the editing screen with the following information:
| Input field | Meaning | Remarks |
|---|---|---|
Label |
Readable name of the storage location |
unique mandatory information |
Abbreviation |
Short name to identify and reference the storage location in other parts of the app |
unique mandatory information |
Description |
Technical description and meaning of the storage location |
|
Sample types |
Sample types preferably stored at this storage location |
Edit selection list in Master Data / Sample Types |
Clinical trials |
Samples belonging to clinical trials preferably stored at this storage location |
Edit selection list in Master Data / Clinical Trials |
|
|
Your input is checked, processed and saved immediately. |
Any input errors are displayed as a message and the relevant input fields are highlighted accordingly. The time and the editor are recorded in the history of the entry.
In the toolbar of the view you can find even more functions for editing storage locations:
- History
-
shows the editors and the time for the creation and last editing of the item
- Delete
-
removes the storage location from the app’s memory
Calling the Back function in the toolbar closes the view and takes you back to the list view.
|
|
Related articles with additional content: |
Remove storage location
To remove a storage location, call the Delete entry function in the 3-dot-menu of the list item in the Master Data / Storage Locations view.
Alternatively, open the desired storage location for editing and call the Delete function there in the 3-dot-menu of the toolbar.
In addition, it is also possible to remove several storage locations at the same time. To do this, select the list items to be removed in the Master Data / Storage Locations view and then call the Delete function in the 3-dot-menu of the toolbar.
In all 3 cases, a message is then displayed to confirm the action. Only after the confirmation of the user the removal of the selected item takes place.
|
|
The removal of a storage location is not logged in the history and cannot be undone or retraced after confirmation. |
|
|
Related articles with additional content: |
Devices
For planning daily work, it is important to have an overview of the available inventory of laboratory instruments and supporting analytical software. All relevant information about the available devices (including both: instruments and software), their current location and operational status can be documented in the device directory.
List and search devices
A searchable listing of all available data about devices can be found in view Master Data / Devices.
The listing contains information about:
| Title | Meaning |
|---|---|
Device |
Readable name of the device |
Manufacturer |
Name of the device manufacturer |
Serial number |
Serial number of the device |
Location |
Current location of the device |
In the toolbar of the view you can find even more functions for processing devices:
- Create entry
-
adds a new device
- Reload list
-
updates the content of the listing
- Delete selected entries
-
removes the selected list entries
|
|
Related articles with additional content: |
Add new device
To add a new device open view Master Data / Devices and call the function Create entry.
A wizard opens for entering all the necessary information for the new entry:
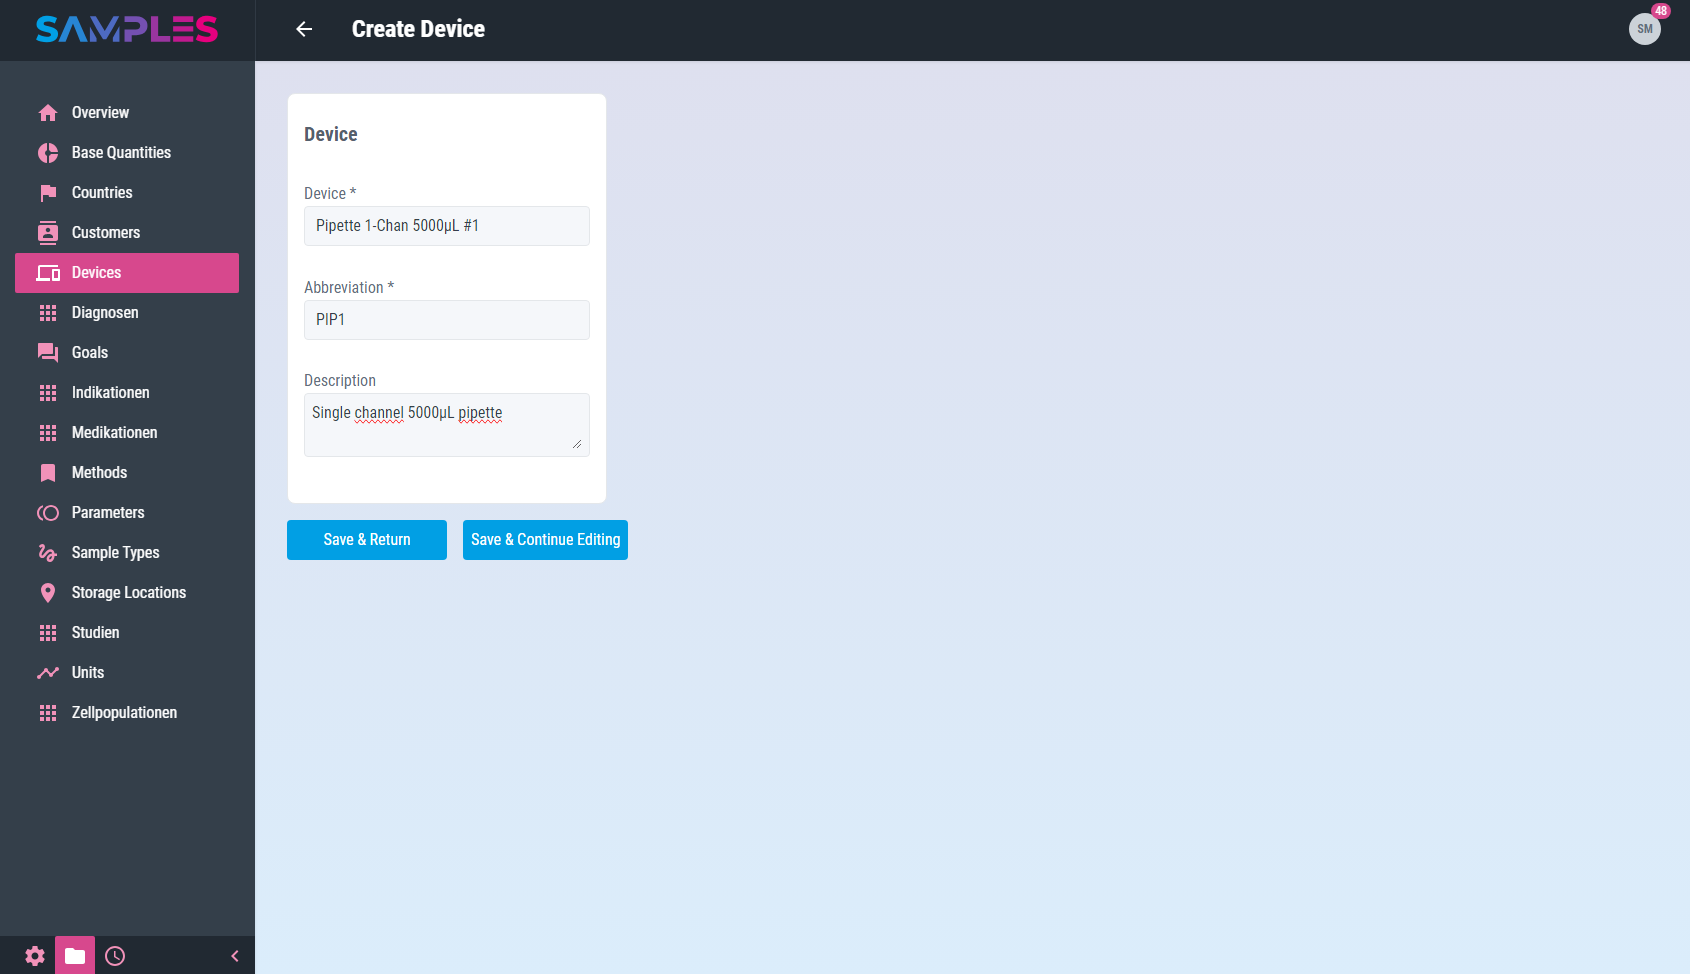
This includes:
| Input field | Meaning | Remarks |
|---|---|---|
Device |
Readable name of the device |
unique mandatory information |
Abbreviation |
Short name to identify and reference the device in other parts of the app |
unique mandatory information |
Only the click on the button Finish completes the assistant.
Your input is checked by the app for completeness and correctness before it is permanently saved. In case of errors in the input, a hint message is displayed and the corresponding input field is highlighted.
The time and editor of the input are recorded in the history of the new entry. Finally, the updated list of devices is opened again.
|
|
Related articles with additional content: |
Edit device
To display and edit all information about a device, call up the desired list entry by clicking on it in the Master Data / Devices view.
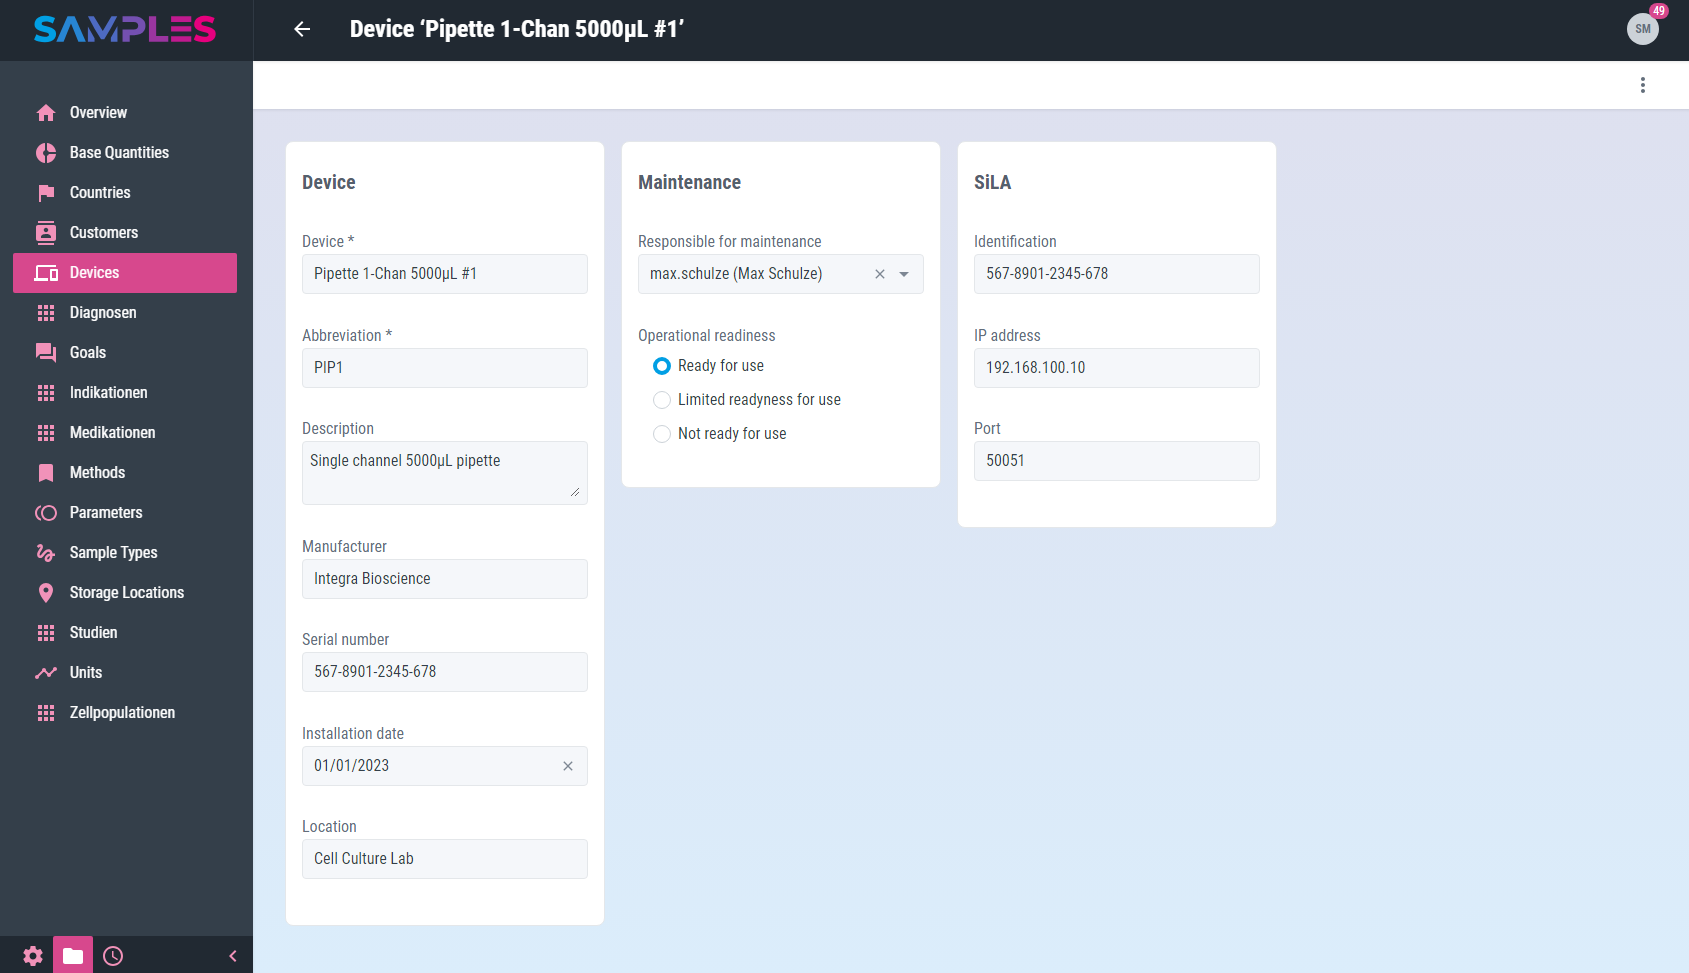
This opens the editing screen with the following information:
| Input field | Meaning | Remarks |
|---|---|---|
Device |
Readable name of the device |
unique mandatory information |
Abbreviation |
Short name to identify and reference the device in other parts of the app |
unique mandatory information |
Description |
Technical description and meaning of the device |
|
Manufacturer |
Name of the device manufacturer |
|
Serial number |
Serial number of the device |
|
Installation date |
Date of installation of the device |
|
Location |
Current location of the device |
|
Responsible for maintenance |
employee responsible for the maintenance and care of the device |
Edit the selection list in Administration / Users |
Operational readiness |
current readiness status for using the device |
|
Identification |
SiLA Identification |
|
IP-Adress |
IP of the SiLA Service for remote controlling the device |
valid IP addresses only, e.g. 192.168.10.15 |
Port |
Port number of the SiLA service for controlling the device. |
valid port numbers only (0-65535) |
|
|
Your input is checked, processed and saved immediately. |
Any input errors are displayed as a message and the relevant input fields are highlighted accordingly. The time and the editor are recorded in the history of the entry.
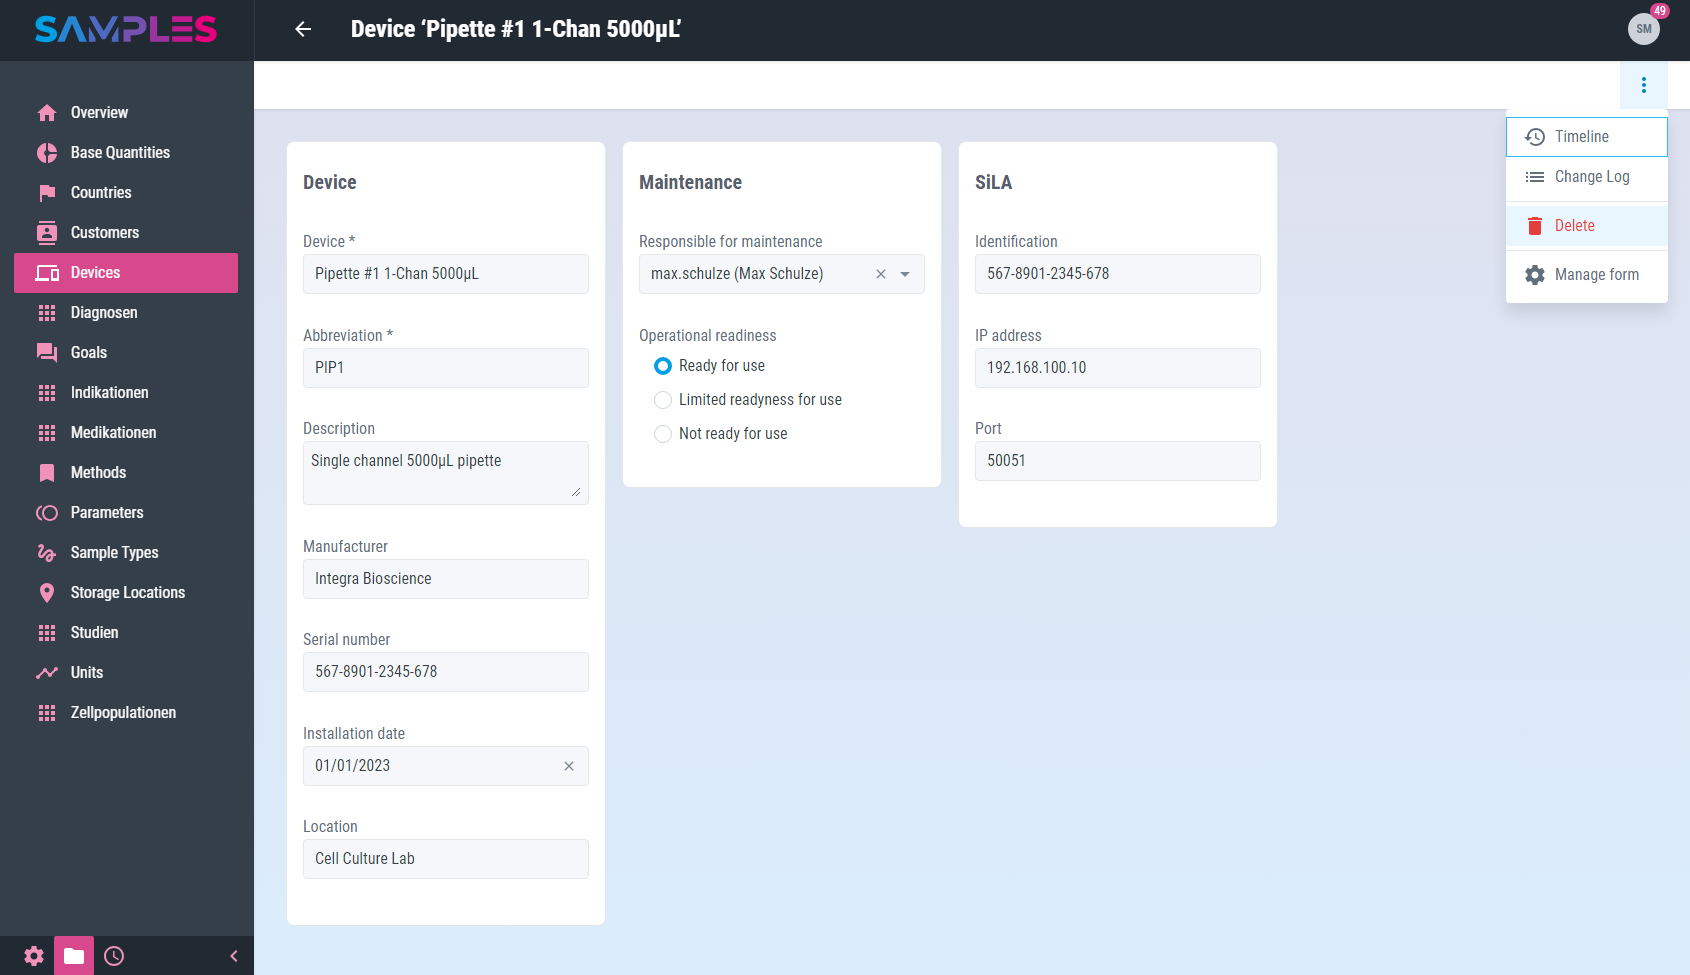
In the toolbar of the view you can find even more functions for editing devices:
- History
-
shows the editors and the time for the creation and last editing of the item
- Delete
-
removes the device from the app’s memory
Calling the Back function in the toolbar closes the view and takes you back to the list view.
|
|
Related articles with additional content: |
Remove device
To remove a device, call the Delete entry function in the 3-dot-menu of the list item in the Master Data / Devices view.
Alternatively, open the desired device for editing and call the Delete function there in the 3-dot-menu of the toolbar.
In addition, it is also possible to remove several devices at the same time. To do this, select the list items to be removed in the Master Data / Devices view and then call the Delete function in the 3-dot-menu of the toolbar.
In all 3 cases, a message is then displayed to confirm the action. Only after the confirmation of the user the removal of the selected item takes place.
|
|
The removal of a device is not logged in the history and cannot be undone or retraced after confirmation. |
|
|
Related articles with additional content: |
Customers
In routine, laboratories often interact with internal or external customers, e.g. hospitals, general practitioners, operating sites, other specialised departments. SAMPLES stores this contact information for traceability of test results to the source of the sample.
Several customers within an organisation or department (e.g. different doctors and wards of a clinic or sections of a production line) are clearly grouped together for easier processing.
List and search customers
A searchable listing of all available data about customers can be found in view Master Data / Customers.
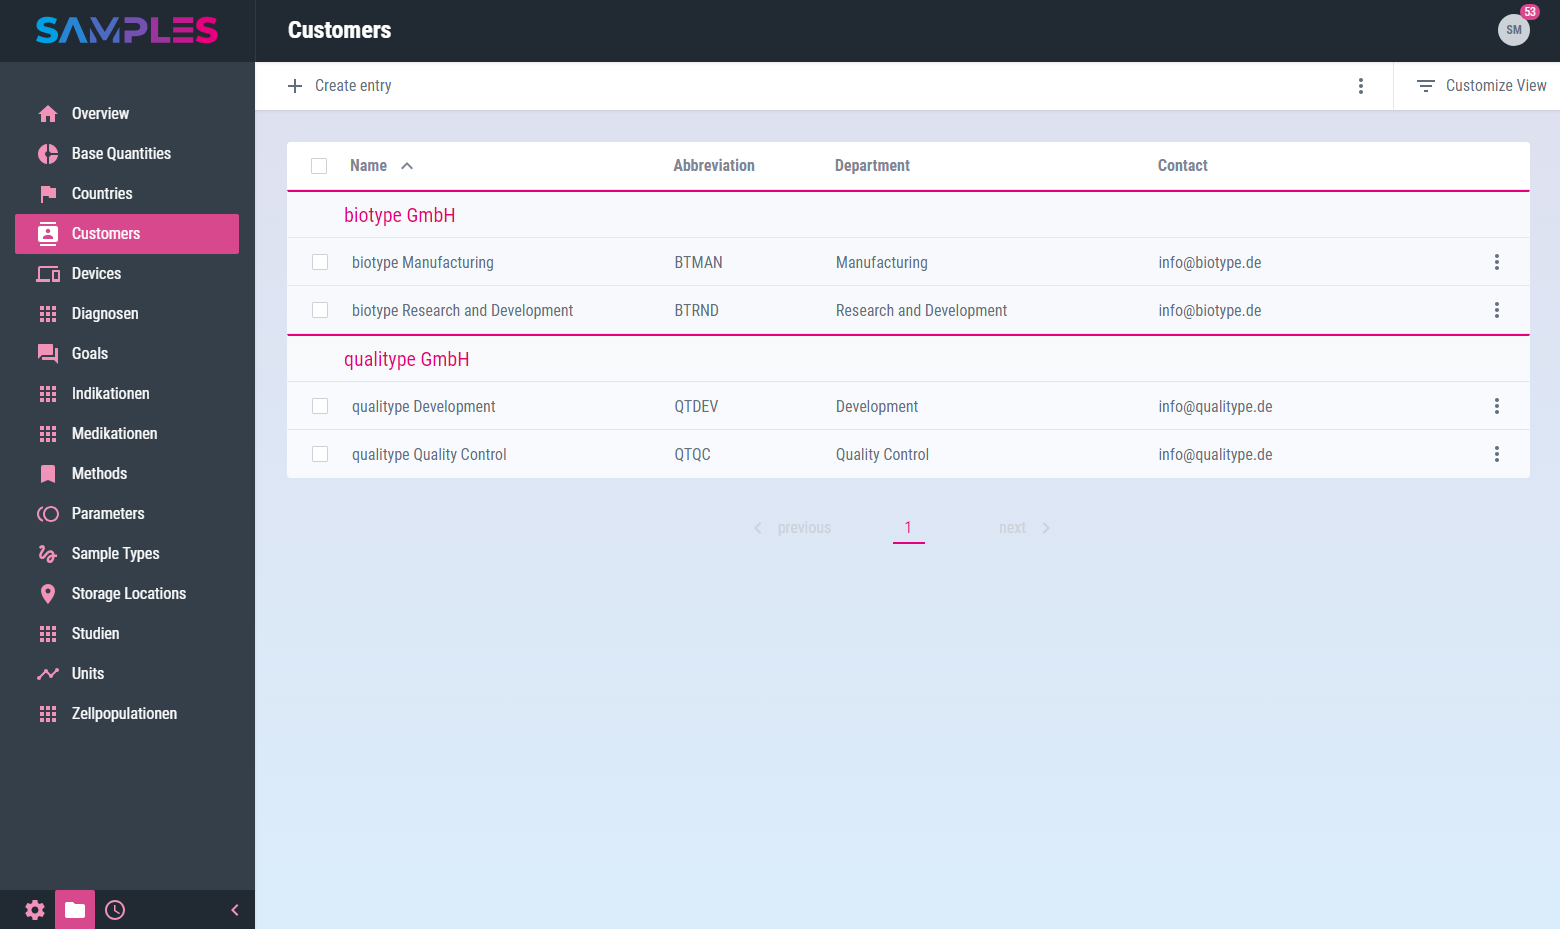
The listing contains information about:
| Title | Meaning |
|---|---|
Name |
Readable name of the customer |
Abbreviation |
Short name to identify and reference the customer in other parts of the app |
Organization |
Name of the parent organization to which this customer belongs |
Department |
Name of the department within the parent organization to which this customer belongs |
Contact |
Phone number and email for direct contact with the customer |
In the toolbar of the view you can find even more functions for processing customers:
- Create entry
-
Adds a new customer
- Reload list
-
Updates the content of the listing
- Delete selected entries
-
Removes the selected list entries
|
|
Related articles with additional content: |
Add new customer
To add a new customer open view Master Data / Customers and call the function Create entry.
A wizard opens for entering all the necessary information for the new entry:
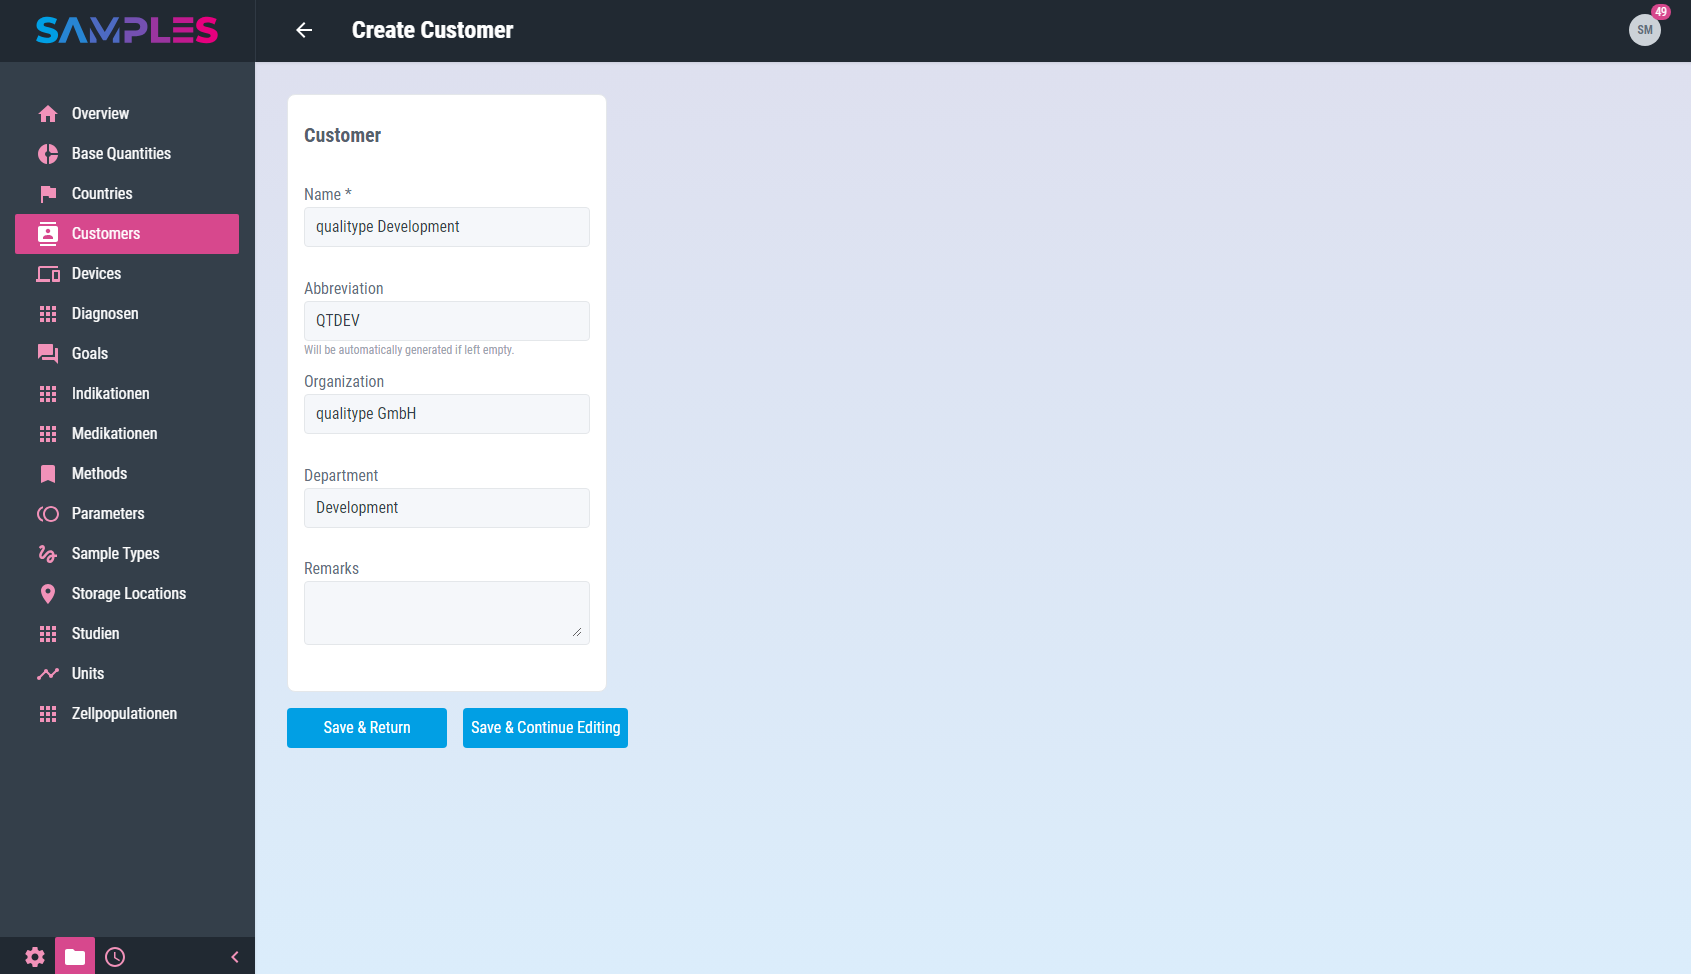
This includes:
| Input field | Meaning | Remarks |
|---|---|---|
Name |
Readable name of the customer |
unique mandatory information |
Abbreviation |
Short name to identify and reference the customer in other parts of the app |
If the input is empty, the app generates an abbreviation based on the name. |
Organization |
Name of the parent organization to which this customer belongs |
|
Department |
Name of the department within the parent organization to which this customer belongs |
Only the click on the button Finish completes the assistant.
Your input is checked by the app for completeness and correctness before it is permanently saved. In case of errors in the input, a hint message is displayed and the corresponding input field is highlighted.
The time and editor of the input are recorded in the history of the new entry. Finally, the updated list of customers is opened again.
|
|
Related articles with additional content: |
Edit customer
To display and edit all information about a customer, call up the desired list entry by clicking on it in the Master Data / Customers view.
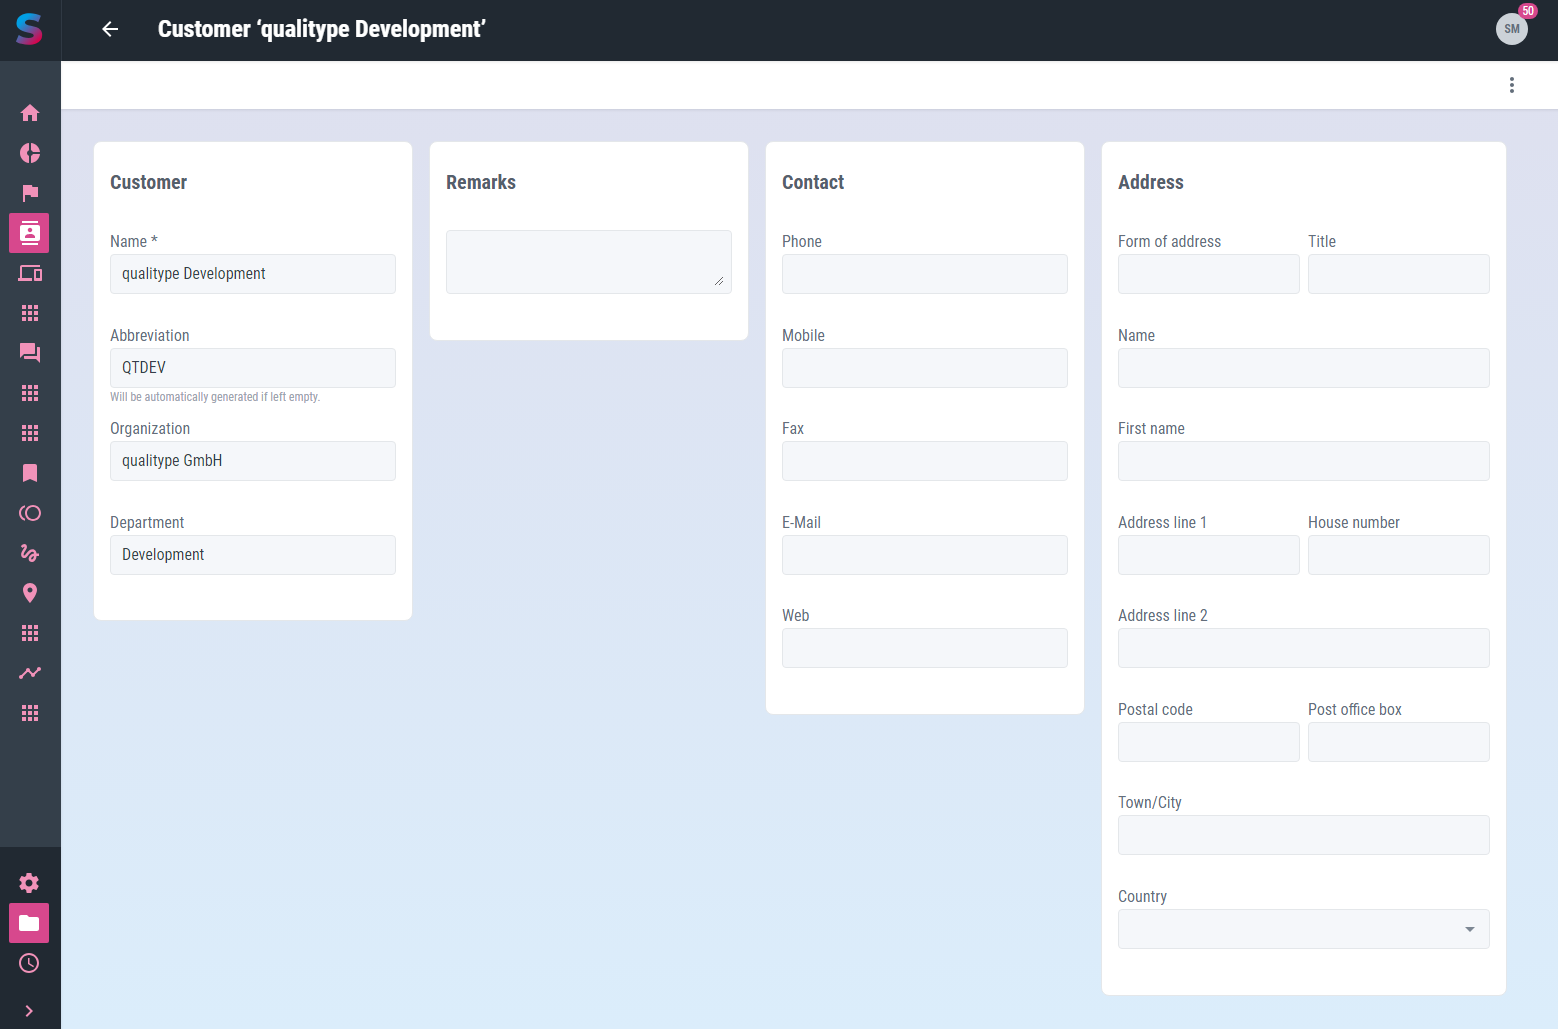
This opens the editing screen with the following information:
| Input field | Meaning | Remarks |
|---|---|---|
Name |
Readable name of the customer |
unique mandatory information |
Abbreviation |
Short name to identify and reference the customer in other parts of the app |
If the input is empty, the app generates an abbreviation based on the name. |
Organization |
Name of the parent organization to which this customer belongs |
|
Department |
Name of the department within the parent organization to which this customer belongs |
|
Remarks |
additional remarks to the customer |
|
Phone |
Landline phone number for contacting the customer |
|
Mobile |
Mobile phone number for contacting the customer |
|
Fax |
Phone number of the fax machine to contact the customer |
|
Electronix mail address to contact the customer |
||
Web |
Homepage or social media profile for contact with the customer |
|
Form of address |
Salutation from the postal address of the customer |
e.g. Mrs. or Mr. |
Title |
Academic title from the customer’s postal address |
e.g. Prof. or Dr. |
Name |
Family name of the customer |
|
First name |
Given name of the customer |
|
Adress line 1 |
Street name from the customer’s postal address |
|
House number |
House number from the customer’s postal address |
|
Adress line 2 |
Additional information to the customer’s postal address |
e.g. part of town |
Postal code |
Postal code from the customer’s postal address |
|
Post office box |
Post office box from the customer’s postal address |
|
Town/City |
Name of the city from the customer’s postal address |
|
Country |
Name of the country from the customer’s postal address |
Edit the selection list in Master Data / Countries |
|
|
Your input is checked, processed and saved immediately. |
Any input errors are displayed as a message and the relevant input fields are highlighted accordingly. The time and the editor are recorded in the history of the entry.
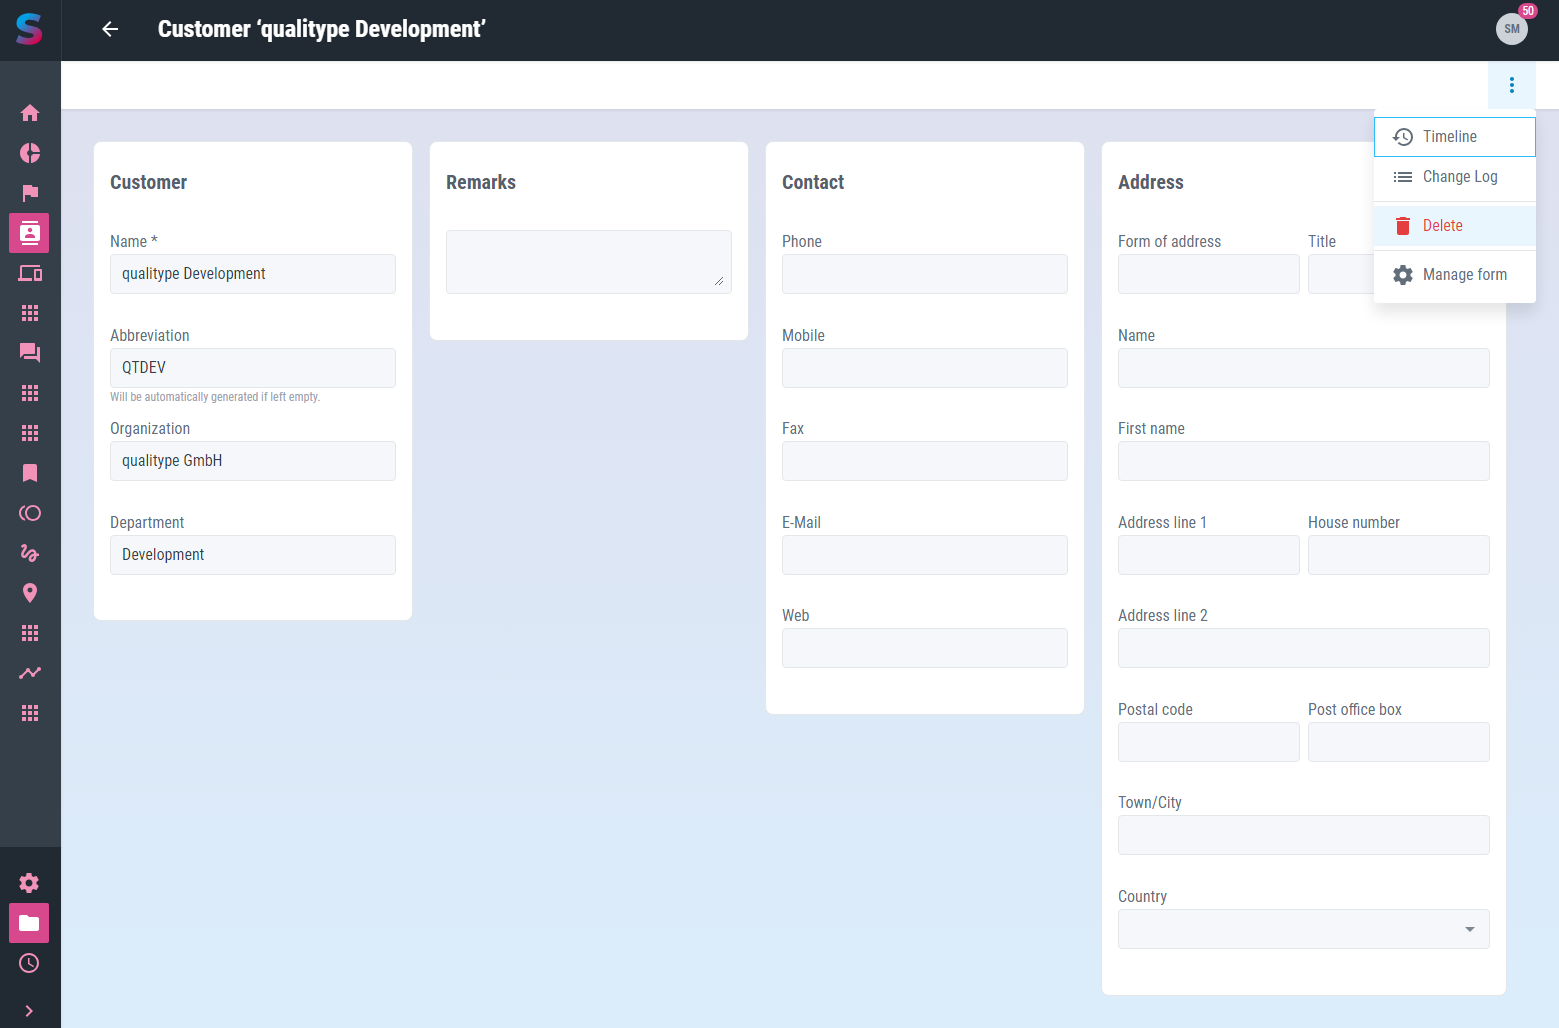
In the toolbar of the view you can find even more functions for editing customers:
- History
-
shows the editors and the time for the creation and last editing of the item
- Delete
-
removes the customer from the app’s memory
Calling the Back function in the toolbar closes the view and takes you back to the list view.
|
|
Related articles with additional content: |
Remove customer
To remove a customer, call the Delete entry function in the 3-dot-menu of the list item in the Master Data / Customers view.
Alternatively, open the desired customer for editing and call the Delete function there in the 3-dot-menu of the toolbar.
In addition, it is also possible to remove several customers at the same time. To do this, select the list items to be removed in the Master Data / Customers view and then call the Delete function in the 3-dot-menu of the toolbar.
In all 3 cases, a message is then displayed to confirm the action. Only after the confirmation of the user the removal of the selected item takes place.
|
|
The removal of a customer is not logged in the history and cannot be undone or retraced after confirmation. |
|
|
Related articles with additional content: |
Countries
SAMPLES stores contact information of users and clients. The postal address of these contacts can be clearly geographically located by specifying a country.
In addition, it is possible to add further, country-specific information to this content via user-defined fields.
List and search countries
A searchable listing of all available data about countries can be found in view Master Data / Countries.
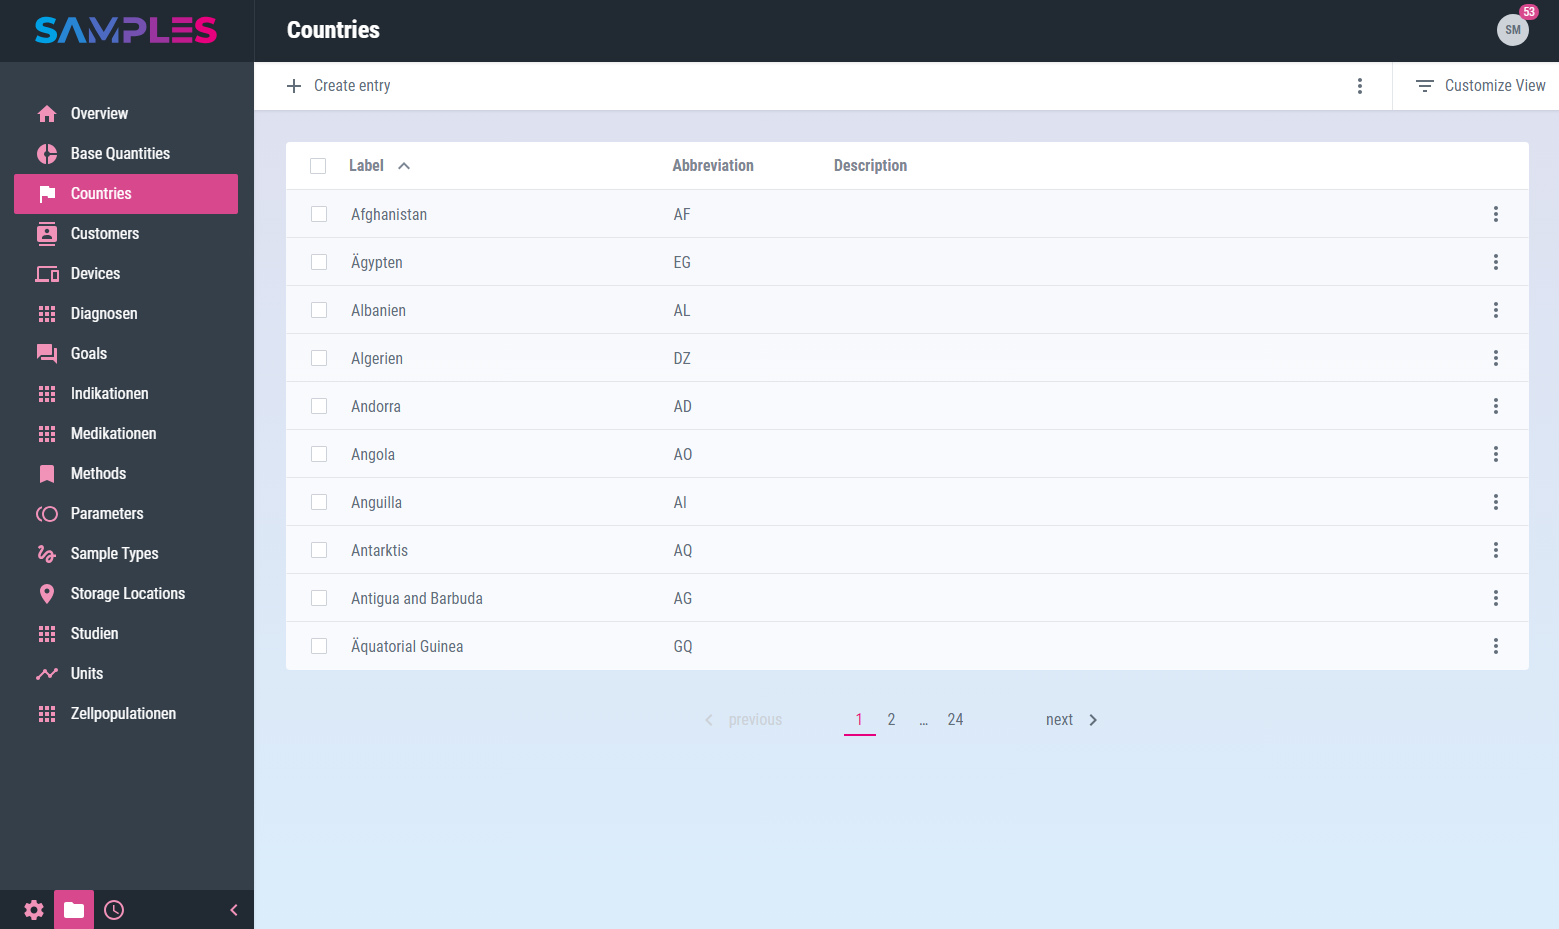
The listing contains information about:
| Title | Meaning |
|---|---|
Label |
Readable name of the country |
Abbreviation |
Short name to identify and reference the country in other parts of the app |
Description |
Technical description and meaning of the country |
In the toolbar of the view you can find even more functions for processing countries:
- Create entry
-
adds a new country
- Reload list
-
updates the content of the listing
- Delete selected entries
-
removes the selected list entries
|
|
Related articles with additional content: |
Add new country
To add a new country open view Master Data / Countries and call the function Create entry.
A wizard opens for entering all the necessary information for the new entry:
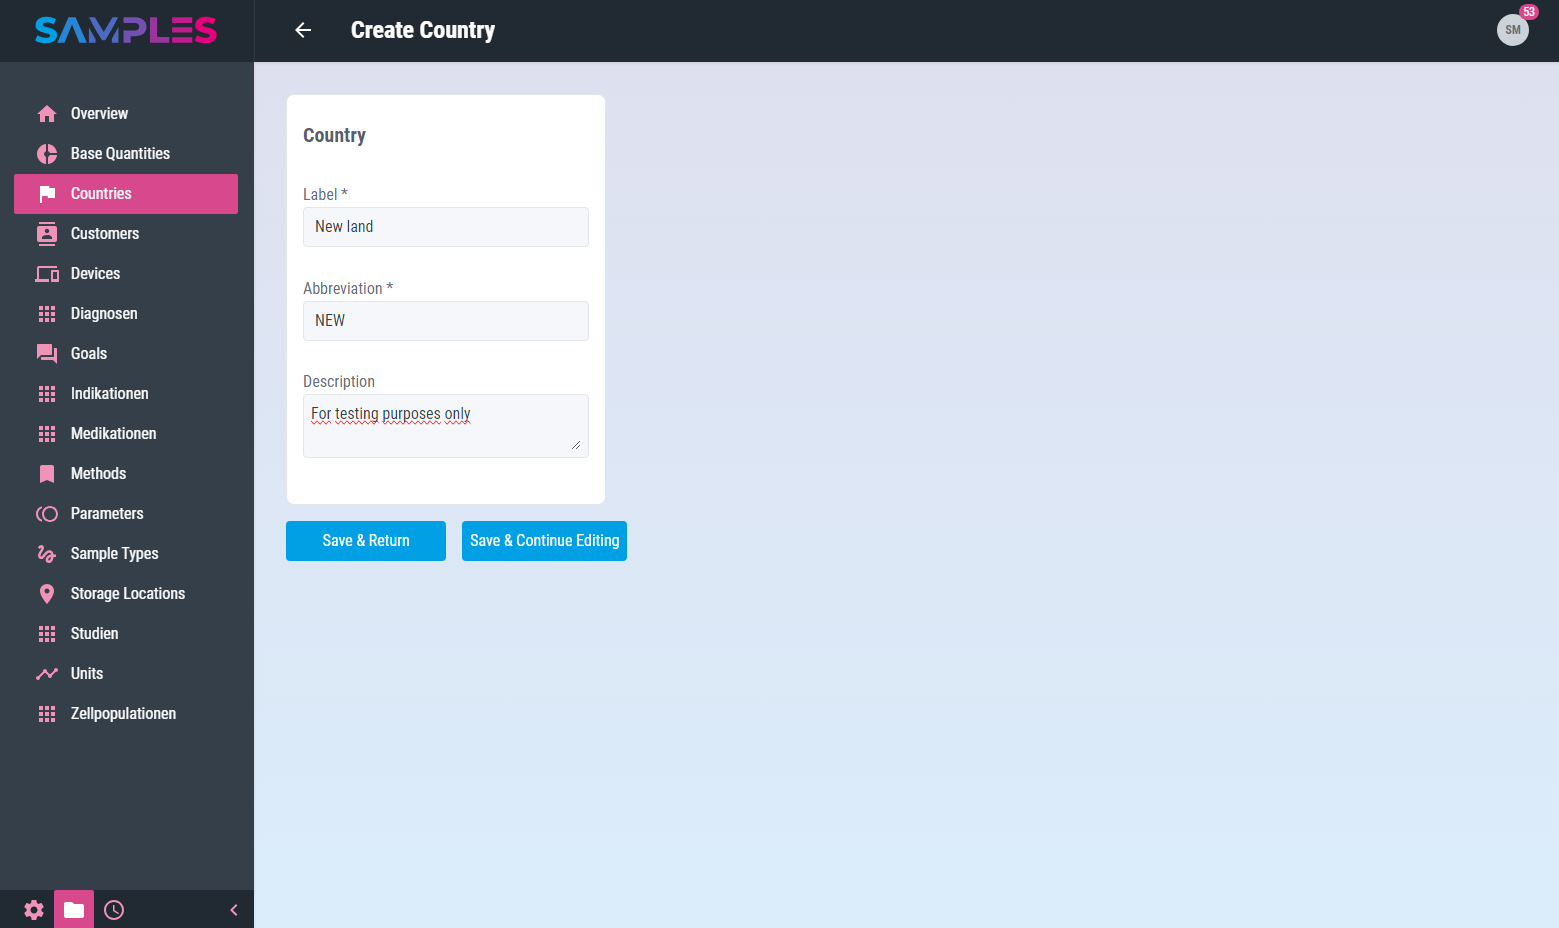
This includes:
| Input field | Meaning | Remarks |
|---|---|---|
Label |
Readable name of the country |
unique mandatory information |
Abbreviation |
Short name to identify and reference the country in other parts of the app |
unique mandatory information |
Description |
Technical description and meaning of the country |
Only the click on the button Finish completes the assistant.
Your input is checked by the app for completeness and correctness before it is permanently saved. In case of errors in the input, a hint message is displayed and the corresponding input field is highlighted.
The time and editor of the input are recorded in the history of the new entry. Finally, the updated list of countries is opened again.
|
|
Related articles with additional content: |
Edit country
To display and edit all information about a country, call up the desired list entry by clicking on it in the Master Data / Countries view.
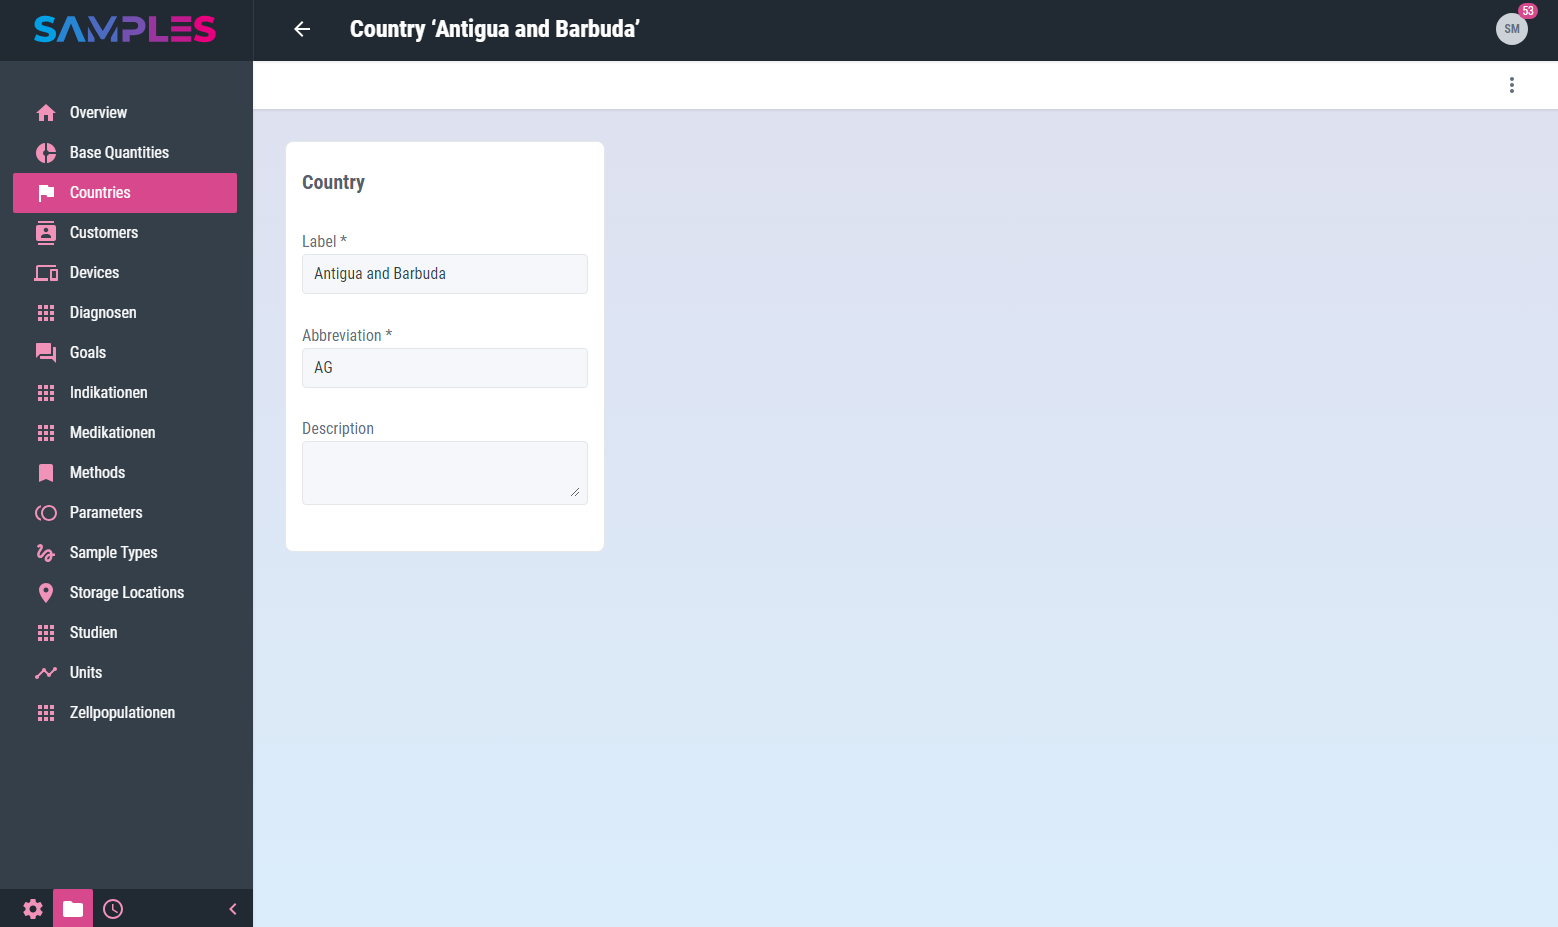
This opens the editing screen with the following information:
| Input field | Meaning | Remarks |
|---|---|---|
Label |
Readable name of the country |
unique mandatory information |
Abbreviation |
Short name to identify and reference the country in other parts of the app |
unique mandatory information |
Description |
Technical description and meaning of the country |
|
|
Your input is checked, processed and saved immediately. |
Any input errors are displayed as a message and the relevant input fields are highlighted accordingly. The time and the editor are recorded in the history of the entry.
In the toolbar of the view you can find even more functions for editing countries:
- History
-
shows the editors and the time for the creation and last editing of the item
- Delete
-
removes the country from the app’s memory
Calling the Back function in the toolbar closes the view and takes you back to the list view.
|
|
Related articles with additional content: |
Remove country
To remove a country, call the Delete entry function in the 3-dot-menu of the list item in the Master Data / Countries view.
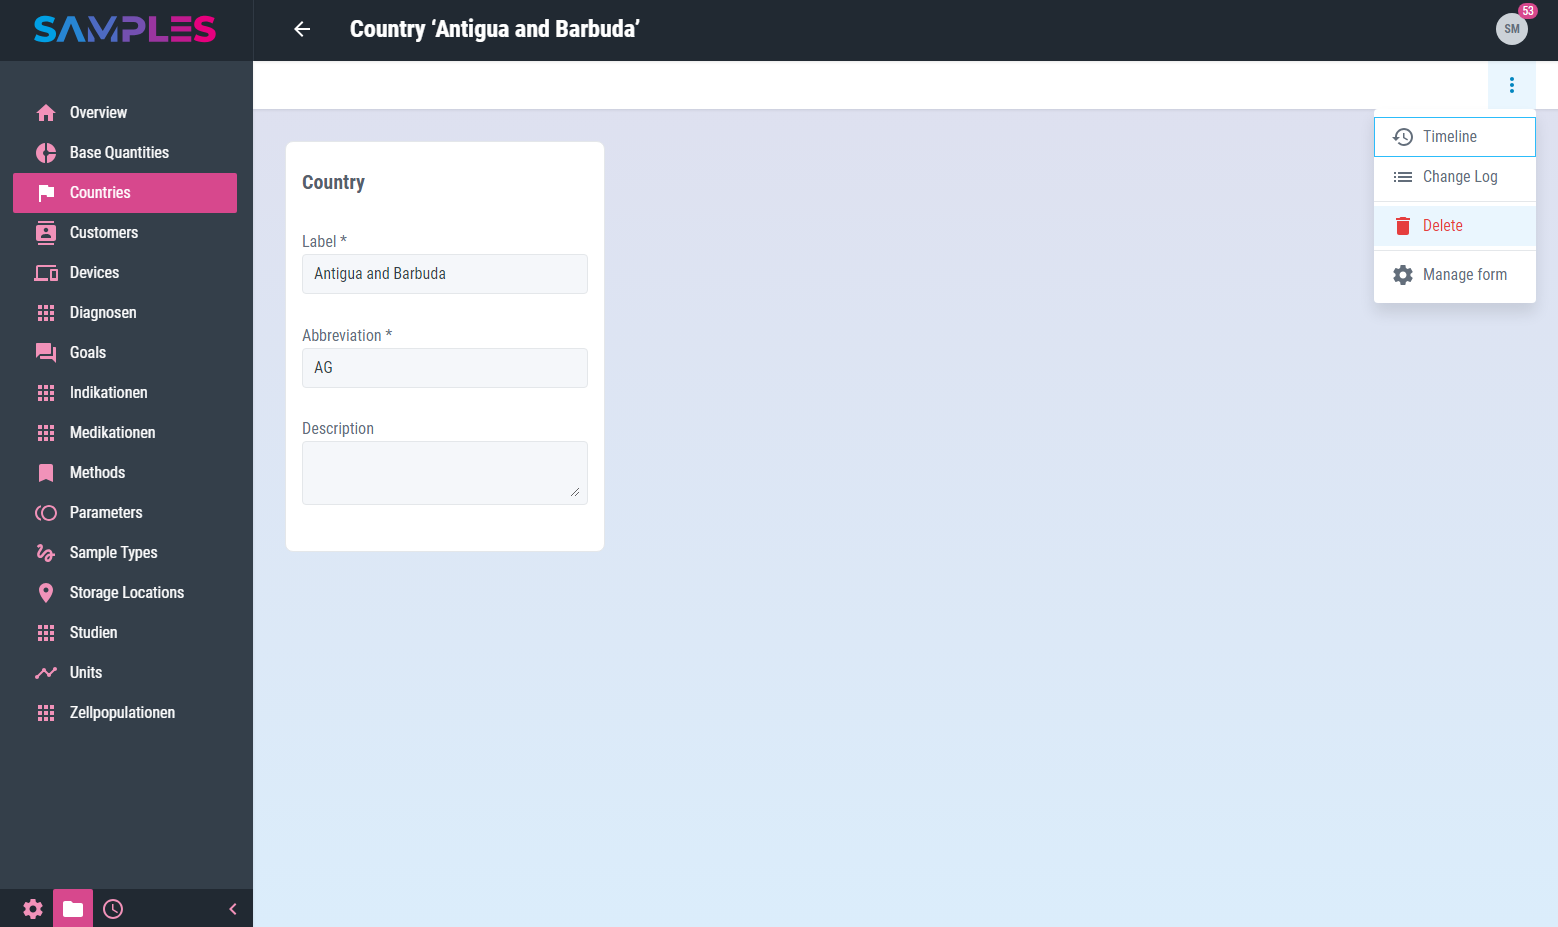
Alternatively, open the desired country for editing and call the Delete function there in the 3-dot-menu of the toolbar.
In addition, it is also possible to remove several countries at the same time. To do this, select the list items to be removed in the Master Data / Countries view and then call the Delete function in the 3-dot-menu of the toolbar.
In all 3 cases, a message is then displayed to confirm the action. Only after the confirmation of the user the removal of the selected item takes place.
|
|
The removal of a country is not logged in the history and cannot be undone or retraced after confirmation. |
|
|
Related articles with additional content: |
Daily routine tasks
The daily laboratory routine is shaped by the path of the sample through the laboratory process. The registration of samples and their preparation is followed by examination, data analysis, validation, etc. In this manual section, all related application functions are explained in detail.
Orders
Orders bundle all information about a service request to examine one or more samples with a specific objective for an external client.
List and search orders
A searchable listing of all available data about orders can be found in view Routine / Orders.
The listing contains information about:
| Title | Meaning |
|---|---|
Order number |
Internal identification number of the order |
Processing status |
Current processing status of the order |
Goals |
List of goals for the samples of the order |
In the toolbar of the view you can find even more functions for processing orders:
- Create entry
-
adds a new order
- Download list contents
-
generates an Excel-file with all important order data
- Reload list
-
updates the content of the listing
- Delete selected entries
-
removes the selected list entries
|
|
Related articles with additional content: |
Download order list
To export and download the current contents of the Routine / Orders view to a file in MS Excel format (.xlsx), the Download list contents function is called from the 3-dot menu of the toolbar.

The result is a file with the following content:
| Title | Meaning |
|---|---|
Auftragsnummer |
Internal identification number of the order |
Bearbeitungsstatus |
Current processing status of the order |
Untersuchungsziele |
List of goals associated to all samples of the order |
It is made available in the download folder of the web browser and can be further processed from there.
|
|
Related articles with additional content: |
Register new order
For the registration of a new order open view Routine / Orders and call the function Create entry.
A wizard opens for entering all the necessary information for the new entry in 5 steps:
Step 1: Customer
The first step involves selecting an already known customer or entering a new customer.
The following information is entered:
| Input field | Meaning | Remarks |
|---|---|---|
Name |
Readable name of the customer |
unique mandatory information |
Abbreviation |
Short name to identify and reference the customer in other parts of the app |
not editable after selection of a customer |
Organization |
Name of the parent organization to which this customer belongs |
not editable after selection of a customer |
Department |
Name of the department within the parent organization to which this customer belongs |
not editable after selection of a customer |
By calling Continue the input is continued with the next step.
Step 2: Order
Now the input of essential order data as well as the goals applicable to all samples of the order takes place.
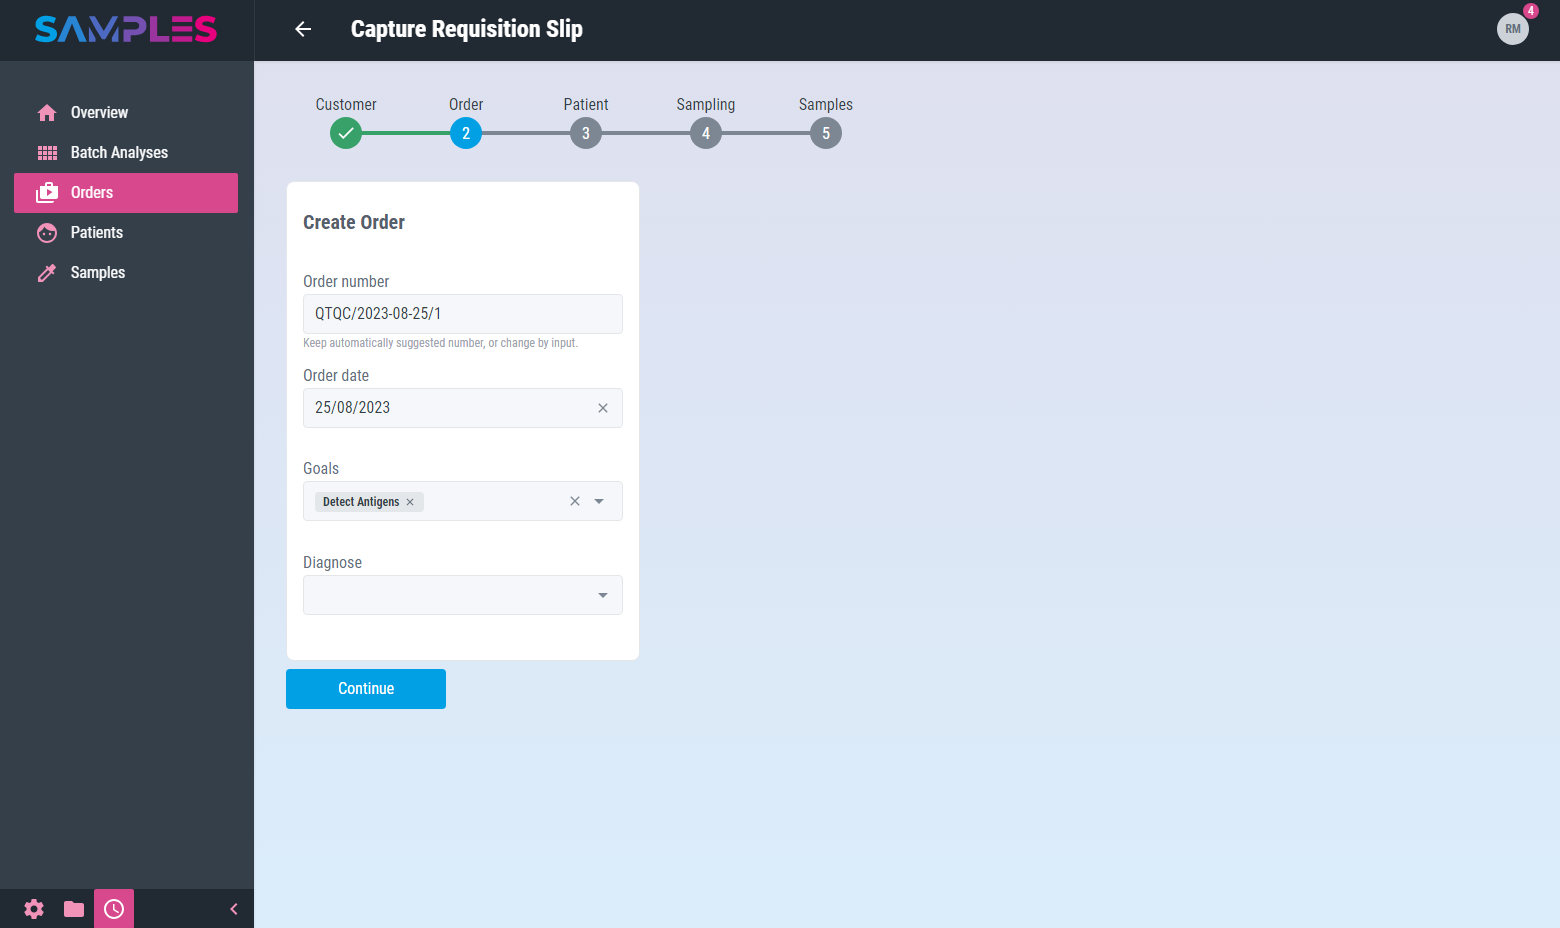
The following information is entered:
| Input field | Meaning | Remarks |
|---|---|---|
Order number |
Internal identification number of the order |
unique mandatory information |
Order date |
Date of order entry |
|
Goals |
List of goals for the samples of the order |
|
Diagnose |
Diagnosis of the patient from whom the samples were taken |
By calling Continue the input is continued with the next step.
Step 3: Patient
In this step, a patient is selected from the list or the data of a new patient is entered.
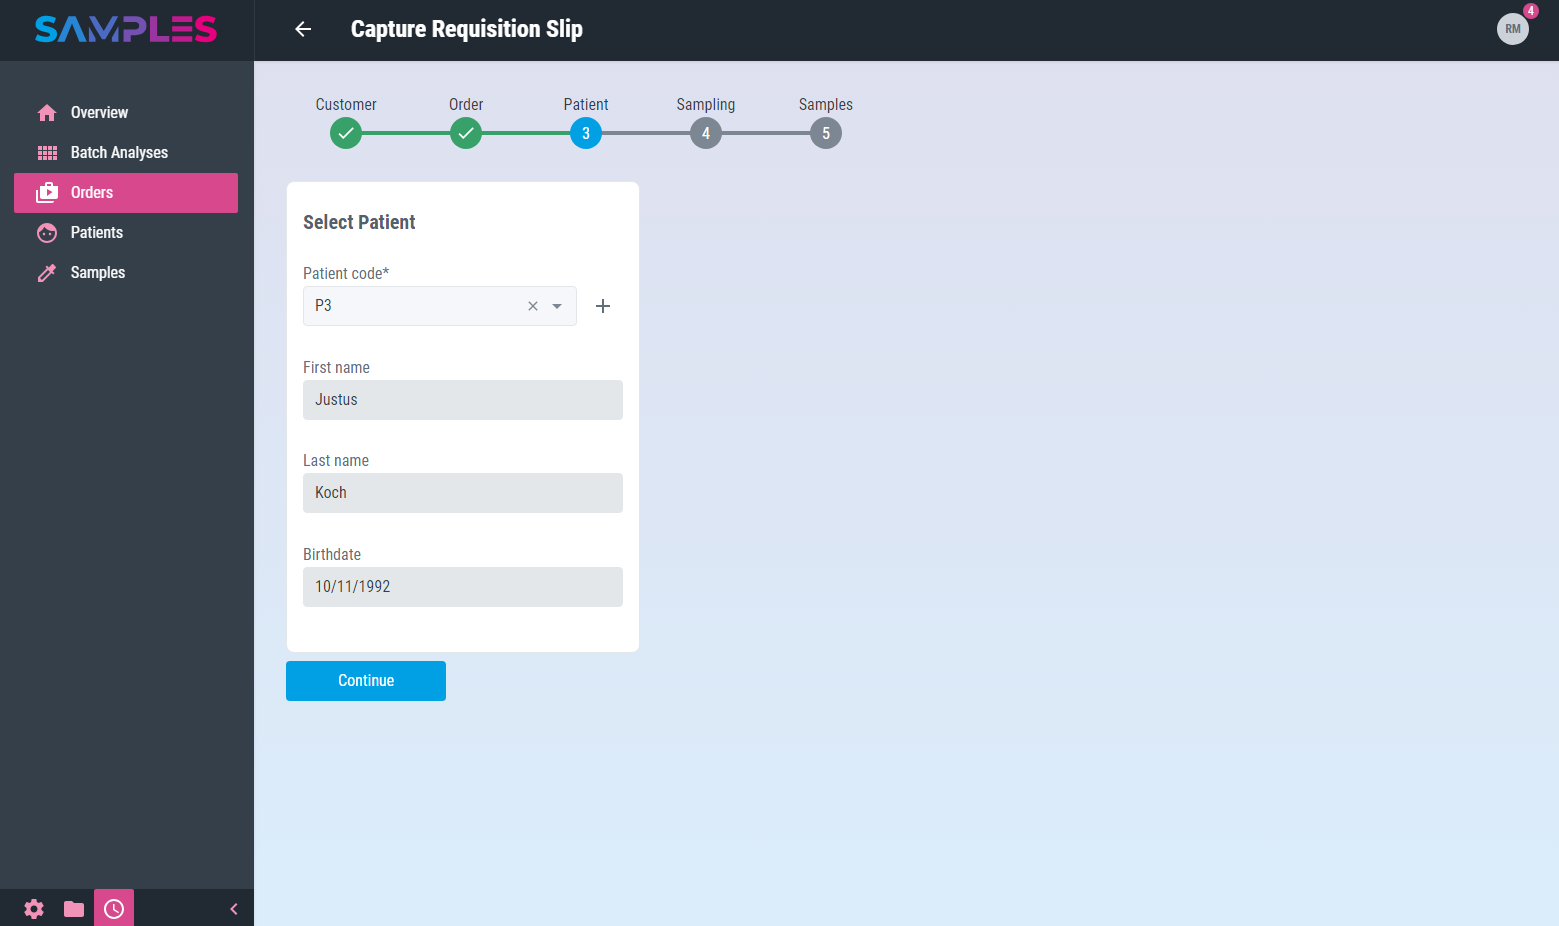
The following information is entered:
| Input field | Meaning | Remarks |
|---|---|---|
Patient code |
Pseudonymized or anonymized coding of the patient |
unique mandatory information |
First name |
Given name of the patient |
not editable after selecting a patient |
Last name |
Family name of the patient |
not editable after selecting a patient |
Birthdate |
Date of birth of the patient |
not editable after selecting a patient |
By calling Continue the input is continued with the next step.
Step 4: Sample collection
Now all background information about the collection of samples from the patient, that is necessary for further processing, is entered.
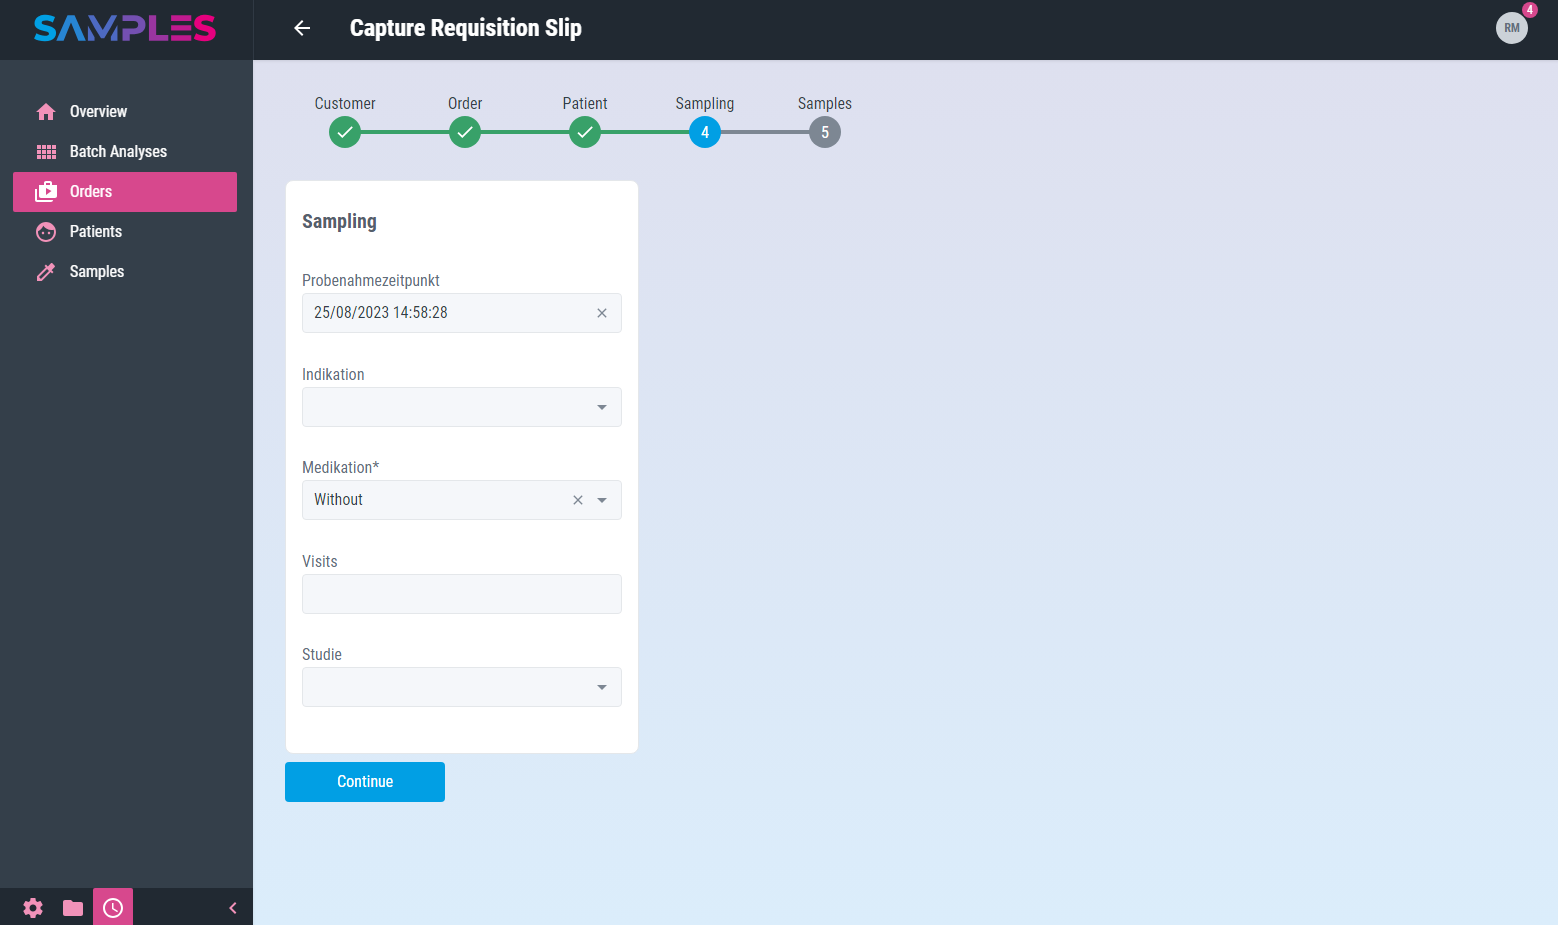
The following information is entered:
| Input field | Meaning | Remarks |
|---|---|---|
Probenahmezeitpunkt |
Date and time of collection of the samples from the patient |
|
Indikation |
Indication for the examination of the samples |
|
Medikation |
Medication given to the patient at the time of sample collection |
mandatory information |
Visits |
Sequence number of the patient’s current treatment step at the time of sampling |
|
Studie |
Assignment of the examination of the samples to a currently conducted clinical trial |
By calling Continue the input is continued with the next step.
Step 5: Samples
Finally, the last step is to enter the samples to be analyzed as part of the order.
A call to the Add sample button adds a new sample to the order. After adding or selecting a sample of the order in the Registered Samples list, the sample information can be edited:
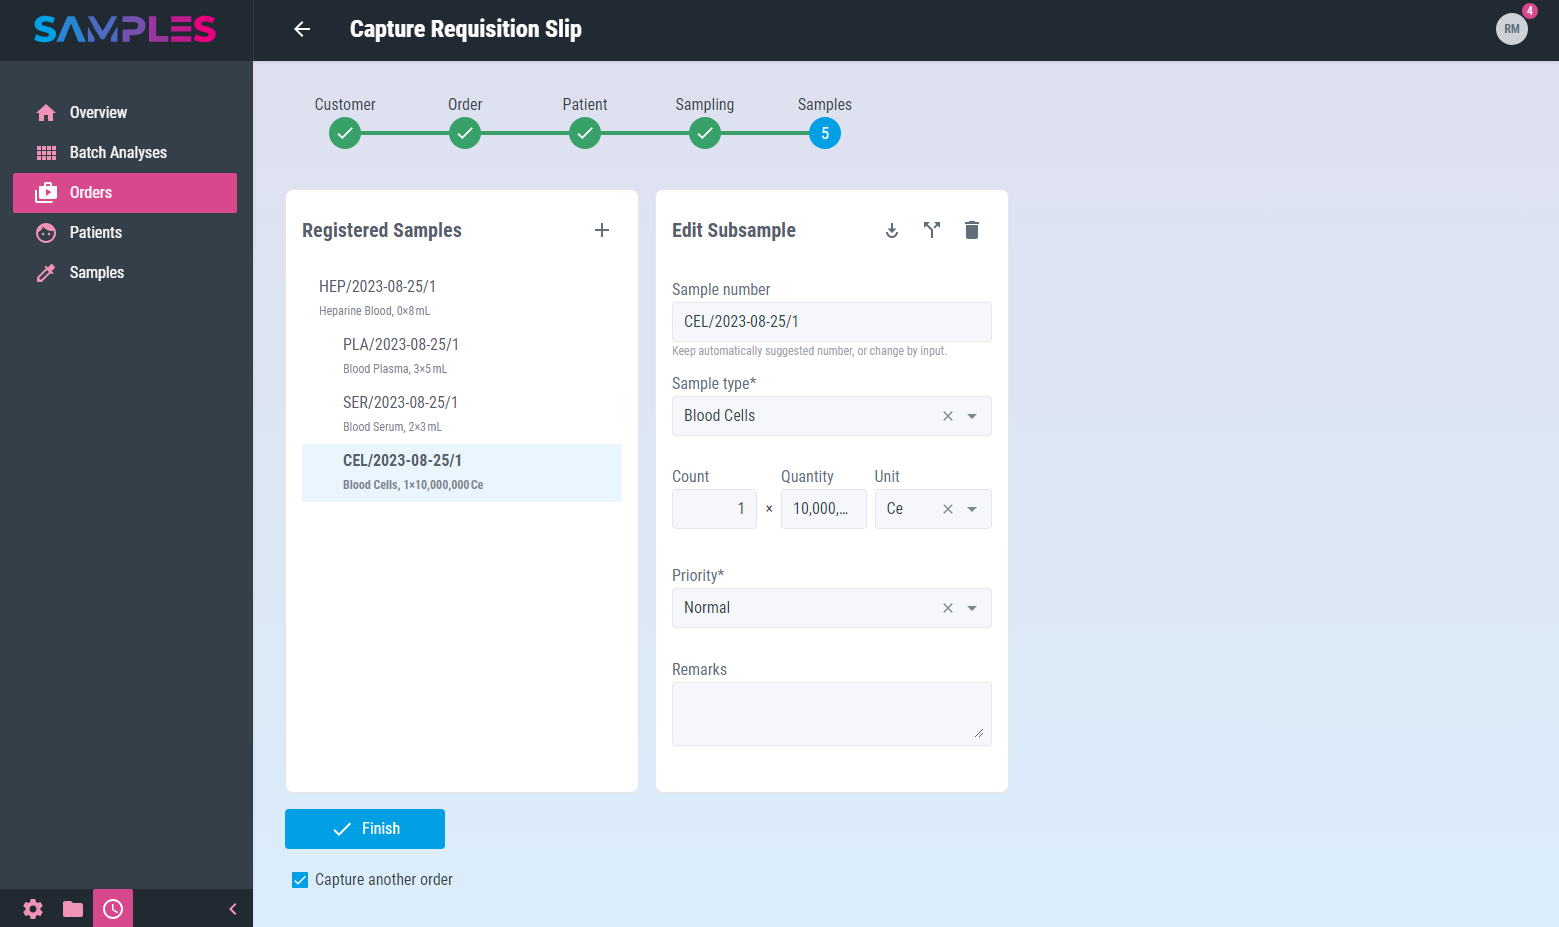
The following information is entered:
| Input field | Meaning | Remarks |
|---|---|---|
Sample number |
Internal identification number of the sample |
unique mandatory information |
Sample type |
Type of sample material |
mandatory information |
Count of tubes |
Number of tubes |
|
Volume |
Tube size |
|
Unit |
Unit associated to tube size |
|
Priority |
Priority for processing the sample |
mandatory information |
Remarks |
Supplementary notes on sample collection or processing |
Calling the Delete sample function removes the selected sample from the Registered samples list.
Finishing
Only the click on the button Finish completes the assistant.
Your input is checked by the app for completeness and correctness before it is permanently saved. In case of errors in the input, a hint message is displayed and the corresponding input field is highlighted.
The time and editor of the input are recorded in the history of the new entry. Finally, the updated list of orders is opened again.
|
|
Related articles with additional content: |
Edit order
To display and edit all information about an order, call up the desired list entry by clicking on it in the Routine / Orders view.
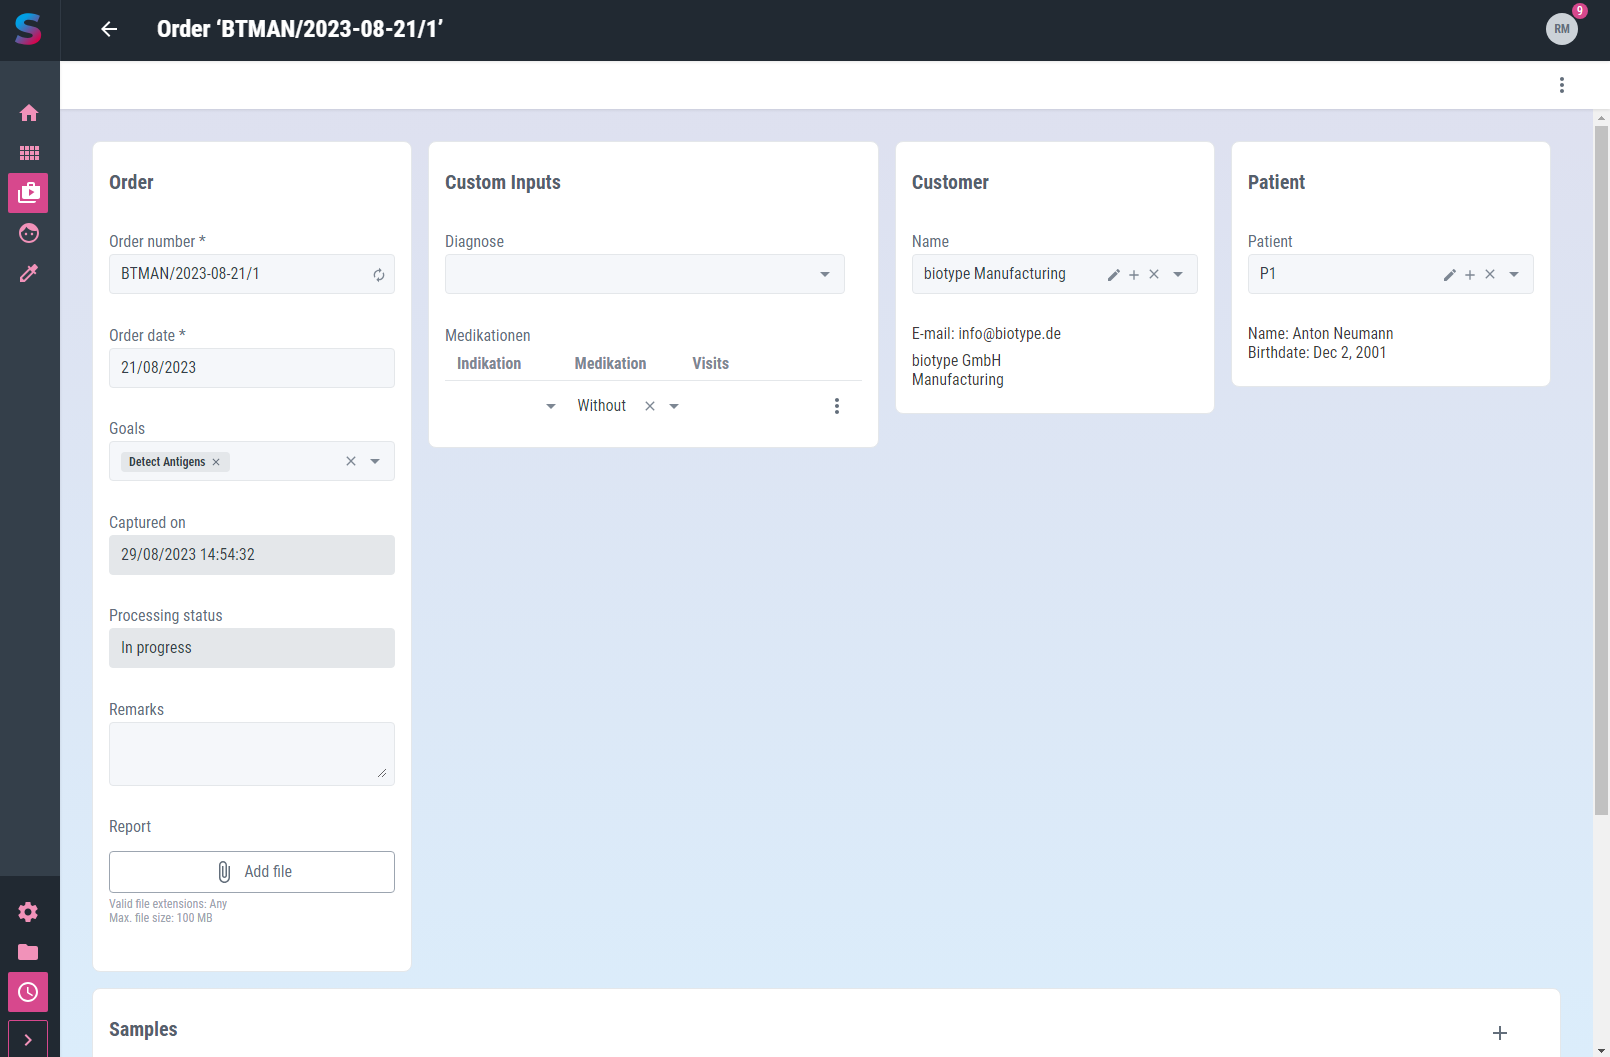
This opens the editing screen with the following information:
| Input field | Meaning | Remarks |
|---|---|---|
Order number |
Internal identification number of the order |
unique mandatory information |
Order date |
Date of order entry |
mandatory information |
Goals |
List of goals for the samples of the order |
|
Captured on |
Time of registration of the order |
read-only |
Processing status |
Current processing status of the order |
read-only |
Remarks |
Additional remarks to the order |
|
Name |
Readable name of the customer |
Edit the selection list in Master data / Customers |
Patient |
Pseudonymized or anonymized coding of the patient |
Edit the selection list in Routine / Patients |
|
|
Your input is checked, processed and saved immediately. |
Any input errors are displayed as a message and the relevant input fields are highlighted accordingly. The time and the editor are recorded in the history of the entry.
In the toolbar of the view you can find even more functions for editing orders:
- History
-
shows the editors and the time for the creation and last editing of the item
- Delete
-
removes the order from the app’s memory
Calling the Back function in the toolbar closes the view and takes you back to the list view.
|
|
Related articles with additional content: |
Archive order
To archive an order, open the appropriate list item in the Routine / Orders view and call the Archive function in the 3-point menu of the toolbar.
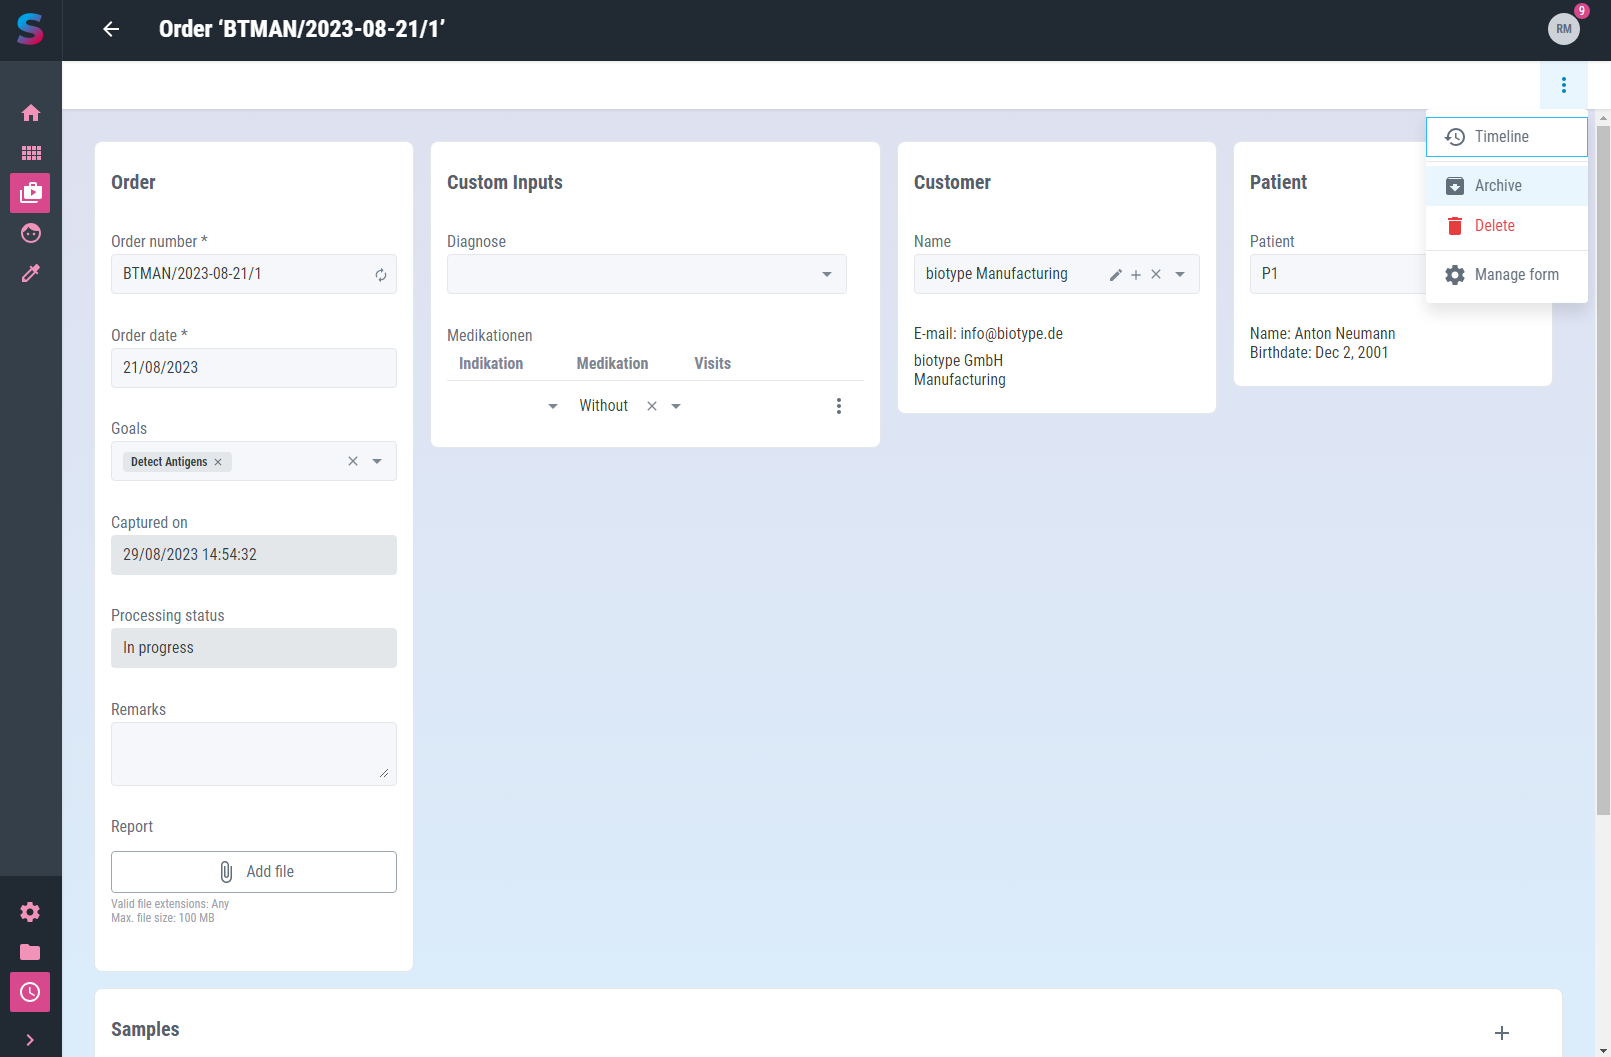
After confirming the action, the item is archived.
The editor and the time of the action are recorded in the history of the archived item. The order can no longer be edited and does not appear in the overview list (unless you activate the Show archived option there).
|
|
Related articles with additional content: |
Restore archived order
To restore an archived order, first perform an archive search (with the Show archived option) for the desired list item in the Routine / Orders view. Then open its edit view by clicking on the item in the list.
Since this is still an archived item, editing is not possible. To restore, i.e. undo the archiving, now call the Restore function in the 3-point menu of the toolbar.
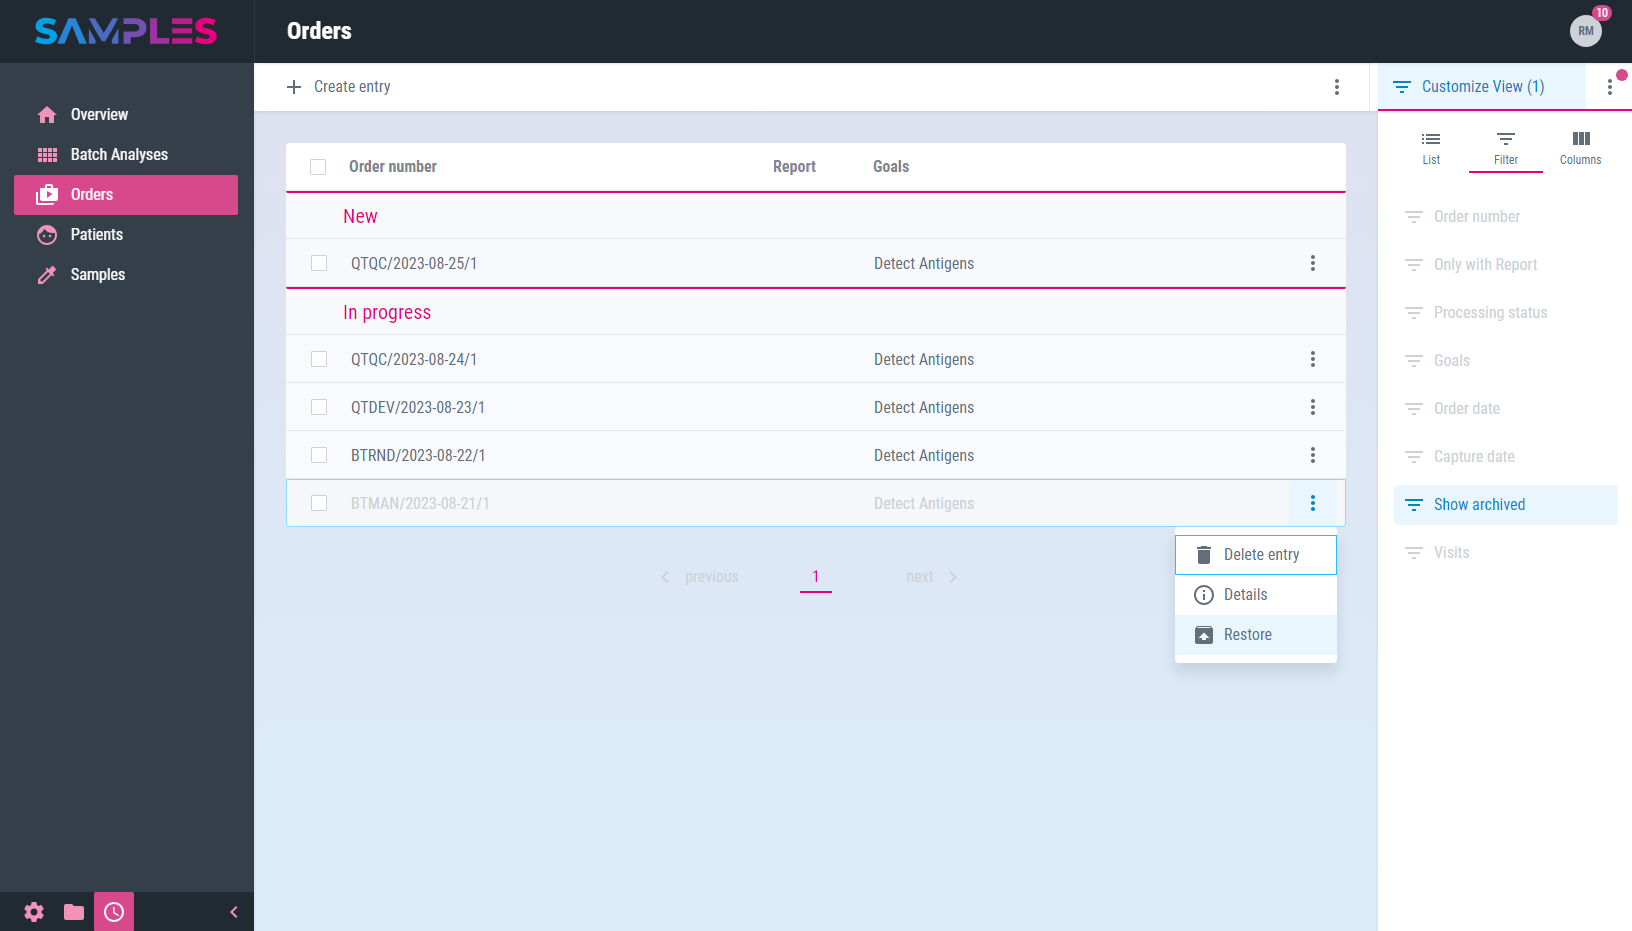
The editor and time of the action are recorded in the history of the item. The order that has now been restored can now be edited and also appears again in the overview list without the need for an archive search.
|
|
Related articles with additional content: |
Remove order
To remove an order, call the Delete entry function in the 3-dot-menu of the list item in the Routine / Orders view.
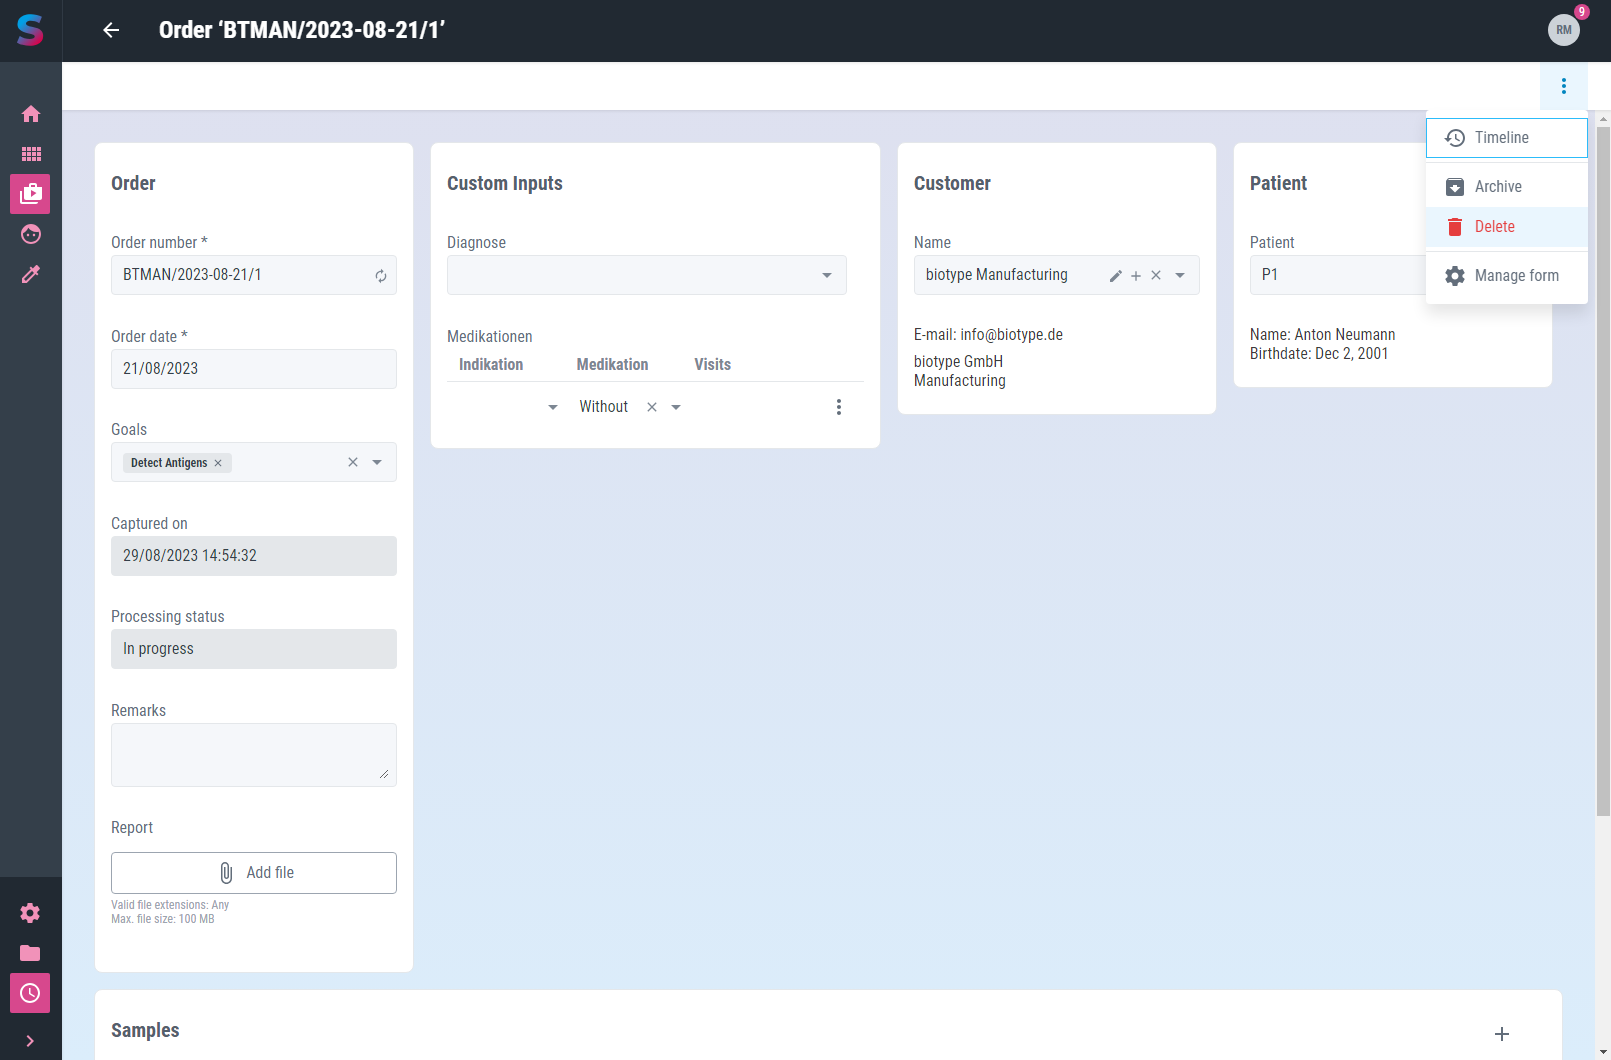
Alternatively, open the desired order for editing and call the Delete function there in the 3-dot-menu of the toolbar.
In addition, it is also possible to remove several orders at the same time. To do this, select the list items to be removed in the Routine / Orders view and then call the Delete function in the 3-dot-menu of the toolbar.
In all 3 cases, a message is then displayed to confirm the action. Only after the confirmation of the user the removal of the selected item takes place.
|
|
The removal of an order is not logged in the history and cannot be undone or retraced after confirmation. |
|
|
Related articles with additional content: |
Patients
In a clinical setting, the examination of a sample often serves the purpose of making a diagnosis or a treatment decision for a patient.
List and search patients
A searchable listing of all available data about patients can be found in view Routine / Patients.
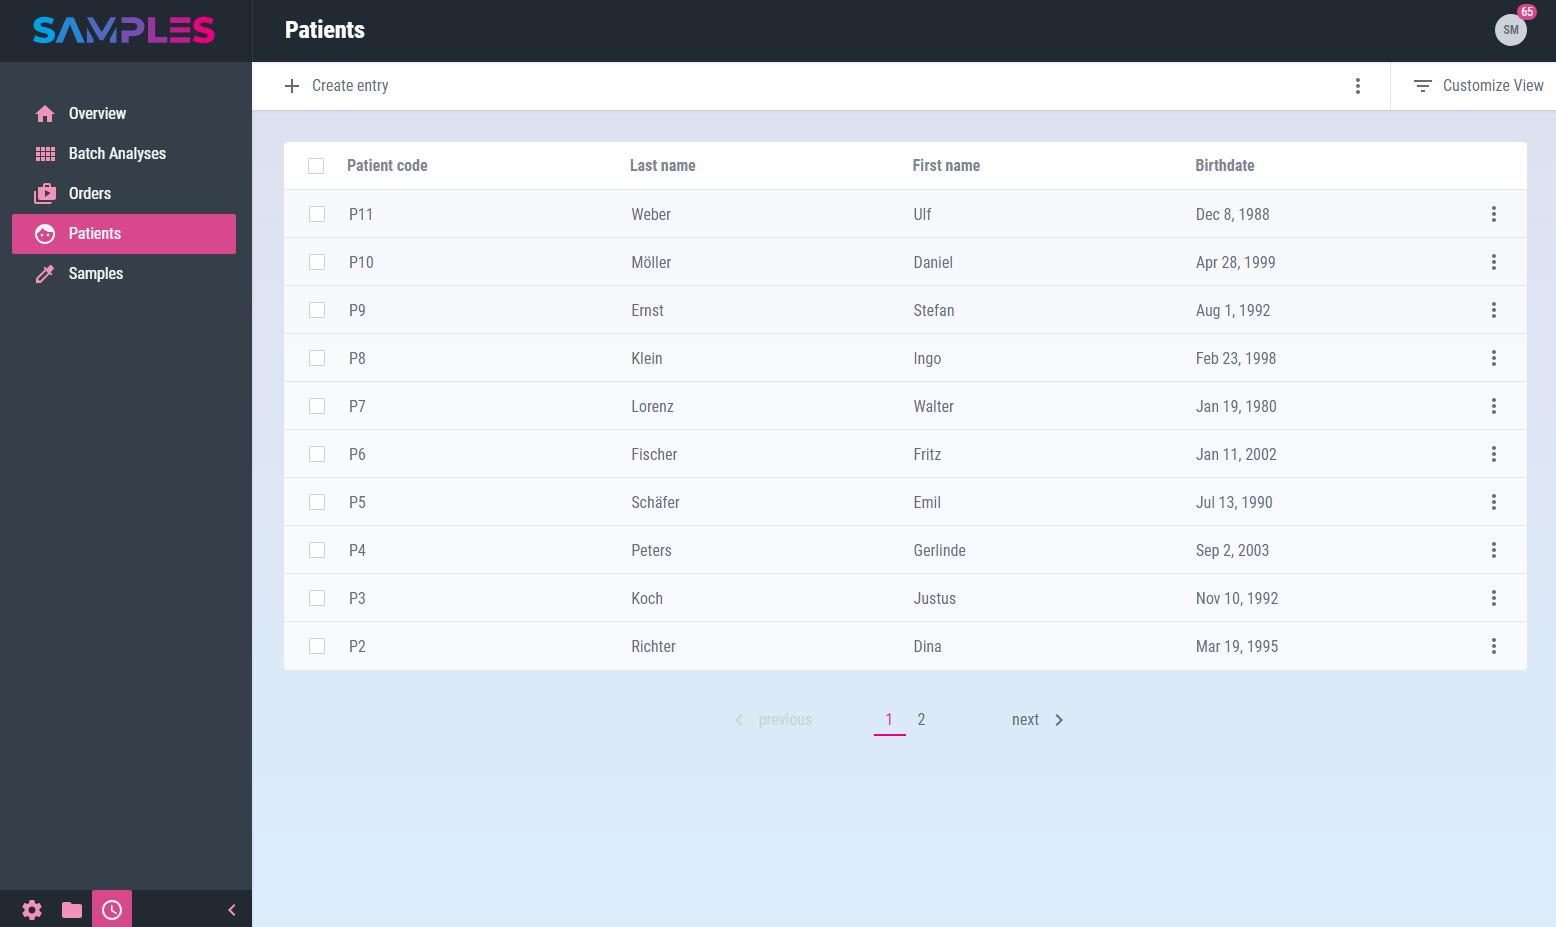
The listing contains information about:
| Title | Meaning |
|---|---|
Patient code |
Pseudonymized or anonymized coding of the patient |
Last name |
Family name of the patient |
First name |
Given name of the patient |
Birthdate |
Date of birth of the patient |
In the toolbar of the view you can find even more functions for processing patients:
- Create entry
-
adds a new patient
- Download list contents
-
generates an Excel-file with all important patient data
- Reload list
-
updates the content of the listing
- Delete selected entries
-
removes the selected list entries
|
|
Related articles with additional content: |
Download patient list
To export and download the current contents of the Routine / Patients view to a file in MS Excel format (.xlsx), the Download list contents function is called from the 3-dot menu of the toolbar.
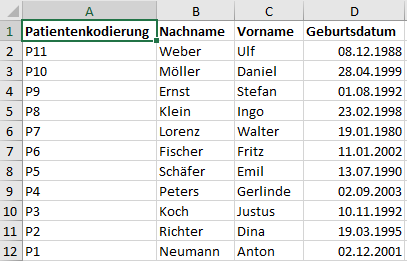
The result is a file with the following content:
| Title | Meaning |
|---|---|
Patientenkodierung |
Pseudonymized or anonymized coding of the patient |
Nachname |
Family name of the patient |
Vorname |
Given name of the patient |
Geburtsdatum |
Date of birth of the patient |
It is made available in the download folder of the web browser and can be further processed from there.
|
|
Related articles with additional content: |
Register new patient
For the registration of a new patient open view Routine / Patients and call the function Create entry.
A wizard opens for entering all the necessary information for the new entry:
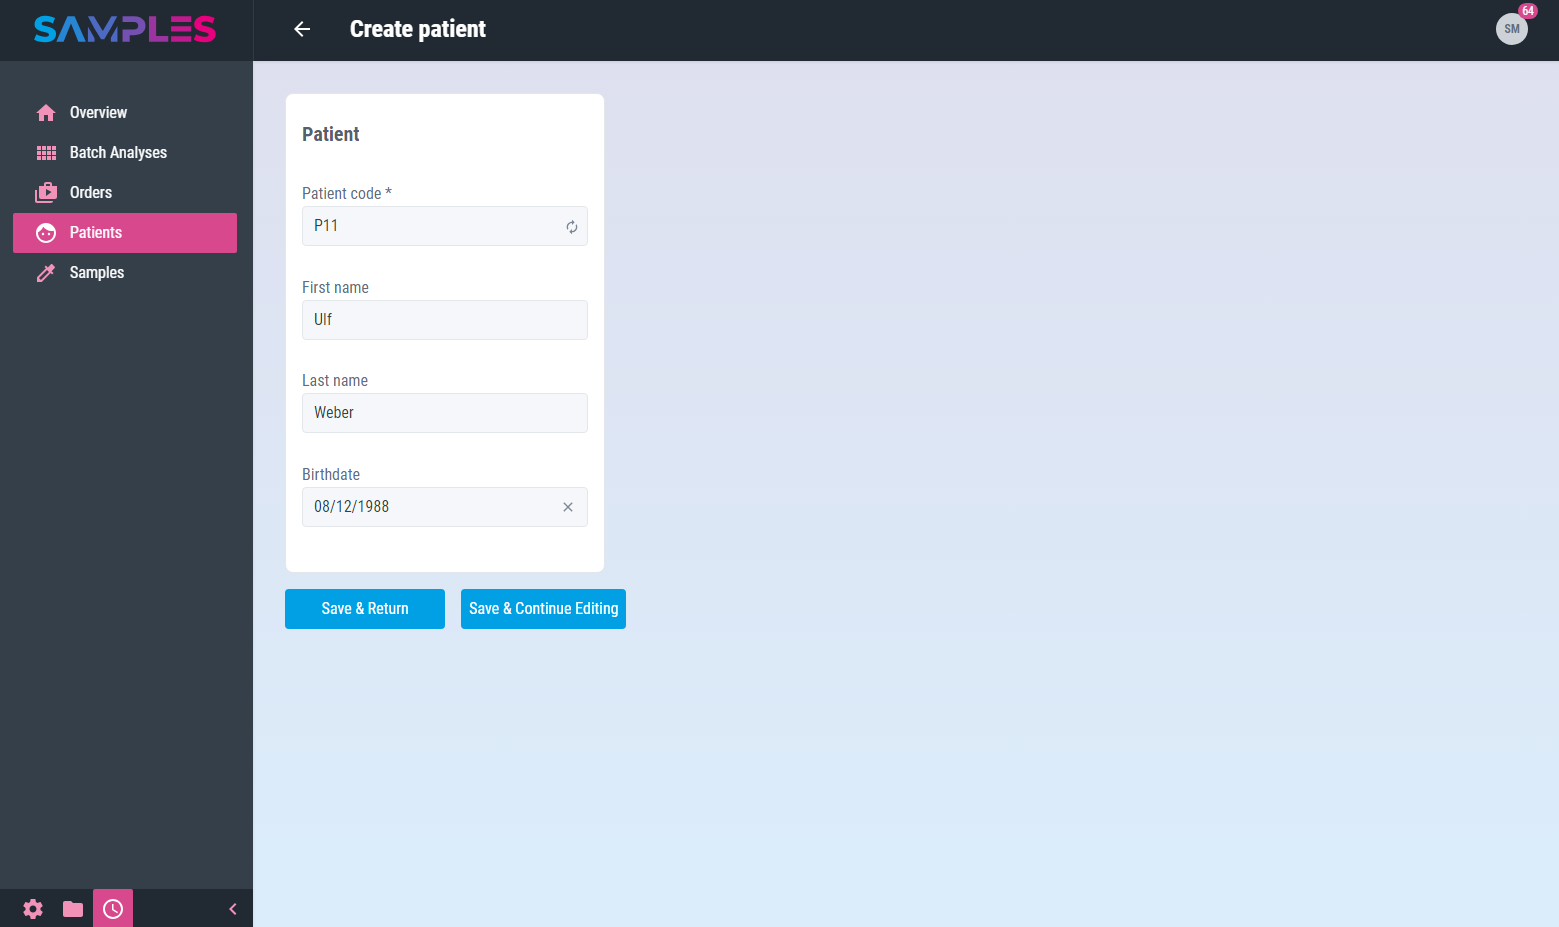
This includes:
| Input field | Meaning | Remarks |
|---|---|---|
Patient code |
Pseudonymized or anonymized coding of the patient |
unique mandatory information |
First name |
Given name of the patient |
|
Last name |
Family name of the patient |
|
Birthdate |
Date of birth of the patient |
Only the click on the button Finish completes the assistant.
Your input is checked by the app for completeness and correctness before it is permanently saved. In case of errors in the input, a hint message is displayed and the corresponding input field is highlighted.
The time and editor of the input are recorded in the history of the new entry. Finally, the updated list of patients is opened again.
|
|
Related articles with additional content: |
Edit patient
To display and edit all information about a patient, call up the desired list entry by clicking on it in the Routine / Patients view.
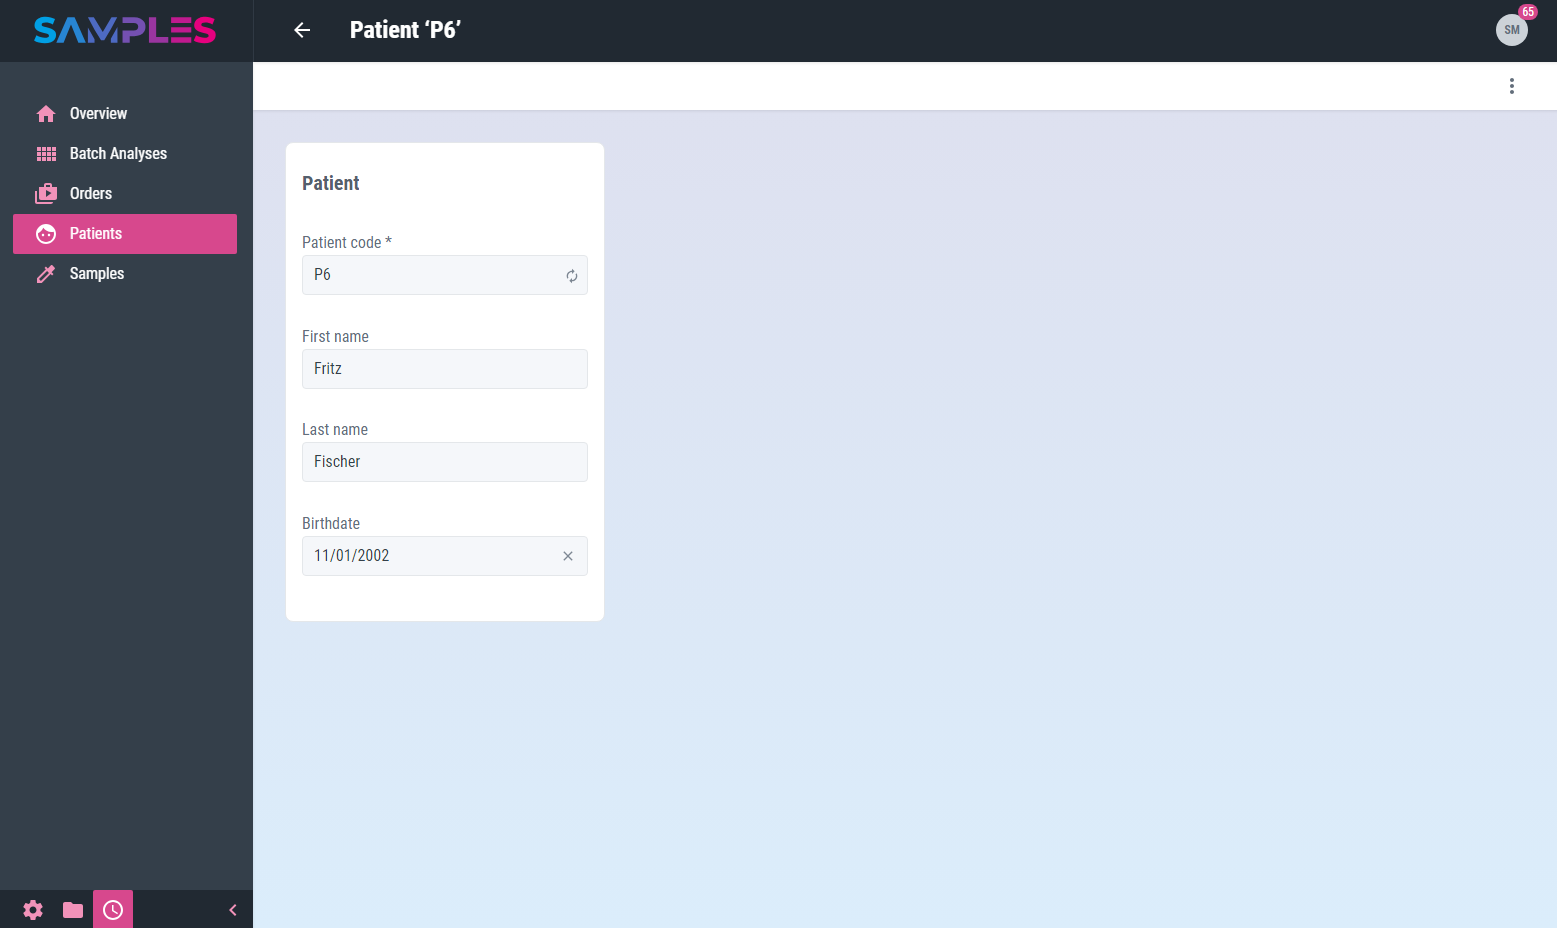
This opens the editing screen with the following information:
| Input field | Meaning | Remarks |
|---|---|---|
Patient code |
Pseudonymized or anonymized coding of the patient |
unique mandatory information |
First name |
Given name of the patient |
|
Last name |
Family name of the patient |
|
Birthdate |
Date of birth of the patient |
|
|
Your input is checked, processed and saved immediately. |
Any input errors are displayed as a message and the relevant input fields are highlighted accordingly. The time and the editor are recorded in the history of the entry.
In the toolbar of the view you can find even more functions for editing patients:
- History
-
shows the editors and the time for the creation and last editing of the item
- Delete
-
removes the patient from the app’s memory
Calling the Back function in the toolbar closes the view and takes you back to the list view.
|
|
Related articles with additional content: |
Remove patient
To remove a patient, call the Delete entry function in the 3-dot-menu of the list item in the Routine / Patients view.
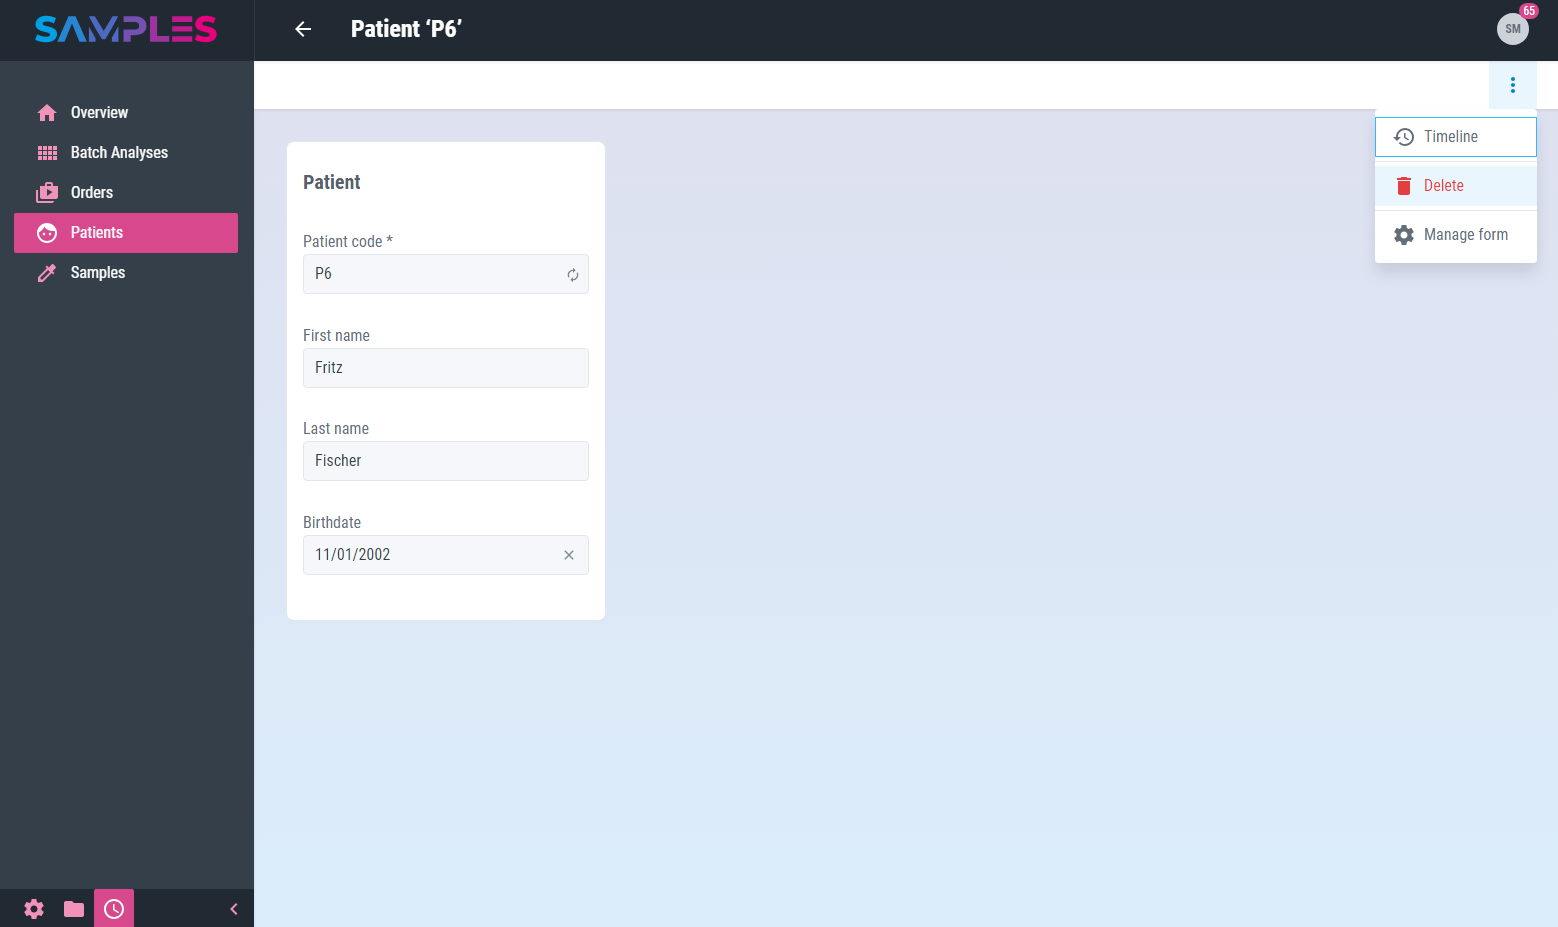
Alternatively, open the desired patient for editing and call the Delete function there in the 3-dot-menu of the toolbar.
In addition, it is also possible to remove several patients at the same time. To do this, select the list items to be removed in the Routine / Patients view and then call the Delete function in the 3-dot-menu of the toolbar.
In all 3 cases, a message is then displayed to confirm the action. Only after the confirmation of the user the removal of the selected item takes place.
|
|
The removal of a patient is not logged in the history and cannot be undone or retraced after confirmation. |
|
|
Related articles with additional content: |
Samples
The sample material to be examined and the app’s namesake. The aim of the daily laboratory routine is to gain information through the processing and examination of samples.
List and search samples
A searchable listing of all available data about samples can be found in view Routine / Samples.
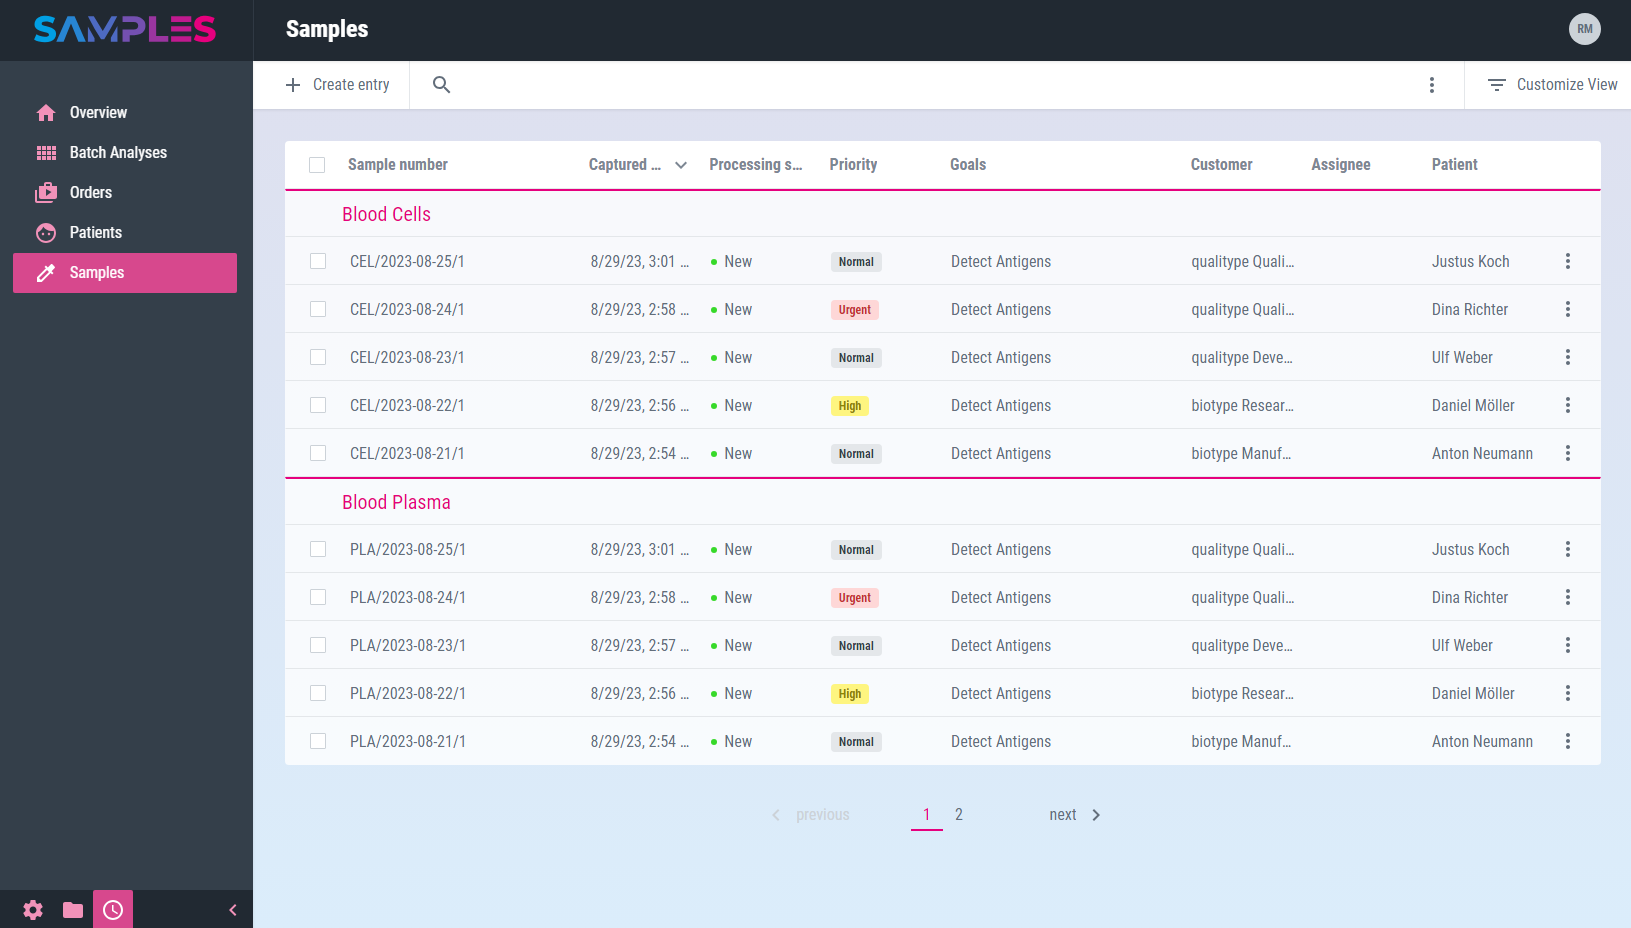
The listing contains information about:
| Title | Meaning |
|---|---|
Sample number |
Internal identification number of the sample |
Sample type |
Type of sample material |
Captured on |
Time of registration of the sample |
Processing status |
Current processing status of the sample |
Priority |
Priority for processing the sample |
Goals |
List of goals for the sample |
Customer |
Name of the external customer who requested examination of the sample |
Assignee |
Login name of the current editor of the sample |
Patient |
Name of the patient from whom the sample was taken |
In the toolbar of the view you can find even more functions for processing samples:
- Create entry
-
adds a new sample
- Search sample by barcode
-
opens the sample by the barcode on the label
- Download list contents
-
generates an Excel-file with all important sample data
- Reload list
-
updates the content of the listing
- Delete selected entries
-
removes the selected list entries
- Download results
-
generates an Excel-file with all examination results of the selected samples
|
|
Related articles with additional content: |
Download sample list
To export and download the current contents of the Routine / Samples view to a file in MS Excel format (.xlsx), the Download list contents function is called from the 3-dot menu of the toolbar.
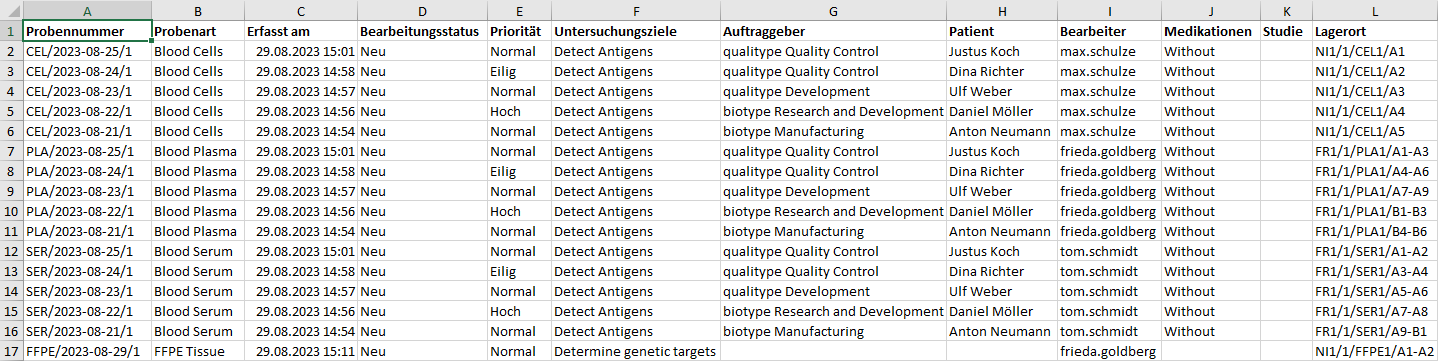
The result is a file with the following content:
| Title | Meaning |
|---|---|
Probennummer |
Internal identification number of the sample |
Probenart |
Type of sample material |
Erfasst am |
Time of registration of the sample |
Bearbeitungsstatus |
Current processing status of the sample |
Priorität |
Priority for processing the sample |
Untersuchungsziele |
List of goals for the sample |
Auftraggeber |
Name of the external customer who requested examination of the sample |
Patient |
Name of the patient from whom the sample was taken |
Bearbeiter |
Login name of the current editor of the sample |
Medikationen |
Medication given to the patient at the time of sample collection |
Studie |
Assignment of the examination of the samples to a currently conducted study |
Einfrierort |
Current storage location, compartment, box and position of the sample |
It is made available in the download folder of the web browser and can be further processed from there.
|
|
Related articles with additional content: |
Register new sample
For the registration of a new sample open view Routine / Samples and call the function Create entry.
A wizard opens for entering all the necessary information for the new entry:
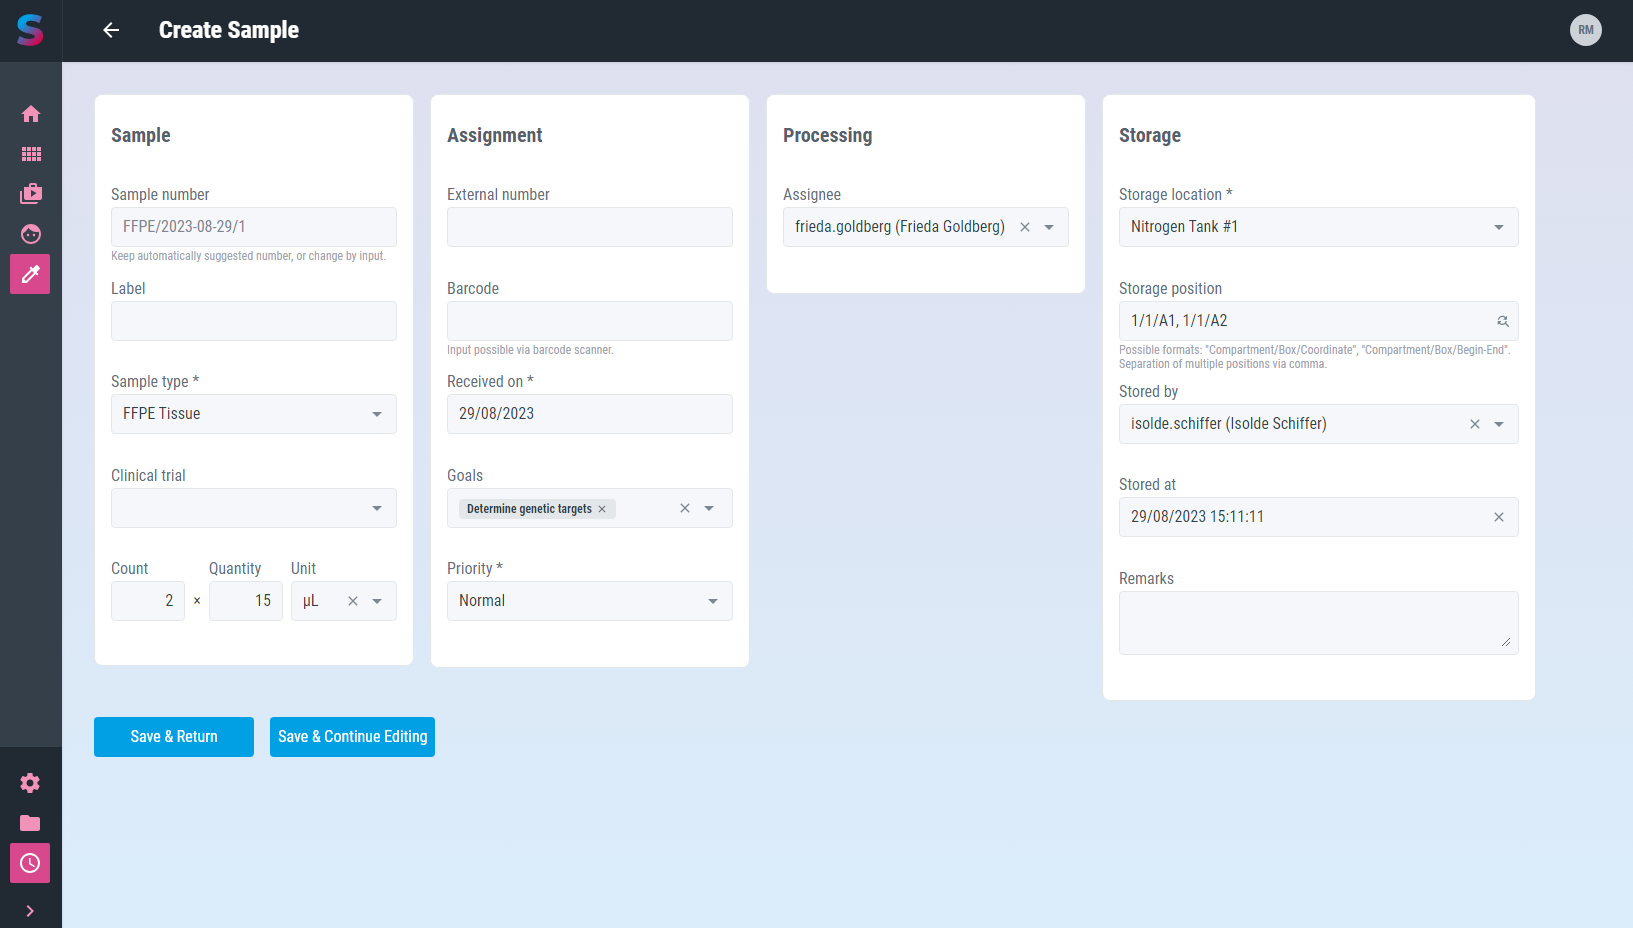
This includes:
| Input field | Meaning | Remarks |
|---|---|---|
Sample number |
Internal identification number of the sample |
Unique mandatory information |
Label |
Supplementary label the sample |
|
Sample type |
Type of sample material |
Mandatory information, edit the selection list in Master Data / Sample Types |
Clinical trial |
Assignment of the examination of the samples to a currently conducted study |
Edit the selection list in Master Data / Clinical Trials |
Count of tubes |
Number of sample tubes |
|
Volume |
Size of the sample tubes |
|
Unit |
Unit associated to the size |
Edit the selection list in Master Data / Units |
External number |
External identification number of the sample for reference purposes |
|
Barcode |
Additional information stored in the barcode label of the sample |
|
Received on |
Date of receipt of the sample in the laboratory |
mandatory information |
Goals |
List of goals for the sample |
Edit the selection list in Master Data / Goals |
Priority |
Priority for processing the sample |
mandatory information |
Assignee |
Login name of the current editor of the sample |
Edit the selection list in Administration / Users |
Storage location |
Current or planned storage location for the sample |
Edit the selection list in Master Data / Storage Locations |
Storage position |
Current or planned position within the above-mentioned storage location for the sample |
|
Stored by |
Employee responsible for the storage of the sample |
Edit the selection list in Administration / Users |
Stored on |
Time of storage of the sample |
|
Remarks |
Supplementary notes on the storage of the sample |
Only the click on the button Finish completes the assistant.
Your input is checked by the app for completeness and correctness before it is permanently saved. In case of errors in the input, a hint message is displayed and the corresponding input field is highlighted.
The time and editor of the input are recorded in the history of the new entry. Finally, the updated list of samples is opened again.
|
|
Related articles with additional content: |
Edit sample
To display and edit all information about a sample, call up the desired list entry by clicking on it in the Routine / Samples view.
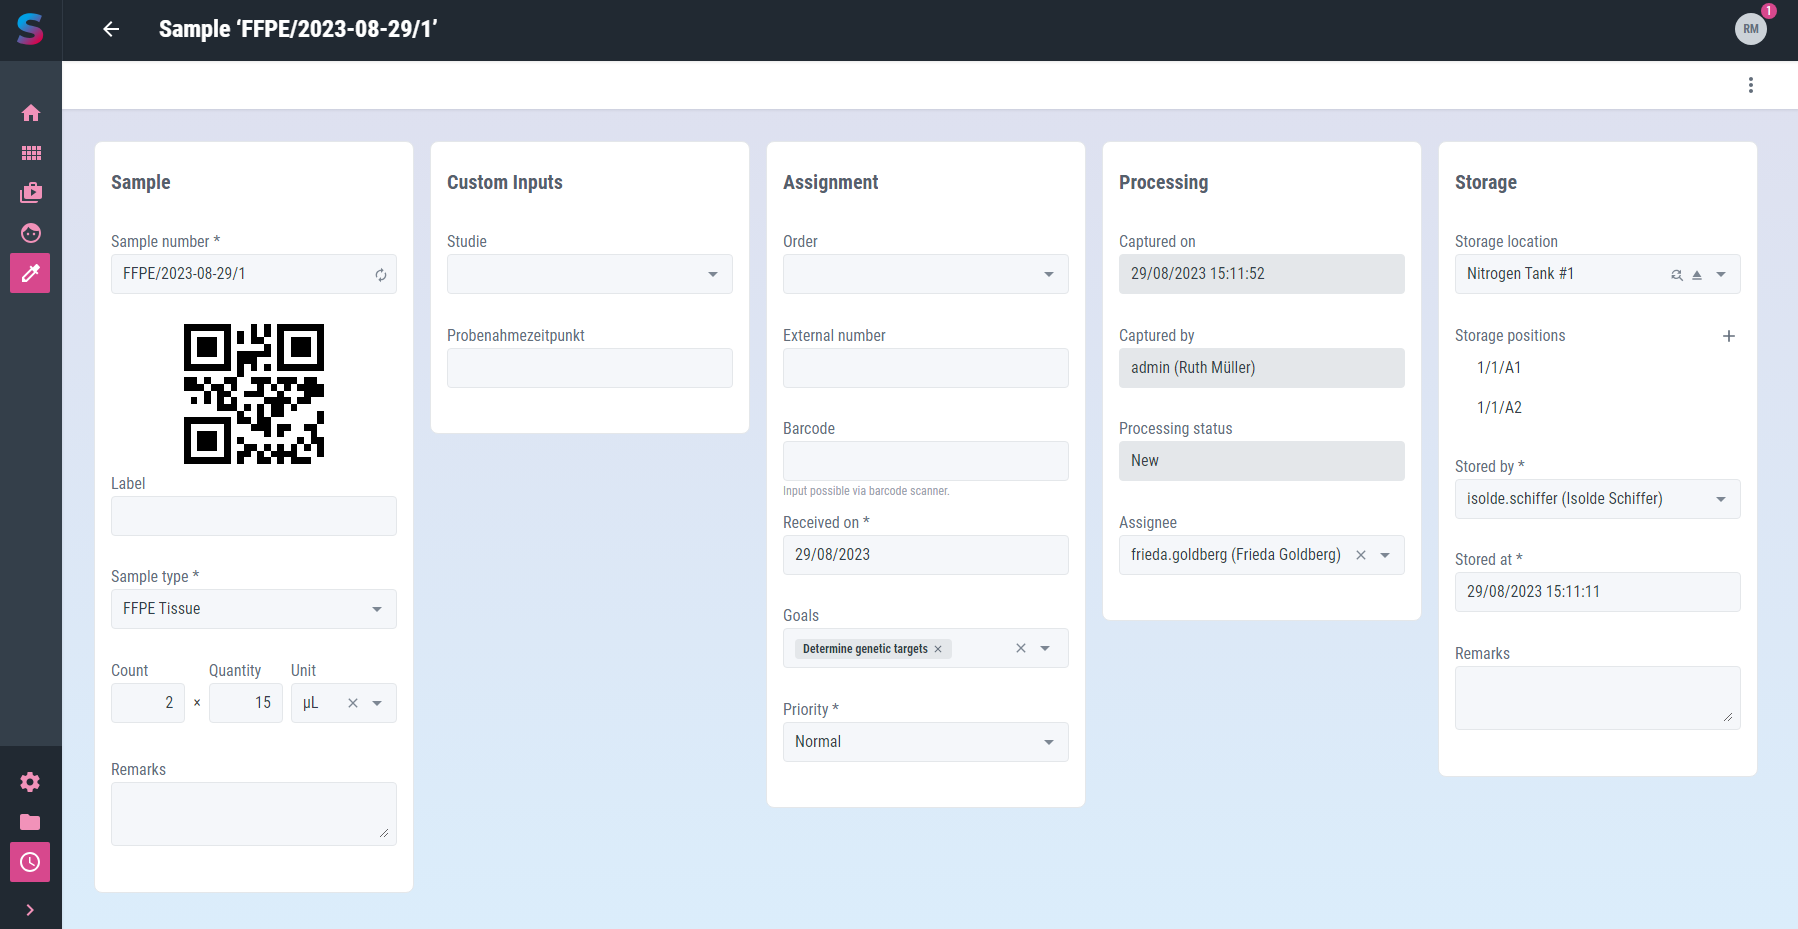
This opens the editing screen with the following information:
| Input field | Meaning | Remarks |
|---|---|---|
Sample number |
Internal identification number of the sample |
Unique mandatory information |
Label |
Supplementary label the sample |
|
Sample type |
Type of sample material |
read-only |
Count of tubes |
Number of sample tubes |
|
Volume |
Size of the sample tubes |
|
Unit |
Unit associated to the size |
Edit the selection list in Master Data / Units |
Remarks |
Supplementary notes to the sample |
|
Order |
Internal identification number of the order |
Edit the selection list in Routine / Orders |
External number |
External identification number of the sample for reference purposes |
|
Barcode |
Additional information stored in the barcode label of the sample |
|
Received on |
Date of receipt of the sample in the laboratory |
mandatory information |
Goals |
List of goals for the sample |
Edit the selection list in Master Data / Goals |
Priority |
Priority for processing the sample |
mandatory information |
Captured on |
Time of sample registration |
read-only |
Captured by |
Employee responsible for the registration of the sample |
read-only |
Processing status |
Current processing status of the sample |
read-only |
Assignee |
Login name of the current editor of the sample |
Edit the selection list in Administration / Users |
Storage location |
Current or planned storage location for the sample |
Edit the selection list in Master Data / Storage Locations |
Storage position |
Current or planned position within the above-mentioned storage location for the sample |
|
Stored by |
Employee responsible for the storage of the sample |
Edit the selection list in Administration / Users |
Stored on |
Time of storage of the sample |
|
Remarks |
Supplementary notes on the storage of the sample |
|
|
Your input is checked, processed and saved immediately. |
Any input errors are displayed as a message and the relevant input fields are highlighted accordingly. The time and the editor are recorded in the history of the entry.
In the toolbar of the view you can find even more functions for editing samples:
- History
-
shows the editors and the time for the creation and last editing of the item
- Delete
-
removes the sample from the app’s memory
Calling the Back function in the toolbar closes the view and takes you back to the list view.
|
|
Related articles with additional content: |
Archive sample
To archive a sample, open the appropriate list item in the Routine / Samples view and call the Archive function in the 3-point menu of the toolbar.

After confirming the action, the item is archived.
The editor and the time of the action are recorded in the history of the archived item. The sample can no longer be edited and does not appear in the overview list (unless you activate the Show archived option there).
|
|
Related articles with additional content: |
Restore archived sample
To restore an archived sample, first perform an archive search (with the Show archived option) for the desired list item in the Routine / Samples view. Then open its edit view by clicking on the item in the list.
Since this is still an archived item, editing is not possible. To restore, i.e. undo the archiving, now call the Restore function in the 3-point menu of the toolbar.
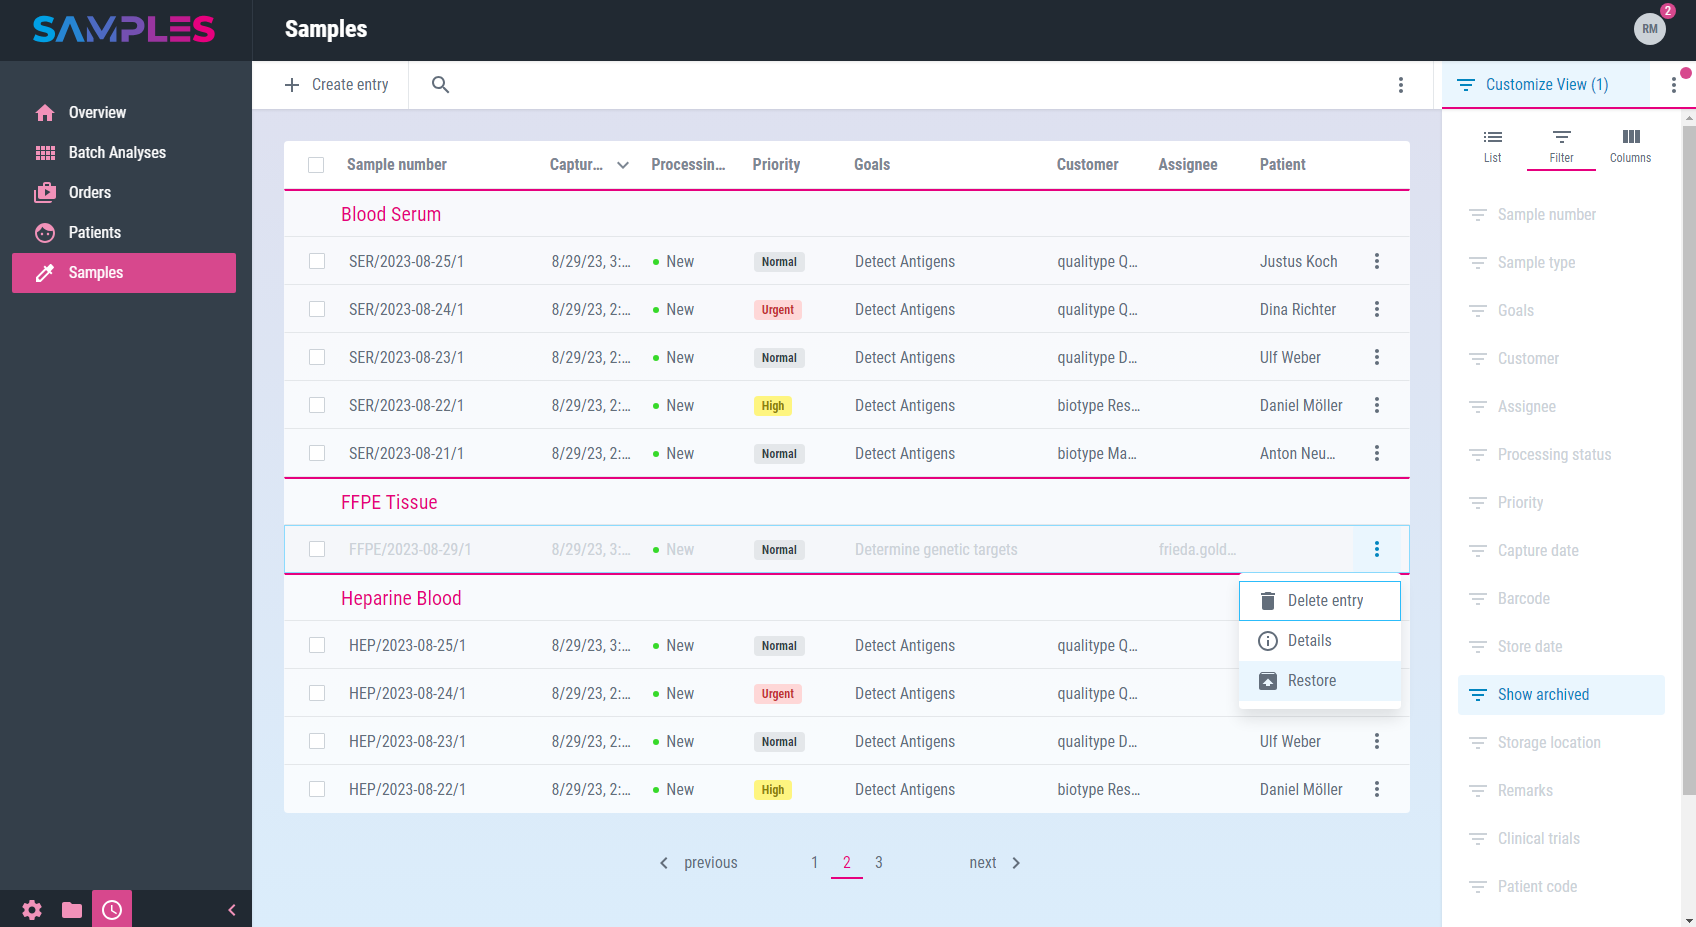
The editor and time of the action are recorded in the history of the item. The sample that has now been restored can now be edited and also appears again in the overview list without the need for an archive search.
|
|
Related articles with additional content: |
Remove sample
To remove a sample, call the Delete entry function in the 3-dot-menu of the list item in the Routine / Samples view.
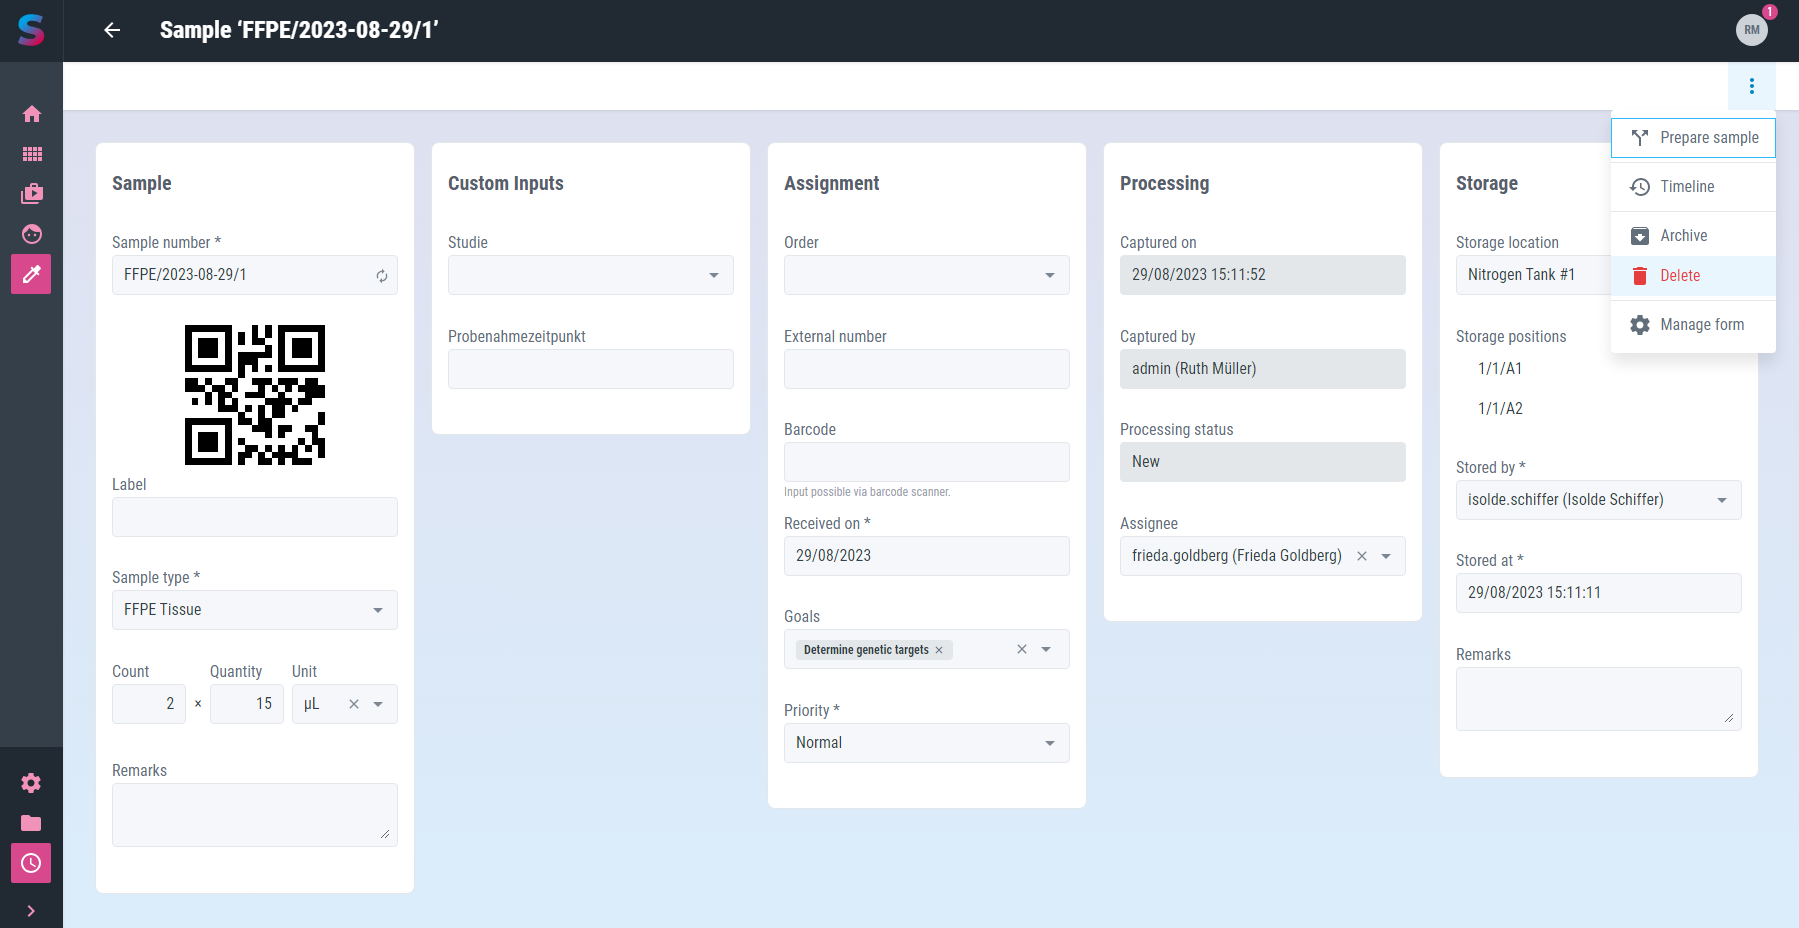
Alternatively, open the desired sample for editing and call the Delete function there in the 3-dot-menu of the toolbar.
In addition, it is also possible to remove several samples at the same time. To do this, select the list items to be removed in the Routine / Samples view and then call the Delete function in the 3-dot-menu of the toolbar.
In all 3 cases, a message is then displayed to confirm the action. Only after the confirmation of the user the removal of the selected item takes place.
|
|
The removal of a sample is not logged in the history and cannot be undone or retraced after confirmation. |
|
|
Related articles with additional content: |
Batch-Analyses
For the bundling of samples with the aim of similar processing and examination on a sample tray, they are combined into batch analyses.
List and search batch-analyses
A searchable listing of all available data about batch-analyses can be found in view Routine / Batch-Analyses.
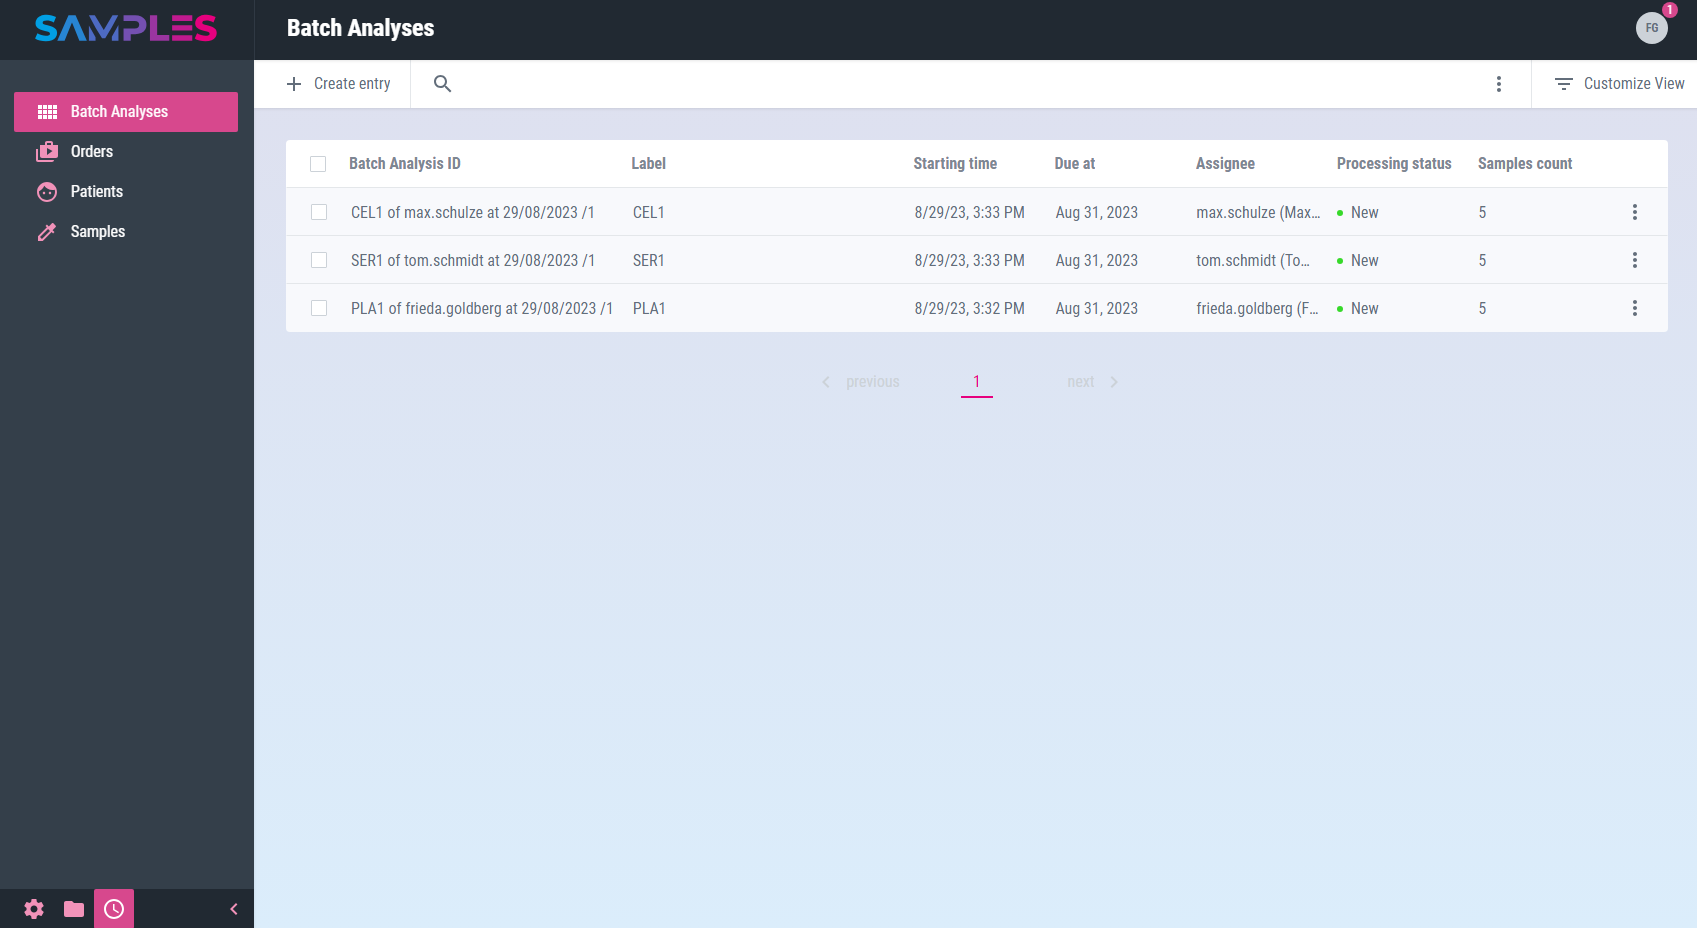
The listing contains information about:
| Title | Meaning |
|---|---|
Batch Analysis ID |
Identification number of the batch analysis |
Label |
Readable name or short name of the batch analysis |
Starting time |
Start of the analysis |
Due at |
Due date or deadline for the completion of the batch analysis |
Assignee |
Login name of the current batch analysis editor |
Processing status |
Current processing status of the sample |
Samples count |
Number of examined samples in this batch analysis |
In the toolbar of the view you can find even more functions for processing batch-analyses:
- Create entry
-
adds a new batch analysis
- Search sample tray by barcode
-
opens a batch analysis by the barcode on the sample tray label
- Reload list
-
updates the content of the listing
- Delete selected entries
-
removes the selected list entries
|
|
Related articles with additional content: |
Add new batch analysis
To add a new batch analysis open view Routine / Batch Analyses and call the function Create entry.
A wizard opens for entering all the necessary information for the new entry:
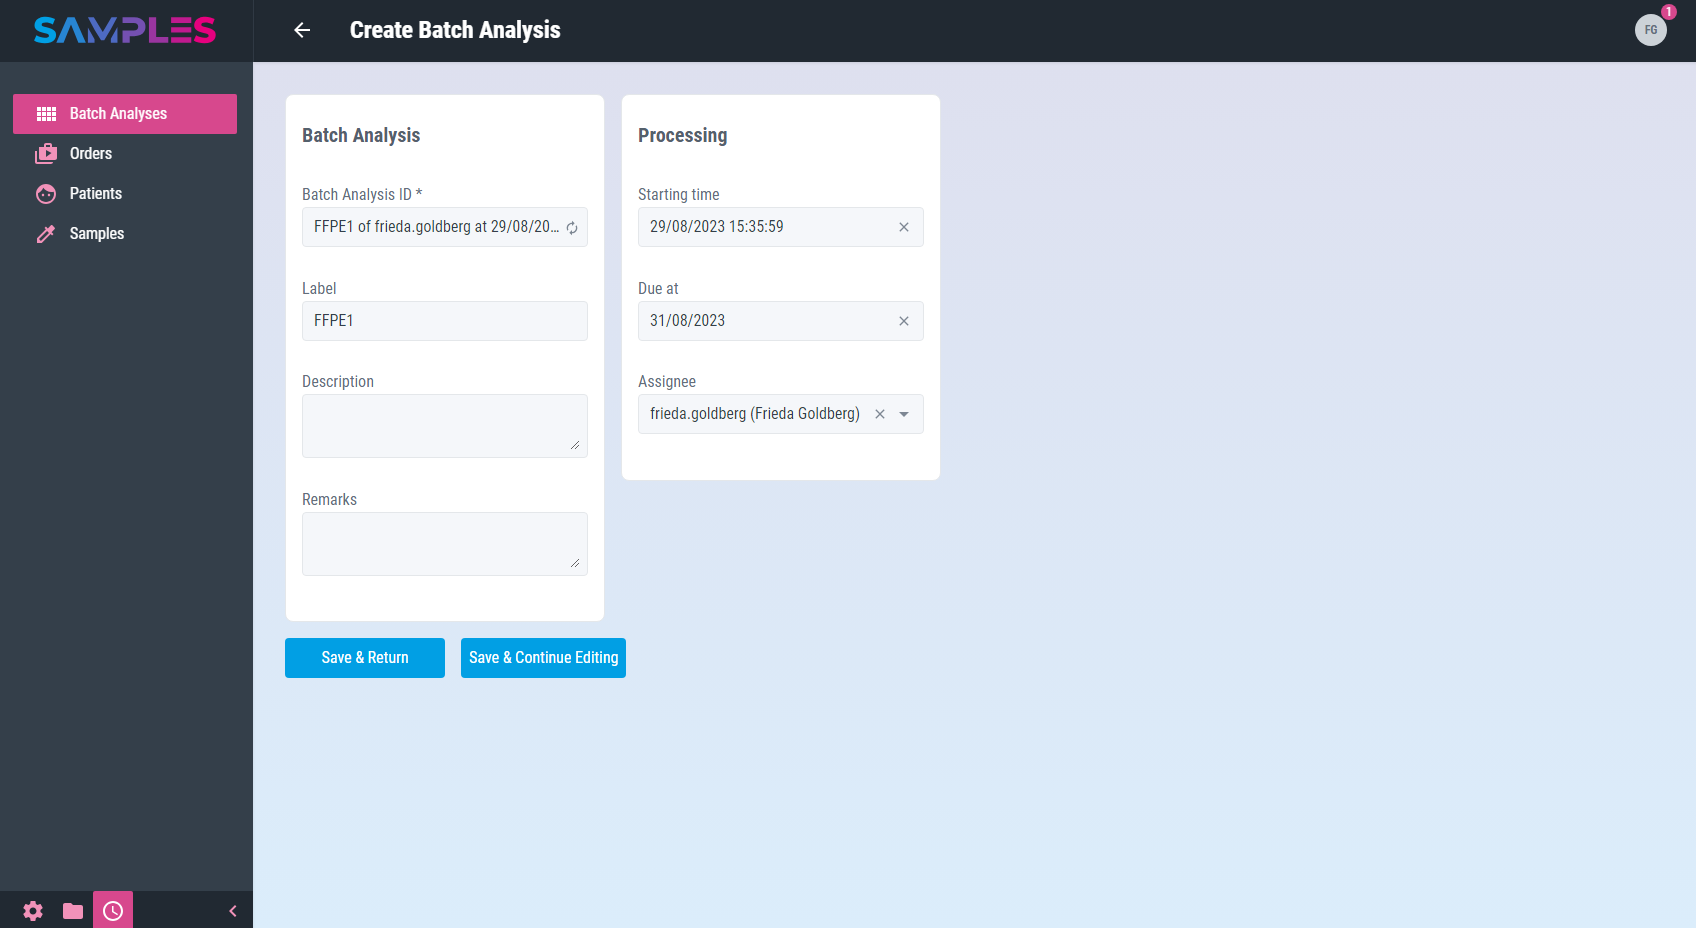
This includes:
| Input field | Meaning | Remarks |
|---|---|---|
Batch Analysis ID |
Identification number of the batch analysis |
unique mandatory information |
Label |
Readable name or short name of the batch analysis |
|
Description |
Instructions for performing the analysis |
|
Remarks |
Supplementary notes of the editor |
|
Starting time |
Start of the analysis |
|
Due at |
Due date or deadline for the completion of the batch analysis |
|
Assignee |
Login name of the current batch analysis editor |
Edit selection list in Administration / Users |
Only the click on the button Finish completes the assistant.
Your input is checked by the app for completeness and correctness before it is permanently saved. In case of errors in the input, a hint message is displayed and the corresponding input field is highlighted.
The time and editor of the input are recorded in the history of the new entry. Finally, the updated list of batch analyses is opened again.
|
|
Related articles with additional content: |
Edit batch analysis
To display and edit all information about a batch analysis, call up the desired list entry by clicking on it in the Routine / Batch Analyses view.
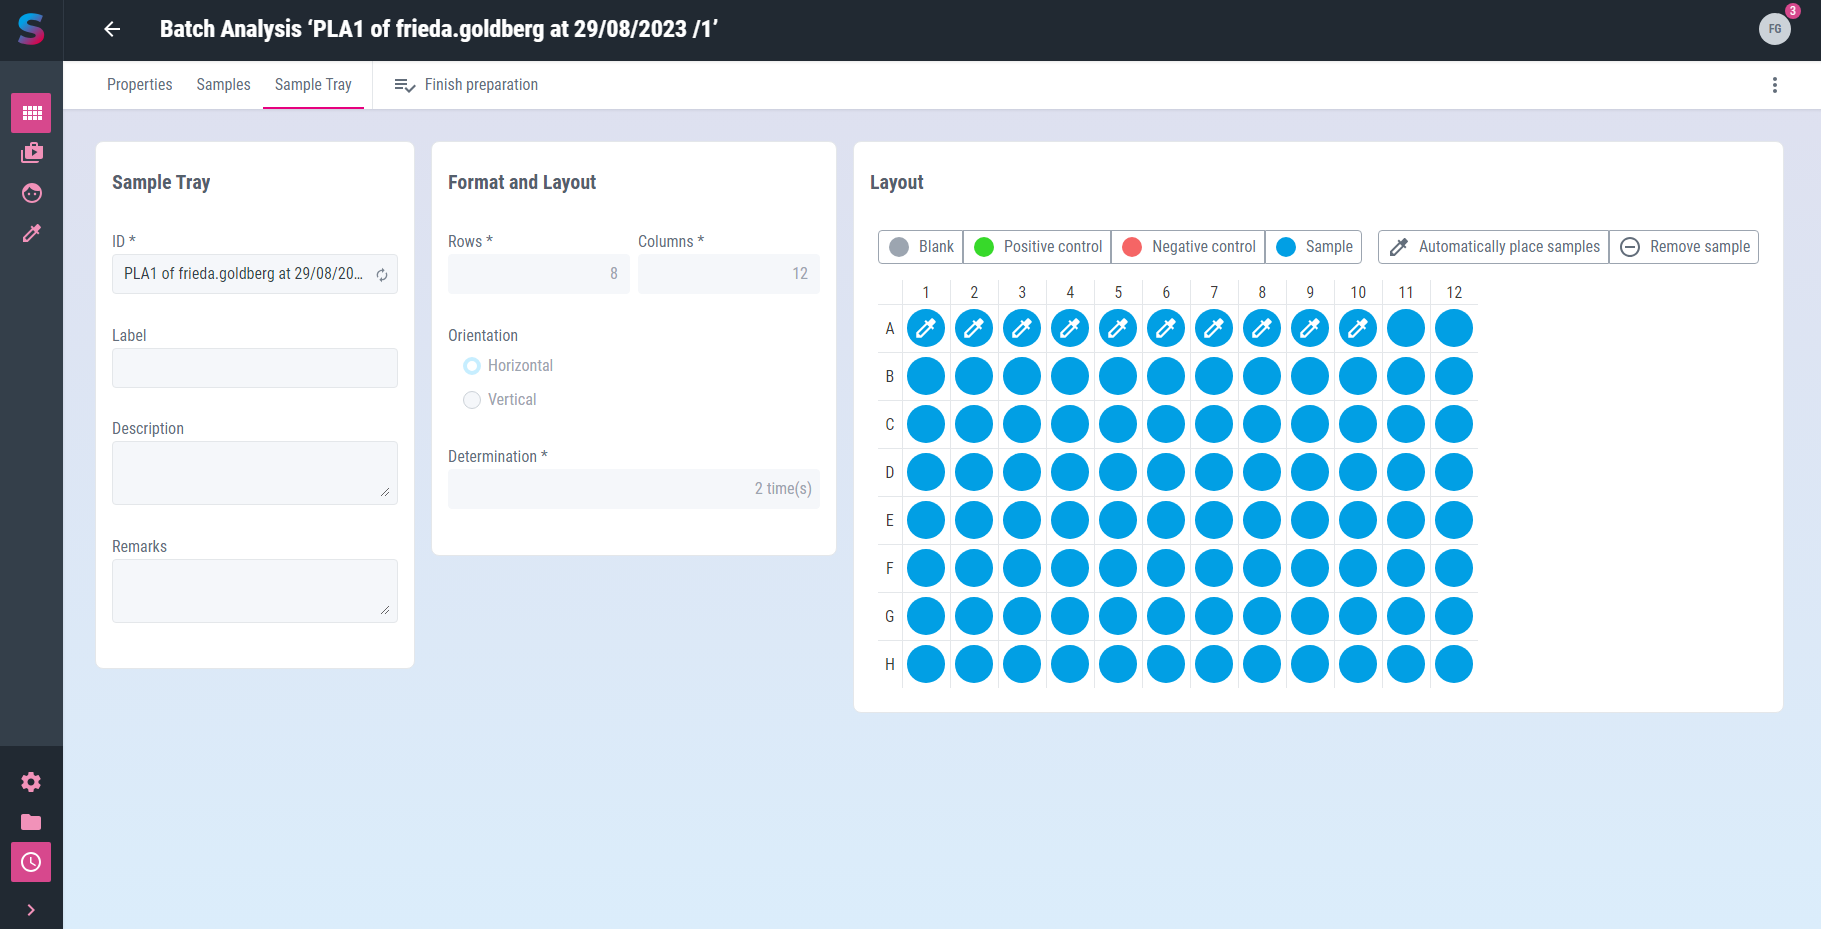
This opens the editing screen with the following information:
| Input field | Meaning | Remarks |
|---|---|---|
Batch Analysis ID |
Identification number of the batch analysis |
unique mandatory information |
Label |
Readable name or short name of the batch analysis |
|
Description |
Instructions for performing the analysis |
|
Remarks |
Supplementary notes of the editor |
|
Starting time |
Start of the analysis |
|
Due at |
Due date or deadline for the completion of the batch analysis |
|
Assignee |
Login name of the current batch analysis editor |
Edit selection list in Administration / Users |
Processing status |
Current processing status of the sample |
read only |
|
|
Your input is checked, processed and saved immediately. |
Any input errors are displayed as a message and the relevant input fields are highlighted accordingly. The time and the editor are recorded in the history of the entry.
In the toolbar of the view you can find even more functions for editing batch analyses:
- History
-
shows the editors and the time for the creation and last editing of the item
- Delete
-
removes the batch analysis from the app’s memory
Calling the Back function in the toolbar closes the view and takes you back to the list view.
|
|
Related articles with additional content: |
Remove batch analysis
To remove a batch analysis, call the Delete entry function in the 3-dot-menu of the list item in the Routine / Batch Analyses view.
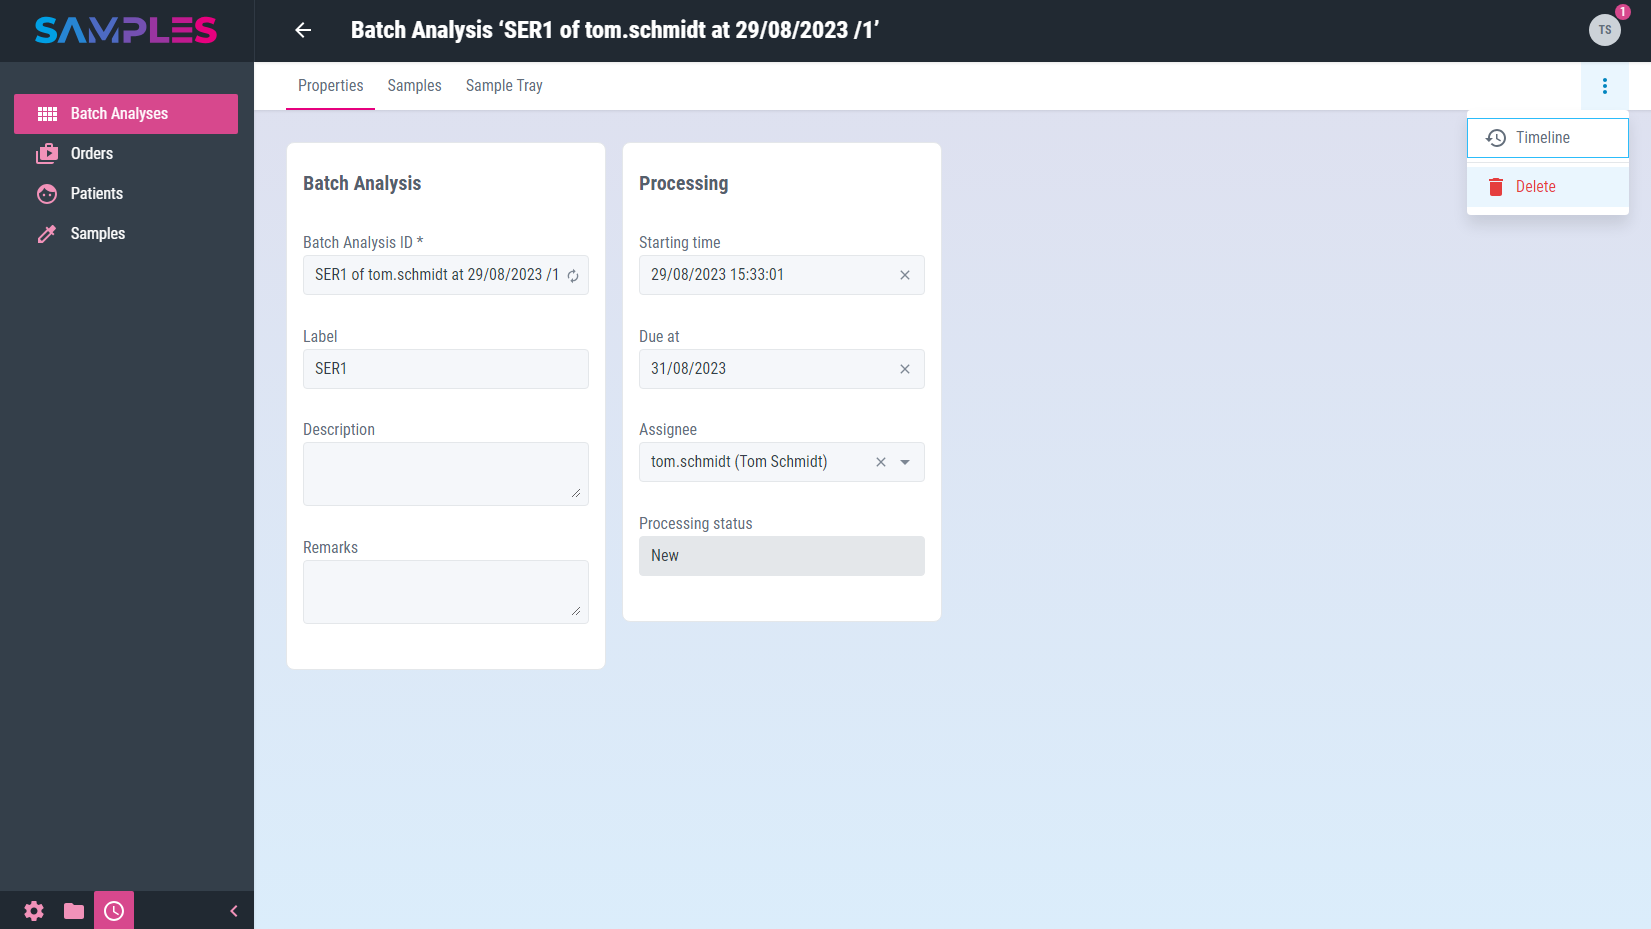
Alternatively, open the desired batch analysis for editing and call the Delete function there in the 3-dot-menu of the toolbar.
In addition, it is also possible to remove several batch analyses at the same time. To do this, select the list items to be removed in the Routine / Batch Analyses view and then call the Delete function in the 3-dot-menu of the toolbar.
In all 3 cases, a message is then displayed to confirm the action. Only after the confirmation of the user the removal of the selected item takes place.
|
|
The removal of a batch analysis is not logged in the history and cannot be undone or retraced after confirmation. |
|
|
Related articles with additional content: |